With Actions, MessageML allows your bots to send messages containing components that have UI extensibility capabilities, such as opening another chatroom or start a conversation with a specific user for your Symphony users.
These functionalities are gathered in the subpages you can find below.
MessageML tag
The UI Actions are represented by the <ui-action> tag, that can be associated with different attributes, such as trigger, action, or other more specific attributes.
Please note that UI-Actions are not rendered on mobile
Building Extension Apps
Building Extension Apps on Symphony Messaging is an easy and secure way to customize the Symphony Messaging experience. Take these simple steps in order to create and deploy your Extension App today!
1. Plan Your App
Symphony Messaging Extension Apps leverage the Symphony Messaging Extension API in order to create innovative workflows and automations. Depending on your desired workflow, there are many different development avenues available for you and your development team. Understanding these different development options, APIs available and Extension App capabilities is key to creating a successful app and positive user experience. Learn more about the different types of Extension Apps and APIs here:
The easiest way to get started is by using the Symphony Messaging Generator to create a project that includes the App Development Kit (ADK) and the UI Toolkit. These tools allow you to interface with the Extension API and build interfaces that feel native in Symphony Messaging.
3. Add Custom Business Logic
The next step is to add custom business logic to your app. Begin leveraging Symphony Messaging's Extension API and bring your extension apps to life:
Building Bots on Symphony Messaging is fast, easy, and secure. Take these simple steps in order to create and deploy your Bot today!
1. Plan Your Bot
Symphony Messaging Bots can leverage the Symphony Messaging REST API to create innovative workflows and timesaving automations. Depending on your desired workflow, there are many different development avenues available for you and your development team. Understanding these different development options and different APIs available is key to creating a successful bot and positive user experience. Learn more about the different types of Symphony Messaging Bots and APIs here:
Symphony has built numerous tools in order to streamline Symphony Messaging Bot Development. Our rich suite of developer tools offers centralized configuration and authentication protocols, provides out of the box API bindings, convenient error handling, datafeed management, and ensures that your Bot is built using Symphony's best practices.
Using an ultra simplified configuration and authentication set up, an intuitive message and room control mechanism, new APIs for message templating and workflow activities, developing bots has never been easier.
Learn more about how you can get started with our developer tools here:
At Symphony, security is always first. In order to leverage Symphony Messaging's robust set of open APIs, your Bot must first authenticate itself. You can learn more about how to authenticate and the different types of authentication here:
The last step is to add custom business logic to your Bot. Begin learning about the capabilities of Symphony Messaging REST APIs and bring your workflows and automations to life:
Want to take your Bot building to the next level? Symphony offers a free course and certification program for Developers wishing to improve their Symphony Messaging skills, technical knowledge, and expertise. Learn more about how you can become a Certified Developer today!
Overview of Key Manager API
Symphony Messaging Key Manager APIs
The Symphony Messaging Key Manager API's sole purpose is to authenticate a bot or API caller with the Key Manager.
Key Manager Authenticate API
In order to access Agent API endpoints, bots must be authenticated with the Pod and the Key Manager. To authenticate with the Key Manager, a bot must call the Key Manager Authenticate endpoint.
If successful, the Key Manager API returns a Key Manager Token which is valid for up to two weeks. This Key Manager Token must be passed along with every subsequent Agent API request in order to encrypt/decrypt messages on the Agent server. You can read more about Authentication and Token management here:
Please find below the list of icons that can be used with Elements Buttons.
Headless Bot
Headless Bots are the simplest form of Bots. Headless Bots usually take the form of a script that is either run on a scheduled basis or triggered by an event from an external system. These scripts are usually transient and terminate after performing their assigned task, like sending an alert or daily digest message.
Often times, Headless Bots run on a scheduled basis. Since Headless Bots do not have a conversational aspect, they do not need to create/maintain a Datafeed. As a result, Headless Bots do not need to always be running.
In practice, each time a Headless Bot kicks off its scheduled workflow, it will:
Authenticate
Authentication
In order for bots to access the Symphony Messaging REST API and other Symphony Messaging resources, bots must first authenticate.
As we learned in , bots must be authenticated on the Pod in order to access Pod API endpoints. To make authenticated Pod API calls, bots must pass a valid Session Token as a header of each Pod API request.
We also learned in , that bots must be authenticated on the Key Manager in order to access Agent API endpoints. To make authenticated Agent API calls, Bots must pass a valid Session Token and Key Manager Token as headers of each Agent API request.
In order to obtain a valid Session Token and Key Manager Token, bots must call the Session Authenticate endpoint on the Pod and Key Manager Authentication endpoint on the Key Manager.
We recommend that bots follow the RSA authentication workflow in order to obtain valid Session and Key Manager Tokens:
Date and time
You can display a date, time or datetime to your user taking into account your user's date/time formats, as well as their timezone using the dateTime element.
Tags
Description
Attributes
Entities
Entities (also called Structured Objects) are rich, inline, interactive components for Symphony messages that allow you to embed information that is more complex than simple text.
To containing a Structured object, construct the message content using MessageML with either a <div> or a <span> element containing the following attributes:
class="entity": specifies that the message contains a corresponding structured object.
Add an Extension App to a Symphony Pod
Visit the Admin and Compliance Portal of the respective pod either via Settings > Admin Portal in the web or desktop client or by visiting https://my-company-pod.symphony.com/?admin
From the left navigation, select App Management
Main features introduced
Agent needed to parse message sent by the bot
Initial release
Agent 25.6
<dateTime value="2024-12-31T09:29:47Z" format="date | time | time_secs"/>
Display a date or time to the user, taking into account the user locale timezone.
value (required): ISO-8601 or UTC timestamp.
format:
date_time: date + time format based on user settings and user timezone. Default value if no format is provided
date : ddMMyyyy with format based on user settings (DD/MM/YYYY, MM/DD/YYYY, YYYY/MM/DD) and user timezone
time : hhmm with format based on user settings (12h / 24h) and user timezone
time_secs : hhmmss with format based on user settings (12h / 24h) and user timezone
Tags
This element is read-only - if you want an interactive element instead, you can use a Date Picker or Time Picker in a chat.
If the app developer has provided a bundle.json file, use the Import Application Bundle File button on the top right. If not, fill in the fields manually.
Ensure that the RSA public key and required app permissions are set correctly
Click Create
From the left navigation, select App Settings
Locate the newly-created entry and change the Global Status from Disabled to Enabled
If the app is intended for users to optionally self-install and uninstall from marketplace, change the Visibility from Hidden to Visible
If the app is intended for all users in the organisation to have installed, change the Installation from Manual to Automatic
Click Save at the bottom
Host the extension app on a TLS-enabled server together with the application manifest (bundle.json file)
Visit https://my-company-pod.symphony.com/?bundle=https://localhost:4000/bundle.json assuming your app is running on localhost on port 4000 and you have a bundle.json served on the root
Acknowledge the developer mode warning and proceed
Create Extension App for Production
This section is meant as a reference for pod administrators. If you are a developer trying to load your extension app onto your company's pod, please seek assistance from your pod administrator or local IT helpdesk.
Sideload Extension App for Development or Testing
Note that this method does not support obtaining user identity as app authentication is not supported. If you wish to test an app that requires user identity, you will have to create an actual app using the steps above with the assistance of your pod administrator
Post a message/alert in a designated chat or call any number of API endpoints
Terminate its process
Headless Bots can also listen for webhooks or incoming events from external/third-party systems. By listening and handling different events from multiple systems, Headless Bots are able to transform Symphony Messaging into a centralized notification center for all your data.
In practice, a Headless Bot needs to expose an endpoint in order to listen and handle these webhooks or incoming events. Each time the bot receives a webhook or an incoming request, it must also:
Authenticate
Post a message/alert in a designated chat or call any number of API endpoints
Terminate its process
Continue on to our Building a Headless Bot guide. Here you will learn how to get your own Headless Bot up and running and take a closer look at the APIs used to create a simple Headless Bot workflow:
For users that do not want to use RSA Authentication, bots can perform certificate-based authentication in order to obtain valid Session and Key Manager Tokens:
Token Management
The token you receive is valid for the lifetime of a session that is defined by your Pod's administration team. This ranges from 1 hour to 2 weeks.
You should keep using the same token until you receive an HTTP 401, at which you should re-authenticate and get a new token for a new session.
Note: Datafeeds survive session expiration, you do not need to re-create your datafeed if your session expires.
data-entity-id: the unique ID of the corresponding structure object.
This MessageML markup is then passed into the endpoint via the message parameter. The following examples show the use of the attributes in <div> and <span> respectively:
The examples above reference an entity object called entityIdentifier. The JSON corresponding to this object is passed to the create message endpoint via the data parameter. For example:
Please continue below in the subpages if you want to learn more about Structured Objects
Build, innovate, and automate your workflows on the Symphony Messaging platform.
Streamline your workflows by leveraging the Symphony Messaging open APIs to build innovative bots and AI agents, save time through smart automation, and develop custom extension apps.
Dive into our core concepts to guide your development journey from initial code to production deployment.
Get started
Select one of the sections below to launch your developer experience.
Get started by exploring Symphony Messaging bots. Learn the essentials to build and launch your own bot.
Interested in building your first bot with our Developer Relations team? Check out our free online courses in the developer training center to get started.
AI agents are specialized service accounts that bring LLM-powered reasoning, contextual data access, and tool use into Symphony's secure messaging environment.
Bring customized and extensible workflows into Symphony Messaging through extension apps. Understand how to build, deploy, and manage your extension app.
Join our Developer Certification program and get free sandbox access. Register today!
Symphony Messaging REST API in-depth documentation and reference guide:
Symphony Messaging Extension API in-depth documentation and reference guide:
Streamline your development process with our Dedicated SDKs, Bot Developer Kit, Bot Generators and more.
Securely embed standalone Symphony Messaging chat modules inside other websites and applications:
Conversational Bot
Chatbots or conversational Bots, are the most common bots in the Symphony Messaging ecosystem. These types of bots run 24/7 and wait for users to initiate conversations in order to perform certain tasks. The conversations could be simple commands or even natural language queries. The bot will determine the user’s intent based on their messages and take the appropriate action.
Chatbot Workflow
1. Kick off your Workflow
As stated before, users can interact with chatbots in chatrooms or 1 to 1 chats. In order to initiate your chatbot's workflow we recommend that users @mention the bot's username in order to get the bot's attention and signal to the bot to begin its intended function. That way, chatbots can be active members of chatrooms, but eliminate noise that is outside the scope of its intended workflow.
It is common for Bots to contain multiple commands or sub workflows that it can action upon. It is best practice to list these commands in a help menu. Additionally, it is best practice for all commands to follow a "/" so that it's clear what text is meant to be processed as a command. The following illustrates these best practices:
2. Listen for Events
A core aspect of all chatbots and conversational bots is the ability to 'listen' to different types of commands and events and reply to them accordingly. The mechanism that enables Bots to listen to events in chats is the Datafeed.
The Datafeed is a real-time message and event stream that can be created using the REST API. The datafeed provides a secure stream of messages and events from all conversations that a bot is in.
In order to 'listen' and respond to user events, bots create a single datafeed and will subsequently have access to all chat activity including non-chat based events such as users being added/removed from chatrooms, external connection requests, as well as chats being created.
To learn more about the Datafeed continue here:
The next step of your chatbot workflow is to introduce your custom business logic. Once you have access to the bot's events and messages through the Datafeed, the next step is to create dedicated event listeners. Inside these listeners is where you parse messages, fetch data from external sources, manage conversation state, and make requests to our Symphony Messaging REST API in order to reply to users directly or perform administrative functions such as creating chatrooms.
You can learn more about parsing events and introducing custom business logic .
Continue on to our guide in order to learn more about our development tools and appropriate development pathway for building your first Symphony Messaging Chatbot.
Creating a Service Account
Guide for creating a bot user in the admin portal
Please note the below steps can only be performed by a Symphony Messaging Pod Administrator as only they will have the necessary administrator privileges to access the Admin Portal. Please do not attempt this if you are not a Pod Administrator and reach out to your internal IT Helpdesk if you are unsure who your Symphony Messaging Pod Administrator is.
If you are attempting to use the Developer Sandbox at , this section is not relevant for you. Please register for an account at the Developer Center at and click on the request link in the welcome email to obtain your sandbox credentials.
In order to create a bot and begin your development journey, you must first create a bot user, also known as a service account. You can only do this yourself if you are a pod administrator on your Symphony Messaging pod. Otherwise, please seek assistance from your pod administrator or your internal IT Service Desk if you are unsure who to contact.
Create a Bot User
1. Navigate to your Symphony Messaging Admin Portal for your Pod
For example, https://mycompany.symphony.com/?admin
2. Select Create an Account in the left navigation pane
3. Select the Service Account tab
4. Fill in your bot information
The bot username here has to match the username supplied by a bot configuration file exactly.
Paste the entire contents of the public key in the Authentication section.
This public key has to match the private key supplied by a bot.
If you are unsure how to generate an RSA key pair, use the .
Enable the required roles that your bot requires.
Enable the required entitlements that your bot requires.
Overview of REST API
The Symphony Messaging REST API acts as a secure interface between your Symphony Messaging Bot and Symphony Messaging's components. Symphony's architecture for bots comprises three components: the Symphony Messaging Pod, the API Agent and the Key Manager.
The Symphony Messaging REST API is spread out across these components according to the type of API being called.
While Bots can call the Symphony Messaging API directly, Symphony Messaging's dedicated BDK and WDK toolkits provide language-specific API bindings that enable bot developers to easily call the API directly from code:
There is one sub-folder per API collection, and each API collection is split in two swagger files: one for the supported endpoints and a second one listing only the deprecated endpoints (e.g. /pod/pod-api-public-deprecated.yaml).
Depending on your pod or agent version, a newly introduced endpoint may not yet be available to you. You can spot these new endpoints as they are tagged with the x-since attribute. For example, an endpoint flagged as x-since: 20.15 will not be present if you are still on SBE 20.14.
To learn more about how bots securely interact with Symphony Messaging's three components, continue onto the REST API Architecture guide below:
To learn more about how bots can make authentication and administrative calls such as manage streams, manage users or facilitate cross-pod connections, continue onto the Pod API guide below:
To learn more about how bots can authenticate and encrypt messages on Symphony Messaging, continue onto the Key Manager API guide below:
To learn more about how bots can send and receive encrypted messages on Symphony Messaging, continue onto the Agent API guide below:
For the full Symphony Messaging API reference continue here:
Overview of Streams
A Stream is like a container for messages exchanged between two or more users via a given 1 to 1 chat (IM) or chat room.
Each Stream has a unique ID also known as a Conversation ID, that is returned when the IM or chat room is created using the Create Instant Message, Create Non-inclusive Instance Message, and Create Room v3 endpoints respectively. This ID can then be used in subsequent endpoints to perform operations on the IM or chat room.
On the Symphony Messaging web or desktop client, this ID can be found by clicking on the timestamp of any message in the conversation. This will open the Message Status module, where the Conversation ID can be found, as shown in the following picture.
The Conversation ID in the Symphony Messaging Web Client is in Standard Base64 encoding and need to be converted to be URLSafe. Conversation IDs returned in API responses are already URLSafe Base64 encoding.
To obtain the URLSafe Base64 Conversation ID:
Replace forward slashes / with underscores _
Replace pluses + with minuses -
The following list shows the existing endpoints:
MessageML
This article gives an overview of the message workflow and shows how message representations are used throughout the workflow. In its subpages are presented the specifications of messageML.
Introduction of the MessageML
When calling API methods that create messages, the content of the message must be sent using MessageML markup. MessageML is a tag-based language that is a subset of XHTML, with the addition of tags specific to Symphony Messaging for embedding information (e.g. a mention) into a message.
You can find the specifications of the MessageML language in the attached subpages. Even if they are grouped in different categories for documentation clarity purposes, please note you can do your own mix, respecting the specific rules explained at each component specification level.
Also, please note that messages in MessageML markup are enclosed in a <messageML> tag.
MessageML has full unicode support and messages should be sent using UTF-8 character encoding.
When or messages using the API, MessageML shorthand tags are translated into equivalent XHTML tags and returned in .
Tables
Tags
MessageML supports the following tags to arrange information within a message using tables:
Tags
Description
Optional attributes
<table><tr><td>text</td></tr></table>
Render "text" in a table format.
Here after you can find an example of a message sent by a bot and containing table tags as well as the structure of the messageML sent:
Images
Tags
MessageML supports the following tags to embed media into messages:
Tags
Description
Attributes
<img src="url"/>
Image. Images have a max height of 256px; otherwise, the default size is the size of the image. For more information on how to send images through API call, refer to .
• src
• class
Rules and Limitations via an example
For the following examples, we are sending an SVG image along with the message.
Note that an admin user might have to enable the sending of some specific file types. To do that, go to AC Portal >> Company Settings >> Edit Entitlements >> File Types.
• Sending an image via the API using the image URL
Sending an image via API using Data URL (base64 encoding).
Note that it is necessary to include data:image/imageType+xml;base64 before the data string, as shown in the following example:
Here after you can find an example of a message sent by a bot and containing an inline image as well as the structure of the messageML sent:
Regular Expressions - Regex
Elements input validation. Available from Symphony v20.6 and above
Input validation is your first line of defense when creating a secure application.
Symphony Elements supports input validation using regular expressions (regex) for the text field and text area elements.
The regular expression pattern is validated on the front end by the Client. It is therefore critical to also validate the input in your code as well.
Regular expression Denial of Service - ReDoS
Regular expressions can cause performance issues in the Client if the validation of the regular expression is very complex. Poorly designed regular expressions can even cause denial of service (ReDoS). Please verify that your regular expressions are safe, using the following service: https://redos-checker.surge.sh/.
To prevent performance issues on the Client, a validation mechanism checks regular expressions to ensure they are safe. If the regular expression is unsafe, it is automatically disabled. In that situation, the user input will not be validated.
The following code snippets assumes that both <text-field> and <textarea> elements are placed within the right messageML context : <messageML> + <form> including an action <button>.
Overview of Extension API
Symphony extension applications are standalone web applications that are embedded within the Symphony user interface as iframes that interact with the Symphony container using the Client Extension API.
Extension API Capabilities
The Client Extension API is a JavaScript library that consists of services containing methods that allow developers to build apps that extend and interact with Symphony's user interface. Using these services, developers can:
Add modules, or windows, containing your app content to the Symphony client
Add entry points for your app, such as navigation items in Symphony's left sidebar or links on #hashtag and $cashtag hovercards
Add interactive buttons to chat and user profile module headers
Enable users to share content from your app into Symphony chats
Register custom renderers to richly display messages containing structured objects
Some of Symphony’s services will require you to implement your own services with methods to handle events. For example:
Handling a user click on your app’s left sidebar menu item by opening your default app module
Handling a user click on your app’s #hashtag or $cashtag hovercard link by opening an app module with a contextual search
Applications created with the Client Extension API run in iframes inside the Symphony client.
Symphony apps consists of:
The main application controller, a hidden iframe that uses the Client Extension API services to bootstrap your app, extending the Symphony user interface
In most cases, one or more application views, separate iframes that are rendered within Symphony modules
Applications can be built using any web development technology of your choice.
Services are used for communication between your app and the Symphony client. There are two types of services: remote and local.
Remote services are services that are shared:
The services of the Client Extension API are remote services whose methods can be invoked by your application controller and views
You can also implement remote services that can be shared between your application controllers and views
Local services are services are specific to either your controller or one of your views.
To learn more about the services and capabilities provided by the Extension API continue here:
Overview of Agent API
The Symphony Messaging Agent is responsible for encryption and decryption of messages and content sent to and from a bot. As a result, the Agent API is used to build applications that send and receive messages and content. The following guide includes API collections that exist on the Agent:
The Message APIs create, read and search messages on the Pod. These APIs can be used to do the following:
Get messages
Create messages
Extension API Services
The Client Extension API uses services for communication between your application and the Symphony client. The Client Extension API provides a set of services that your application can leverage to extend the Symphony Client and to create custom workflows and experiences.
The Client Extensions API provides the following remote services:
Use the modules service to create application-specific modules:
The Applications navigation section is found at the bottom of the left-hand sidebar of the Symphony client workspace. Use the applications-nav service to create a navigation item for your application:
Use the ui
Symphony Messaging Generator
The Symphony Generator is a yeoman-based CLI tool that can be used to quickly generate Symphony Messaging bot, app and workflow project scaffolds. You can create example projects that use our developer toolkits:
BDK for Java
BDK for Python
Filter Function
You can add a new method to the service that is handling button clicks, called filter(), on any UI extension that you are implementing. Before a button is shown, that method is passed the uiClass, the id, and the payload. If filter() returns false, the button is not shown. If the method is unimplemented or it returns any value other than false, the button is shown.
The filter function returns the same data returned by the ui Service . All data except for the the user's phone number is returned in cases where you are using an authenticated app. The user phone number is only returned for 1x1 IMs and User Profiles.
Based on the information returned, you can choose to selectively display the button. For example, you can display the button only if a user's phone number is present, or if a user is not a cross-pod user.
Note: MessageML is just a subset of PresentationML that makes it easier to construct messages from your bot. The API can ingest either MessageML or PresentationML. However, the API will only deliver messages as PresentationML to a bot.
XML Formatting
MessageML is formatted as XML and should have all tags properly formatted. For example, rather than using <br> you must use <br/>.
For string attributes, standard rules for escaping XML special characters apply, i.e. escaping:
' with ' (if single quotes are used to quote the value)
" with " (if single quotes are used to quote the value)
< with <
& with & Other XML named entity sequences such as > may be used.
Valid characters for hashtags and cashtags
Keywords may only contain alphanumeric characters, underscore, dot and dash.
Important: when sending numeric $cashtags as signals, add an * after the $ sign, for example, $_122450.
<cash tag="$_122450"/>
Many of these event handlers are provided out of the box by the BDK 1.0's App Template. To learn more about the out-of-the-box implementations provided by the BDK 1.0 continue to the Planning Your App or Tutorials sections.
service to extend various parts of the Symphony client user interface. For example, add buttons on 1 to 1 chats and chatroom modules or add links to the
#
hashtag and $cashtag hovercards:
Use the share service to allow users to share content from your application into Symphony conversations:
Use the entity service to allow your app to render a Structured Object within a within a message sent by the REST API:
Apps can offer premium functionality through licensed subscriptions. Use the commerce service to identify the products (premium versions) to which a user is subscribed:
Use the dialogs service to create modal windows (e.g. to open a modal window from a button registered at a room level):
Both the Client Extensions API services and your application services use the same interface. Continue here to learn how to implement the Service interface methods:
Note that the content of the regex has to be checked again on the bot side.
Text field
<!-- Validates a login -->
<text-field name="login" pattern="^[a-zA-Z]{3,}$" pattern-error-message="Login must contain at least 3 letters."></text-field>
<!-- Validates a decimal value, hint is not defined -->
<text-field name="price" pattern="^\d+,\d+$" pattern-error-message="This is an incorrect value."></text-field>
<!-- Validates a password -->
<text-field name="password" masked="true" pattern="^[a-zA-Z]\w{3,14}$" pattern-error-message="Your password is not strong enough."></text-field>
Text area
// Implement the filter function on your application service
helloFilterService.implement(
filter: function (type, id, data) {
return !!(data.user && data.user.phone);
}
}
});
Install yeoman and the Symphony Messaging Generator.
$npmi-gyo@finos/generator-symphony
$yarnglobaladdyo@finos/generator-symphony
$bunadd-gyo@finos/generator-symphony
Then, create a directory for your new project and launch the generator.
Configure your bot, workflow or app environments accordingly.
Prerequisite: Install NodeJS first, either directly or via nvm. You can also use other package managers like bun or yarn, which the generator will attempt to use before falling back to npm.
Quick Start
<!-- Validates that a line does not contain the word "badword" -->
<textarea name="justification" pattern="^((?!badword).)*$" pattern-error-message="Justification text must not contain the word 'badword'"></textarea>
$ mkdir mybot && cd $_
$ yo @finos/symphony
Ignore any trailing equal signs =
For example, the URLSafe Base64 encoding oflX1hwfmQ+AK/k/a/BB0y2n///q2+0KfbdA== converts to lX1hwfmQ-AK_k_a_BB0y2n___q2-0KfbdA.
This group of APIs perform testing and obtain diagnostics regarding the health of Symphony Messaging components. These APIs can be used to do the following:
<messageML>
<h1>Images</h1>
<p>This is an image: <img src="https://play-lh.googleusercontent.com/-lTkJjeUtCj3Mf4FLLNKnCyQC0Amur3wxeKxkwbDZl0hjO60H1_VodAuBDKJmYWOvlfG=s180-rw" /></p>
</messageML>
Limit on Image size for Data URL (base64)
This feature is intended to be used for small images, such as custom emoji. Our recommendation is that the total size of base64 encoded embedded images do not exceed 25KB per message.
Looking to migrate your bot from the deprecated SDKs to the latest BDKs? Check out our migration guides to bring your bot up to date with our latest tooling.
Overview of Symphony Messaging REST API Architecture
Symphony Messaging REST API is spread out over three main components: the Pod, API Agent and Key Manager. Let's take a closer look at these components below.
Pod
The Symphony Messaging Pod is a dedicated Symphony Messaging instance for each customer environment. It is a cloud-hosted component that handles all core operations necessary to provide the Symphony Messaging service to you. Since Symphony Messaging provides end-to-end encrypted messaging, all messages passed from user to user are fully encrypted at the time of sending, such that no Pod ever has access to the unencrypted contents of any message.
In addition, the Symphony Messaging Pod provides REST API endpoints in order for your bot to perform administrative functions on the Pod. You can read more about the Pod API here:
The API Agent is the component responsible for encrypting and decrypting content sent from and to a bot. The Agent provides REST API endpoints that allow a bot to send and receive encrypted messages, acting as the intermediary between a bot and the Symphony Messaging Pod. In order to safely encrypt and decrypt these messages, the Agent server interacts the Key Manager which provides the keys used for encrypting and decrypting messages.
Read more about the Agent API here:
The Key Manager generates and stores encryption keys which are used to encrypt and decrypt messages by the Agent Server. The Key Manager provides an authentication API that provides a unique Key Manager Token to a calling bot. This token is used to encrypt/decrypt messages on the Agent Server.
Read more about the Key Manager API here:
The three components above all interact with each other in order to create Symphony Messaging's secure messaging service. Let's take a closer look at the sequence of API calls a bot must make in order to send and receive encrypted messages on Symphony Messaging.
The sequence of API calls and component interaction is illustrated below:
1. First, a bot must authenticate with the Pod. It does so by calling the endpoint.
1a. If successful, the bot will receive a valid Session Token. This Session Token must be passed along with all subsequent Symphony Messaging API requests destined for the Agent or the Pod.
2. Next, a bot must authenticate with the Key Manager. It does so by calling the .
For an even more detailed explanation, enroll in our Developer Certification Program:
For our enterprise customers, the API Agent and Key Manager components are deployed on-premise, while the Pod is always deployed in the cloud. Your bot or REST API caller is an application that must be deployed on-premise in this scenario.
An visual representation showing an on-premise deployment of Symphony Messaging components is shown below:
For our smaller customers, the API Agent and Key Manager may be co-hosted with the Pod in the cloud. Your bot or REST API caller can either be deployed on-premise or in your own cloud environment.
A visual representation showing an in-cloud deployment of Symphony Messaging components is shown below:
Overview of Pod API
Symphony Messaging Pod APIs
The Symphony Messaging Pod API is used to build tools in order to manage and administer Symphony Messaging for your organization. The following guide includes API collections that exist on the Pod:
Session Authenticate API
In order to access Pod API endpoints, bots must be authenticated with the Pod. To do so, a Bot must call the Session Authenticate endpoint.
If successful, the Pod API returns a Session Token which is valid for up to two weeks. This Session Token must be passed along with every subsequent Pod API request. You can read more about Authentication and Token management here:
The User APIs query and manage users on the Pod. These APIs can be used to do the following:
Search users
List all users
Create users
Update user information
List user features
Add/Remove user roles
List user roles
List user audit trail
The full list of Users API endpoints and their corresponding reference guide can be found at and .
The Stream APIs create and manage IMs and chat rooms. These APIs can be used to do the following:
Create IM
Create chatrooms
Search for rooms
The full list of Streams API endpoints and their corresponding reference guide can be found here:
The Connection APIs manage user connections. These APIs can be used to do the following:
Get connection
List connections
Create connections
The full list of Connections API endpoints and their corresponding reference guide can be found here:
The Presence APIs manage presence status for users. These APIs can be used to do the following:
Get/Set user presence
Get all users presence
Register presence interest
The full list of Presence API endpoints and their corresponding reference guide can be found here:
PresentationML
Messages sent using the API are translated into equivalent XHTML tags known as PresentationML, that can be rendered and processed by any HTML client. For example, when you create a message using Create Message v4 , the message field in the response contains the message in PresentationML format.
Messages in PresentationML markup are enclosed in a <div> tag with the following attributes:
data-format: must be set to PresentationML.
data-version: specifies the markup version.
Since PresentationML was included as part of the MessageML format design, you can create messages by passing the message content in MessageML or in PresentationML. Note that PresentationML uses rather than shorthand tags. Therefore, when you send a message using , the message parameter must contain the message content in PresentationML XHTML markup, and the data parameter must contain the XML markup for the referenced in the message.
Shorthand tags translations:
The following table lists XHTML tags for MessageML on the left, and the corresponding PresentationML tags on the right:
Shorthand tag in MessageML
PresentationML Translation
Root <div> tag
When retrieving a message using the API, the message is always encapsulated in a root <div> tag, for easy parsing.
When you create a message using PresentationML, you must include the root <div> tag.
Tag
Description
Attributes
The following is an example of content for a simple message using presentationML markup:
Bots Best Practices
Symphony has a number of best practices to ensure smooth bot development and a positive user experience.
Getting Your Bots Attention
It is common that Symphony chatrooms contain more than one bot listening for events. In order to preserve name space and ensure that there isn't overlap between bot workflows, we recommend that bots only respond to events that begin with an @mention:
By '@mentioning' your bot, it ensures that only the intended bot responds.
Commands
It is best practice to have bots listen for commands beginning with a '/'. This naming convention makes it clear to other users that you are trying to get a bot's attention. Additionally, it makes it clear to your bot that a user is instructing it to perform an actions and kick off its intended workflow.
It is also best practice to enforce command line style arguments for commands that require additional input or data:
It important that users understand exactly what your bot is capable of and what commands your bot understands. It is best practice for your bot to list its commands inside a help menu:
It is considered best practice that bot's only create and read from one datafeed. If your bot goes down, it should re-authenticate, and try to read from the previously created datafeed. If this fails then you should create a new datafeed, and begin reading from this new datafeed.
Creating and reading from multiple datafeeds concurrently can result in your bot processing duplicate messages and subsequently sending duplicate or out of order messages back to the user.
For large rooms, it is recommended that bots do not send messages at a higher rate than 2 messages/sec or every 500ms.
If bots are bulk adding users to rooms, it is recommended that bots add users at rate of 3 users / second.
In some rare cases, bots may receive duplicate messages from Symphony. In order to prevent duplicate processing, developers can implement logic to keep track of previous messages. It is recommended that bots store a list of unique messageIDs up to 15 minutes in the past. Upon each new message, bots should do a quick validation that new message is not received in the past and continue to process the message.
Along with any request made to the , bots should send header X-Trace-Id (random alphanumeric string of 6 characters) for logging purposes.
Please note that the Symphony BDK for Java sets up your logger(Mapped Diagnostic Context) with this X-Trace-Id. This is especially useful for cross-applications debugging, assuming that the X-Trace-Id value is also present in your application logs. You can find more information about how to print the X-Trace-Id with specific technologies (like logback or log4j2) in the.
Commerce Service
Apps can offer premium functionality through licensed subscriptions. Use the commerce service to identify the products (premium versions) to which a user is subscribed:
// To use the commerce service, you must subscribe to it from your application
var commerceService = SYMPHONY.services.subscribe("commerce");
getProducts()
Returns the list of products to which the user is subscribed for your app:
function getProducts(serviceName)
Parameters
Type
Description
This method returns a promise that will be fulfilled with the array of products the user is subscribed to for your app. For each product, the following is returned:
"Premium" is the term used for paid subscription products, while "Standard" represents a freemium app. The name and SKU will be values specified by the application developer when implementing a premium version of their app.
This event is fired when the user's product subscriptions are changed.
Use the method on the service specified in getProducts() to subscribe to this event and specify a callback that will be executed when the event is fired. The callback should change the contents/features of your application to match the user's updated product subscriptions.
Planning Your Bot
A bot on Symphony Messaging can be thought of as an automated version of a human performing specific tasks in Symphony Messaging chats. Most actions that an end user is able to perform in Symphony Messaging can be performed by a bot as well.
Each bot has a unique identity represented by a service account that has similar features to an end-user account such as a name and avatar.
Symphony Messaging Bots enable end users to benefit from innovative workflows and time-saving automations built on top of the Symphony Messaging platform.
The answer lies in Symphony Messaging's open REST API. Once authenticated, Symphony Messaging bots can leverage the APIs that enables bots to execute administrative functions such as creating chatrooms, managing users, and facilitating cross-pod connections. In addition, our APIs allow bots to perform messaging functions such as sending and receiving messages and signals.
For a full overview of the Symphony Messaging REST APIs continue here:
Bot Permissions
List of Bot Permissions
This page lists the available roles and the associated privileges that may be required for certain endpoints:
Privileges
Privileges
Special Characters
The Apache Freemarker uses the HTML output format by default. In some cases, special characters placed within the MessageML must be HTML-escaped, otherwise, the request sending the MessageML will receive a 400 error response. The following are examples of valid HTML-escaping:
Room Selector
The Room Selector is an element that allows users to find and select both rooms or persons. It behaves the same way as the chat selector you see when you forward a message and select where the message should be forwarded.
When a user starts typing in the field, a list of conversations and people will be displayed for selection. Only the chats that the user has access to will be displayed.
Open Source Code Samples
Many members of our community are building bots and code samples and publishing their source code. We collect these examples in this page. You can use any of them as is, or to either bootstrap your own idea or just for inspiration.
This bot provides users to retrieve and export all of their messages from Rooms and IMs.
Property
Value
Description
name
String
Yes
Identifies the room selector.
placeholder
String
No
Specifies a short hint that describes the expected value of the field.
required
Boolean
No
If true, at least one chat or person must be selected to be able to submit the form.
label
String
No
Label displayed on top of the Room Selector.
value
Array of
string
No
Default values that will be preselected in the Room Selector. The array can contain both streamIds, as well as userIds. Please note that if the user does not have access to these users or conversations, they will not be displayed.
The Room Selector element supports multi selection which means that you can search for more than one chat or person.
The Room Selector is not yet available on Symphony Mobile. Mobile will be supported in a future release.
Example of a room selector with both a room and a user pre-selected.
Please note that pre-selected streamIds must follow URL Safe Base64 encoded StreamID.
Resulting payload when a user submitted the form afer having selected two chats and one user in the Room Selector.
The name of a local application-implemented service. If passed, the productUpdate event will be fired on that service if the user's product subscriptions change.
<messageML>
<form id="test">
<room-selector name="room-selector"
label="Select the chats where the alert will be sent."
value="['rsxB51ieSYfPLQ0jgFKg93___nUqhvz4dA','9139691037944']"
placeholder="Select rooms"/>
<button name="submit_button" type="action">Create Alert</button>
</form>
</messageML>
2a. If successful, the bot will receive a valid Key Manager Token. This Key Manager Token must be passed along with all subsequent Symphony Messaging API requests destined just for the Agent.
3. If the bot wants to send a message, the bot will call the Create Message endpoint on the Agent API and pass both Session Token and Key Manager Token as a part of the request.
4. At this point, the Agent Server calls the Key Manager and requests the bot's encryption keys.
5. Next, the Agent Server validates the bot's Key Manager Token.
6. If successful, the Agent will encrypt the payload sent by the bot and will forward the encrypted message up to the Pod where it will be routed to the intended user or chatroom. The message will remain encrypted until it reaches its final destination.
Key Manager
Interacting with the Components
Navigate to Overview of Datafeed to learn more about how bots process messages and other real time events
Before you begin your Bot development journey, it is important to consider the following when determining what type of Bot you build:
Before building your Bot, it's important that you identify the use cases that this Bot will serve. In other words, identify the ways in which this Bot will increase productivity, add meaningful color to your daily tasks, centralize information, reduce business pain points, and make working simpler for its users. To easily identify valuable use cases, ask yourself the following:
Are there any tasks in my daily workflow that are recurring and can be automated to assist me in my job?
Are there numerous sources of information that I check daily that can be centralized inside of Symphony Messaging?
Are there any tasks in my daily workflow that require manually sifting through large amounts of data?
Is there tedious data validation or compliance checks that I must perform when dealing with colleagues, clients, customers, or third-party vendors?
Do I have to manually collect and carefully collate unstructured data from colleagues, clients, customers, or third-party vendors?
The type of Bot you build will depend on who is using and interacting with it. To identify your bot's audience, ask yourself the following:
Are the users of my bot internal or external counter-parties?
Will the bot be interacting with front-office or back-office employees mostly?
Is your bot interacting with a technical audience or business audience?
Will users interact with your bot via the Symphony Messaging Mobile App or on the desktop?
What languages does your audience speak?
Will your bot be performing bot-to-bot communication?
The more you understand your audience, the more you can understand their business pain points and in turn develop a better user-experience and bot-based solution.
Users can interact with Bots in IMs, group chats, and in chatrooms. Before building your Bot, it's important to identify the types of interactions between users and your Bot:
If so, you are looking to build a chatbot, which is a type of Bot that allows direct user interaction in the form of request/reply. You can learn more about rich chat-based workflows and building chatbots here:
If so, you are looking to build an interactive bot. Interactive bots leverage Elements to collect user data and feedback through forms, textfields, buttons, etc. You can learn more about interactive workflows and Elements here:
If so, you are looking to build a headless bot. Headless bots can leverage webhooks or build custom notification handlers and formatters from external systems. You can learn more about headless bot workflows and notification handlers here:
Lastly, it's important to clearly define the lifecycle and scope of your bot's workflow:
What chats will my bot exist in?
Will these rooms be public, private, broadcast, or external (cross-pod)?
How can I define the scope of my bot in order to reduce unnecessary noise not relevant to my bot's workflow?
How can I clearly define the protocol for initiating my bot's workflow?
Continue here for a full list of Bot's best practices to establish Bot parameters, scope, and protocol:
Yes The $ character only needs to be escaped if it comes before the { character.
<messageML>${}</messageML>
#
#
Yes The # character only needs to be escaped if it comes before the { character.
<messageML>#{}</messageML>
>
>
No
<messageML>></messageML>
"
"
No
<messageML>"</messageML>
'
'
No
<messageML>'</messageML>
*
*
No
<messageML>*</messageML>
%
%
No
<messageML>%</messageML>
Here after you can find an example of a message sent by a bot and containing these special characters as well as the structure of the messageML sent:
<messageML>
These are special characters:
<ul>
<li><;</li>
<li>&;</li>
<li>$ or $;</li>
<li># or #;</li>
<li>> or >;</li>
<li>" or ";</li>
<li>' or ';</li>
<li>* or *;</li>
Character
HTML escaping
Required escaping
messageML example
Tags
<
Examples
Author
Symphony
License
MIT
Source Code
This bot provides capabilities to manage room creation and population using Active Directory, .csv files or .eml files (email).
Property
Value
Language
JavaScript (Node)
Author
Symphony
License
This bot tracks watchlists for multiple users and displays a table with clickable buttons to allow users to join discussion rooms.
Property
Value
Language
Java
Author
Symphony
License
This bot uses Symphony Elements to facilitate the creation of polls, firing of poll messages, ending polls and collation of results.
Property
Value
Language
Java
Author
Symphony
Licence
Language
This list is provided for information only, without warranty of any kind. All source code are protected by their respective license.
Symphony Exporter
Javascript (NodeJS)
Symphony Roomzilla
Symphony TradeBuddy
Symphony Poll Bot
Help Menu
Datafeed
All datafeed management and best practices are provided out of the box by our dedicated BDKs (Bot Developer Kit) and WDK toolkits.
Interactive Bots are a form of Chatbot where the conversational flow is driven by interactive Elements forms. Instead of listening for plain text as the only source of data, Interactive Bots can collect data or commands through structured forms.
Elements allow bots to send messages that contain interactive forms with pre-designed text fields, dropdown menus, person selectors, buttons and more. Additionally, Elements reuse Symphony Messaging UX component libraries, enabling developers to easily create interactive bot messages that look and feel like they belong in Symphony Messaging.
Users can interact with chatbots in chatrooms and 1 to 1 chats. In order to initiate your Interactive Bot's workflow we recommend that users @mention the bot's username in order to get the bot's attention and signal to the bot to begin its intended function. That way, bots can be active members of chatrooms, but eliminate noise that is outside the scope of its intended workflow.
It is common for bots to contain multiple commands or sub workflows that it can action upon. It is best practice to list these commands in a help menu. Additionally, it is best practice for all commands to follow a "/" so that it's clear what text is meant to be processed as a command. The following illustrates these best practices:
A core aspect of all Interactive Bots is the ability to 'listen' to different types of commands and events and reply to them accordingly. The mechanism that enables Symphony Messaging Bots to listen to events in chatrooms and IMs is the Datafeed.
The Datafeed is a real-time message and event stream that can be created using the REST API. The datafeed provides a secure stream of messages and events from all conversations that a bot is in.
In order to 'listen' and respond to user events, bots create a single datafeed and subsequently have access to all chatroom activity including non-chat based events such as users being added/removed from chatrooms, external connection requests, and chatrooms IMs being created.
To learn more about the Datafeed continue here:
When an end-user submits an Elements form, the bot is able to access the contents of that form through the Datafeed. The Elements form lifecycle is illustrated below:
First an Interactive Bot sends a messageML message containing an Elements form:
The messageML is sent by your Bot and rendered as a form:
After the user fills out their information and clicks the 'Submit' button, the following payload is captured by the Datafeed and delivered to the bot:
The next step of your Interactive Bot workflow is to introduce your bot's custom business logic. Now that you have access to the bot's events, messages, and elements payloads through the Datafeed, the next step is to create dedicated event listeners. Inside these listeners is where you parse messages and datafeed payloads, fetch data from external sources, manage conversation state, and make requests to Symphony Messaging REST APIs in order to reply to users directly or performs administrative functions such as creating chatrooms.
You can learn more about parsing events and introducing custom business logic .
Continue on to our guide in order to learn more about our development tools and appropriate development pathway for building your first interactive Bot:
Truststores
You should only need to follow the below steps if your organisation uses self-signed custom certificates which are signed by an Internal Root Certificate Authority (Root CA).
Overview
In an enterprise environment, it is very common to have an internal root certificate authority (root CA) that signs all certificates used internally for TLS termination on HTTPS sites. While this trust is federated on the operating system level for all domain-connected Windows workstations, non-Windows servers are typically not configured the same way. Even on a Windows workstation, your Java runtime might not necessarily trust the enterprise root CA certificates.
If a Java application attempts to make a connection to an untrusted remote server, it will throw an SSLException and fail to connect.
Java Truststores
A Java truststore is a bundle of certificates used when establishing connections to remote servers (this could be internal or on the Internet). Each Java runtime ships with a default truststore called cacerts. Adding certificates directly into cacerts is usually not recommended unless there is a centrally-managed deployment process for all workstations and servers.
Bot Truststore
A bot requires connections to several servers like the key manager or API agent, as defined in your bot configuration. This configuration should also define the path to a custom truststore, which ensures that the trust relationship is maintained even as the bot's deployment location is moved, as long as the truststore file is moved together with the deployment artifacts.
The BDK for Java uses the JKS format and the configuration is under the ssl section within the config.yaml:
If you are using the BDK for Java's Spring Starters, modify the appropriate application.yaml file to include the ssl section under the bdk section:
The BDK for Python uses a concatenated PKCS format. Your config.yaml should look like this:
A typical internal certificate has has least 2 certificates in its chain - the certificate itself as well as the root CA certificate that signed it. Some enterprises will have intermediate CAs to form a 3-certificate chain. When Java establishes a connection to a remote server, it requires all signing certificates in that chain to be trusted. Hence, when building a truststore, you will need to import every signing certificate in the chain of each remote server that is not already present in the cacerts bundle.
Publicly-trusted signing certificates from established certificate authorities are already in cacerts so you will most likely not need to import certificates for services on the public Internet. However, if the Java runtime you are using pre-dates the existence of those certificates, then you will need to add them manually.
The keytool command that ships with all Java runtimes is used to manage truststores. You can build a new truststore or append to an existing one using the same command as follows:
You may use the following convenience shell script to automatically build out a new truststore based on a list of servers. Please remember to include all possible connections that your bot requires. This may include: all Key Manager servers, all API Agent servers, the Symphony Messaging pod, any other third-party or internal endpoints that the bot will interact with.
If you have no access to a Linux-based shell, you can also manually perform this process within a Windows environment. All you need is a browser and a Java runtime with keytool installed.
Step 1: Visit an endpoint on each server in your browser and view the certificate
Step 2: Select the next signing certificate
In the Certification Path tab, select the end certificate's parent and View Certificate
Step 3: Export the certificate
In the Details tab, click Copy to File.. and select the Base-64 encoded X.509 option then save the certificate to disk.
Step 4: Repeat for the rest of the chain
Repeat Steps 2 and 3 until you have exported all signing certificates in the chain.
Step 5: Build the trust store
Launch command prompt and repeat this command for each exported certificate
You can verify the entries by using the -list option:
Messages
Message API endpoints
Bots in Symphony Messaging can use the following API endpoints to create, update and suppress messages in Symphony Messaging chats:
Message creation in multiple conversations using the Blast Message endpoint
Message update via the endpoint. Note this functionality is not supported on Mobile. On Mobile, updates will appear as new messages instead of replacing the actual message. Also, note the rules and limitations explained in the endpoint specifications documented.
Message suppression via the endpoint
Please see below a quick animation showing a simple lifecycle of a bot message in Symphony Messaging with a message created by the bot, updated three times, and then finally suppressed.
In the Symphony Messaging message flow, messages are represented in the following markup language forms:
MessageML: A tag-based language that is a subset of XHTML. MessageML allows templating in .
PresentationML: MessageML translated into the equivalent XHTML tags so it can be rendered and processed by any HTML client.
ExtensionML: PresentationML translated to a special markup for use by a front end app to perform custom rendering of an entity.
The MessageML Render bot is a productivity tool that helps developers to create chat messages compliant with Symphony Messaging’s message markup language. Using the Render bot, you can get an overview of our message format capabilities, and quickly iterate on the format of a message while previewing the display.
The Render bot is available . If this link doesn't work, you can look for MessageML Render bot in the directory.
The above diagram shows the following:
Your bot uses theto send messages in MessageML.
The Agent API encrypts the messages, and converts them to PresentationML where they are stored in Symphony Messaging 's data store.
Thedelivers messages to end users or to the Desktop Application as PresentationML.
Each message in Symphony Messaging has a unique message ID.
To find the message ID:
In the Symphony Messaging web or desktop client, click the message timestamp. The Message Status module overlay opens. The message ID is shown in the overlay footer:
When a message is created via the API, a messageID is returned in the response.
Encoding:
The message ID in the UI is in standard Base64 encoding.
Message IDs returned in API responses are in URL Safe Base64 encoding.
A message ID used in a URL should be in URL Safe Base64 encoding.
Messages may include:
Maximum 80 entities (tags and mentions).
Maximum 2,500 unique tokens (distinct words) in the markdown representation of the message.
81,130 characters of the encrypted markdown representation of the message. This corresponds approximately to 60,000 characters before encryption. Note that there is a greater chance of reaching the token or the entity limit than the character limit.
In the Symphony Messaging architecture, messages are stored in each company data store. When messages are sent externally (i.e. in External rooms), the messages are copied and transferred from one company to the other using a queue service.
This service guarantees "At-least-once delivery" of the messages, meaning that on very rare occasions, a message can be received more than once.
If this occurs, you might receive a second copy of that message. Therefore, Bots designed to work with External rooms (cross pod) should be idempotent: they should not be affected adversely when processing the same message more than once. Continue to learn about how your bot should handle duplicate messages.
Getting Started with ADK
The App Developer Kit (ADK) is the preferred tooling for web developers to get started building extension apps on Symphony
Generate your Extension App
The Symphony Generator offers a fast way to bootstrap your Symphony extension app project.
Prerequisite: Install NodeJS first, either or via . You can also use other package managers like or , which the generator will attempt to use before falling back to npm.
First, install yeoman and the Symphony Generator.
$npmi-gyo@finos/generator-symphony
$yarnglobaladdyo@finos/generator-symphony
$bunadd-gyo@finos/generator-symphony
Then, create a directory for your new app project and launch the generator.
$ mkdir my-app && cd $_
$ yo @finos/symphony
This will prompt you with a number of questions about your app and pod configuration. Type in your app ID, using arrow keys to scroll and press enter to move on to the next prompt.
When prompted for Select your type of application, choose Extension App (ADK). You then have a choice of different project types:
Basic - simple project to demonstrate initialization
App View - uses React with either JavaScript or TypeScript to create app views
Message Renderer - overrides rendering of messages with custom formatting
If you require an extension app that requires user identity, you will also need a backend that can perform the process. You should then select the Extension App + Circle of Trust (ADK + BDK) option, which will generate both the extension app project using ADK and a backend project using BDK that will perform the app authentication and validation.
When you are ready to deploy your app permanently (or if you require Circle of Trust), follow the instructions on this page to setup your app.
A browser window should launch with the URL . If it doesn't, visit that page manually. Dismiss the security warning and close the page.
Visit to inject the running app temporarily into a pod for testing
Acknowledge the developer mode notice. Your app is now loaded.
Each project type in the generator corresponds to one of the guides below. Read the respective guide for explanations of how to use ADK.
AI agent
Specialized service accounts that bring LLM-powered reasoning, contextual data access, and tool use into Symphony's secure messaging environment
AI agents
AI agents are specialized service accounts that bring LLM-powered reasoning into Symphony. They can answer questions, use Symphony chat context, and take actions on behalf of a user within the platform's security model.
AI agents are accessible in a dedicated private channel called the AI Agent stream.
Which AI agents can be found in Symphony?
Several kind of AI agents can be found in Symphony:
Built-in agent — Symphony's built-in assistant for messaging tasks such as summaries and catch-ups.
Custom agents — Agents tailored to your users, tools, and workflows. You can create them in or build them with Symphony APIs.
Community agents — Agents published by Symphony partners or the wider Symphony ecosystem.
AI agents extend the standard bot model with user-scoped context and AI-specific behaviors.
They can:
Reason over prompts and conversation context.
Use tools and workflows on behalf of a user.
Stream responses as they are generated.
Expose predefined prompts for repeatable tasks.
AI agents support different interaction patterns depending on the task.
An AI Agent stream is a private, encrypted 1:1 conversation between a user and an AI agent. No other user can join.
Use this stream when the agent needs a private working space, personal context, or a persistent session with the user.
Because the stream is private, the agent can safely return user-specific results and perform user-specific actions there.
The side panel lets a user chat with an AI agent while keeping the current conversation in view. The parent chat is passed as context to the agent.
This is useful for:
Summarizing a room.
Drafting a reply from current context.
Triggering workflows based on the active conversation.
AI agents can use a user's chat context to produce grounded, source-aware answers without joining the room itself.
This allows the agent to help in internal rooms, external rooms, and direct messages, while keeping the interaction private to the requesting user.
Symphony Messaging chat context can be shared with the agent in two main ways:
Implicitly, through the side panel.
Explicitly, through prompt message injection functions.
AI agents can expose predefined prompts for common tasks. These prompts give users a fast way to run proven instructions without writing them from scratch.
Use predefined prompts to:
Inject additional context into a request.
Standardize complex workflows.
Guide tool use across multiple steps.
AI agents can stream responses as they are generated. This reduces time to first output and improves the user experience for longer answers. Each update still passes through Symphony compliance controls before it is shown to the user.
AI agents can return their reasoning trace in the conversation when that experience is enabled.
This allows:
users understand why the agent responded a certain way.
designers inspect tool calls and parameters.
teams improve prompts and edge-case handling.
An AI agent combines two Symphony assets:
A bot identity, which represents the Service Account.
An app, which controls the actions the agent can perform on behalf of a user.
To message an AI agent, or create a new AI Agent stream, the linked app must be installed for that user. This gives administrators fine-grained deployment control. They can enable specific agents only for users who need them.
AI agents are useful for tasks such as:
Summarizing long discussions and catch-ups.
Drafting responses from the current chat context.
Running guided workflows with tool calls and user context.
Choose the path that fits your team:
— the fastest no-code path to create, configure, and manage agents.
Develop custom AI Agent (coming soon) — an API-first path for teams building custom agent logic and integrations.
Initialization
Including the Client Extension API Javascript Library
To use the Client Extension API services, you must include the symphony-api.js JavaScript file in your application controller and views.
To style your app, you must include the symphony-style.css CSS file in your application views and add the class "symphony-external-app" to the <body> tag of your app views.
Icons must be square, with a recommended size of 32x32.
The supported formats are SVG (recommended), PNG and JPG.
Transparency is supported, but please take into account that your icon should work both in the light theme and the dark theme.
In the legacy Symphony Client, it was possible to use a rectangular sprite icon (32x16), where the first 16 pixels were used for the light theme and the last 16 pixels for the dark theme. This is not supported on Client 2.0.
SYMPHONY.remote.hello()
The SYMPHONY.remote.hello() method should be used to initialize the connection to the Client Extension API from your application controller and views.
Returns a promise that will be fulfilled when the introduction is complete. If there is a problem, the promise will be rejected. The promise returns an object containing the user's Symphony client theme name, font size, and any associated classes, including those for theme name or size, as well for condensed and contrast modes.
You should style your application according to the user's theme by applying the theme and font size classes to the <body> tag of any application modules.
If a user changes his theme, a themeChangeV2 event is fired from the , which will pass a themeV2 object with the new values. You should use a service to to this event and update the classes on the application module <body>.
Configuration
The Symphony Messaging Generator creates a basic configuration file that assumes a fully cloud-hosted Symphony Messaging pod architecture. In this scenario, the pod, key manager and agent are all hosted on the same domain e.g. develop2.symphony.com. If your pod architecture is different and you have other connectivity requirements like a network proxy, you will need to add those options to your configuration file.
Property
Description
Text formatting and semantics
MessageML supports the following tags for formatting content within a message:
Tag
Description
Optional attributes
Style Attributes
Tags support the following style attributes where applicable:
To learn more about Symphony's built in styles, continue here:
Checkbox
The checkbox is an interactive box that can be toggled by the user to indicate an affirmative or negative choice.
When clicked, a checkmark (✓) appears inside the box, to indicate an affirmative choice (yes). When clicked again, the checkmark disappears, indicating a negative choice (no).
Checkboxes are used to let a user select one or more options from a limited number of choices. Frequently, a set of checkboxes represents a single question which the user can answer by selecting any number of possible answers.
Radio Button
Radio buttons are shown as small circles, which are filled or highlighted when selected. Only one radio button in a given group can be selected at the same time.
Frequently, a set of radio buttons represents a single question which the user can answer by selecting a possible answer.
Note: If you want the user to be able to select more than one option, use the element.
OpenChat
Chat bots can add buttons in chat messages that on click will open an existing chat room or start a chat with a specific user or group of users.
This can be useful to help Symphony users easily navigate from one chat to another, or to reference another discussion happening in a different chat.
The new chat can either replace the current chat, or open on the side instead.
OpenChat is represented in MessageML as a <ui-action action='open-im'> tag and wraps a single button.
The <ui-action> tag for OpenChat supports the following attributes:
Custom Entities
Structured Objects are rich, inline, interactive components of Symphony messages. Objects allow you to build innovative workflows that go beyond working with normal text or attached files.
Unlike normal message text, these objects are structured and do not need to be parsed to have business logic.
Unlike attachments, end-users can view and interact with objects directly from their Symphony client, without having to change context.
Register and Subscribe
In order to leverage the services provided by the Client Extension API, you must first subscribe to them. To use your applications own services, you must register them via the Client Extension API. Extension apps can register and subscribe to local and remote services in the following ways:
Creates a new local service and register it using existing classes:
If you are developing an Object-Oriented Application, SYMPHONY.services.make() allows you to use a class as a prototype for implementing service methods, allowing you to choose which methods of the class will be available in the service by specifying them in the implements list.
This cannot be and this cannot be achieved by the SYMPHONY.services.register() function, which is only recommended when creating small services since it does not require any class, and it only requires the serviceName
Planning Your App
Symphony extension apps are standalone web applications that are embedded within the Symphony user interface as iframes. These iframes interact with the Symphony container using the Symphony Extension API. Extension apps can be accessed by the end user in two ways:
From the left navigation under the Applications tab. Clicking on your app name brings it into view
Attached to contexts such as #hashtags, $cashtags, or user profiles. Clicking on your app button brings it into view along with the corresponding context.
Developing extension apps enable developers to enrich the Symphony experience and create custom workflows and automations on top of the Symphony platform.
Entity Advanced Templating
The templateparameter in the render() function of the is an string used to render entities. To render a static object or an iFrame, you can use advanced templating.
For a full ExtensionML reference, continue here:
You can create a reusable template that leverages the values in the data object for the specific object. When using the data for these attributes, the template uses the id attribute on the tag to specify which member of the data object holds these attributes.
Register and Connect
You must register your application controller with Symphony and connect your application views using the SYMPHONY.application methods. During this time, the that will be used by your application must be specified.
Register an application controller with the Symphony client. Additionally, subscribe the application to remote services and register local services that can be used remotely. Returns a promise that will be fulfilled when registration is complete.
This method must be called before the application can to any services.
Dialogs Service
Use the dialogs service to create modal windows (e.g. to open a modal window from a button registered at a room level).
The following methods are available on the dialogs service:
show
Receiving Conversation and User Information
Symphony’s Extension API allows apps to extend the Symphony client user interface by adding buttons on the IM, MIM, profile, and chatroom modules. This capability can be used to build apps that act upon the room and user identity details, such as a click-to-call integration.
Your app must be an Extension App.
Extension apps can receive stream participant information when an end user clicks on a button added by the app.
Your button will receive information from the user object in a MIM, IM and a room of up to 20 users.
Please note that the current user’s information isn’t returned, only the information of the other user(s) in the profile of a user, an IM, MIM or room.
AI agents use on-behalf-of APIs. An agent can never access more data than the requesting user can access. Room memberships, information barriers, and sharing restrictions are enforced by design.
Core capabilities
Predefined prompts
Streaming
Thinking
Per-user enablement
Common use cases
Create your first AI agent
AI Agent is an add-on to Symphony Services and may require additional licensing.
Contact sales@symphony.com to enable it in your environment before you begin.
The side panel keeps the current conversation in context while the user chats privately with the agent.
The answer lies in Symphony's Extension API, which is a JavaScript library that consists of services and methods that allow applications to extend and interact with Symphony's user interface. By leveraging these services, developers can:
Add modules, or windows bringing your app's content into the Symphony canvas
Add entry points for your app, such as navigation items on the left hand nav or #hashtags and $cashtags.
Add interactive buttons to chat and user profile module headers
Enable users to share content from your app into Symphony chats
For a full overview of Symphony's Extension API continue here:
Before you begin your extension app development journey, it is important to consider the following when determining what type of app you build:
Before building your extension app, it's important that you identify the use cases that this app will serve. In other words, identify the ways in which this app will increase productivity, add meaningful color to your daily tasks, centralize information, reduce business pain points, and make working simpler for end users. To easily identify valuable use cases, ask yourself the following:
Are there numerous sources of information that I check daily that can be centralized inside of Symphony?
Are there any views or visualizations from third party apps which could be embedded into Symphony's UI?
Are there any tasks in my daily workflow that require manually sifting through large amounts of data?
Would it be helpful if this data could be accessed easily to Symphony users across my organization?
Are there any customized features on Symphony's UI that would increase my productivity and efficiency?
If you need additional inspiration, checkout our Symphony App Directory for examples of what has been built by our robust developer community!
The type of extension app you build will depend on who is using and interacting with it. To identify your app's audience, ask yourself the following:
Are the users of my app internal or external counter-parties?
Are the users of my app front-office or back-office employees mostly?
Will my app be interacting with a technical audience or a business audience?
What languages does your audience speak?
The more you understand your app's audience, the more you can understand their business pain points and in turn develop a better user-experience and app solution.
Users can interact with extension applications in a number of different ways. Specifically, users can launch a standalone extension app from the left-hand nav, invoke the app by clicking on custom UI buttons on a users profile, launch the app by clicking on attached contexts such as #hashtags or $cashtags, and even allow authenticated apps to make actions on-behalf-of an authorized user. Before building your extension app, its important to identify the types of interactions between users and your app:
Many extension applications built on top of Symphony need to receive conversation or user data. For example, if you wanted to build an extension app that extends the Symphony UI to add buttons to the IM, profile, or chatroom modules, it is likely that you would need access to conversation or user data. In order to do so your application will need to perform app authentication. You can learn more about performing app authentication here:
Another common use case for extension applications is to extend various parts of the Symphony UI by adding buttons to IMs, chatrooms, or profile modules. In order to receive the conversation and user data associated with these modules, these extension apps must also perform app authentication. You can learn more about how to receive user and conversation data as well as adding buttons to Symphony modules here:
Another way extension applications can extend Symphony's UI is to override links associated with #hashtag (e.g. #symphony) and $cashtag (e.g. $GOOG) hover cards. By attaching your extension app to #hashtag or $cashtag contexts, you can show content in your app that is relevant to the context clicked by the user. You can learn more about how build extension apps that extend these #hashtag and $cashtag entities in the same guide above.
Extension apps can extend Symphony's UI by acting as a custom renderer for structured objects created by the REST API. Structured objects are rich, inline, and interactive components embedded in a Symphony message. These structured objects can be rendered and injected into Symphony by creating a custom renderer as a part of an extension application. You can learn more about how to create a custom renderer in order to render structured objects here:
Some extension apps contain a dedicated frontend that will be embedded within of Symphony. For example, it's possible that your extension app will need to present complex financial data, charts, or dashboards, to an end user. Obviously, this functionality is not provided by Symphony out of the box, but you can bring it into Symphony through an extension application. Symphony provides a UI toolkit containing a library of react components in order to help build complex frontend applications rapidly. This UI toolkit contains frontend components and styles to allow you get the best out of your workflow.
To learn more about leveraging the UI Toolkit to build complex frontend applications continue here:
What is a Symphony Extension App?
How do Extension Apps create workflows and automations?
Next Steps
1. What are the goals of your Symphony Extension App?
2. Who is your App's target audience?
3. What sort of interactions will your App have?
Will your application need to receive conversation or user data?
Will your application customize modules by adding buttons to IMs, chatrooms, or user profiles?
Will your application customize links added to the #hashtag and $cashtag hovercards?
Will your application perform custom rendering?
Will your application contain a standalone frontend?
__ __ ___ _
\ \ / /__ / __|_ _ _ __ _ __| |_ ___ _ _ _ _
\ V / _ \ \__ \ || | ' \| '_ \ ' \/ _ \ ' \ || |
|_|\___/ |___/\_, |_|_|_| .__/_||_\___/_||_\_, |
|__/ |_| |__/
Welcome to Symphony Generator v2.9.0
Project files will be generated in folder: /Users/user/code/my-app
______________________________________________________________________________________________________
? Enter your pod host develop2.symphony.com
? Select your project type Extension App (ADK)
? Enter your app id my-app
? Select your application type Basic
Using ADK Version: 1.3.0
create package.json
create bundle.json
create webpack.config.js
create src/index.js
bun install v1.0.3 (25e69c71)
+ @symphony-ui/adk-webpack@1.3.0
+ webpack@5.88.2
+ webpack-cli@5.1.4
+ webpack-dev-server@4.15.1
+ @symphony-ui/adk@1.3.0
356 packages installed [3.91s]
Your Extension App project has been successfully generated!
To launch your project, first run: bun start
Then, visit https://localhost:4000/controller.html and dismiss the warning
Finally, visit https://develop2.symphony.com/?bundle=https://localhost:4000/bundle.json
$ npm start # or yarn start or bun start
$ webpack-dev-server --mode=development
SYMPHONY ADK 1.3.0
Building application: my-app
Running at: /Users/user/code/my-app
<i> [webpack-dev-server] Generating SSL certificate...
<i> [webpack-dev-server] SSL certificate: /Users/user/code/my-app/node_modules/.cache/webpack-dev-server/server.pem
<i> [webpack-dev-server] Project is running at:
<i> [webpack-dev-server] Loopback: https://localhost:4000/
<i> [webpack-dev-server] On Your Network (IPv4): https://192.168.1.2:4000/
<i> [webpack-dev-server] On Your Network (IPv6): https://[fe80::1]:4000/
<i> [webpack-dev-server] Content not from webpack is served from '/Users/user/code/my-app/node_modules/@symphony-ui/adk-webpack/dist' directory
Entrypoint controller 450 KiB = vendors.c3acceed.js 404 KiB controller.26a834b5.js 46.4 KiB
webpack compiled in 750 ms
hello: function()
{
"themeV2" : {
"name": "dark",
"size": "normal",
// This will include a list of all theme and font classes available.
"classes": [],
},
"locale" : "en-US"
}
SYMPHONY.remote.hello().then(function(data) {
// Set the theme of the app module
var themeColor = data.themeV2.name;
var themeSize = data.themeV2.size;
// You must add the symphony-external-app class to the body element
document.body.className = "symphony-external-app " + themeColor + " " + themeSize;
});
When Bot's retrieve messages via the API, the messages are delivered as PresentationML.
To obtain the URL Safe Base64 conversation (stream) ID, replace forward slashes with underscores, replace pluses with minuses, and ignore any trailing equal signs.
The size of a message cannot exceed 1.5Mb, including both the messageML (message property) and the entityJSON (data property)
StreamID
URL Safe Base64 encoded StreamID
RUkxW4x40aB74g0UWpaMw3///ozLPsapdA==
RUkxW4x40aB74g0UWpaMw3___ozLPsapdA
Example of payload if the message exceeds the total size limit (default being 1.5Mb)
Note: MessageML is just a subset of PresentationML that makes it easier to construct messages from your bot. The API can ingest either MessageML or PresentationML. However, the API will only deliver messages as PresentationML to a bot.
MessageML Render bot
The Render bot replaces the Presentation ML Live Renderer Tool website, which is no longer available.
Insert a hyperlink that will be displayed in the message.
• href: the URL of the link
• class: .
<b>text</b>
Bold formatting.
Note: when receiving a message from an Agent that contains whitespace between the last character in a bolded section and the closing </b> tag, the bold section will be returned in Markdown (i.e. surrounded by double '*' characters) instead of XHTML tags.
• class: .
<i>text</i>
Italics formatting.
Note: when receiving a message from an Agent that contains whitespace between the last character in an italics-formatted section and the closing </i> tag, the italics section will be returned in Markdown (i.e. surrounded by single '*' characters) instead of XHTML tags.
• class: .
<pre>preformatted text</pre>
Preformatted text.
• class: .
• Non-HTML MessageML are not supported inside <pre>.
<span>text</span>
No formatting.
• This tag can be used to specify visual styles, by adding a class attribute.
• This tag is used to create .
• class: .
• data-entity-id
• See below for list of translated PresentationML attributes.
<code>code sample</code>
Format the text as a block of code.
language: Use the language attribute to benefit from language specific code highlighting. The following languages are available: c, cpp, csharp, css, html, java, js, jsx, php, python, r, typescript, tsx, plaintext, yaml, scala, json, shell, markdown
Note: language attribute is only available with Agent 20.14+.
Here after you can find an example of a message sent by a bot and containing these formatting and semantics tags as well as the structure of the messageML sent:
<messageML>
<h1>Formatting and semantics</h1>
<p>This is a <a href="https://docs.developers.symphony.com/">Link</a> to our developer documentation.</p>
<p>Part 1 of the paragraph separated from part 2 with a line break.<br/>Part 2 of the paragraph.</p>
<p>This text can be either <b>bold</b> or <i>italic</i> or <span style="color:red;">red</span>, or even combine <b><i style="color:red;">several</i></b> formatting tags.</p>
<pre>This is a preformatted text.</pre>
<code language="html"><h1>Code sample</h1>
<p>This is some html</p></code>
The value is the string that will be sent to the server. If the value is not specified, the string on will be sent by default.
checked
Boolean
No
If true, it specifies that the <checkbox> element should be pre-selected (checked) when the page loads. Accepted values: true and false.
The text node of the MessageML will be converted to the <label> tag. This will preserve the formatting tags <i> and <b>, if present.
A form can have a maximum of 50 checkboxes within it. Note: The limit in previous versions was set to 20, so this limit may still apply when sending messages to customers with an earlier version of Symphony (before 20.10).
Once selected, checkboxes can be deselected by clicking them.
Click the reset button to return the checkboxes to their original status (checked or unchecked).
If a checkbox is sent without at least one checked option, it will not be displayed in the datafeed payload.
The following example shows checkboxes being used. It shows how developers can use the checked parameter with the value01 preselected when the form is sent. It also shows how users can select or unselect one or several checkboxes before submitting the form, as well as how to reset it to its initial values.
Note: If you want the user to only be able to pick a single option, use the Radio Button or the Dropdown Menu element.
Attributes
Type
Rules and Limitations
Examples
Versions and Compatibility
Required?
Description
name
String
Yes
Identifies the radio button.
value
String
No
The value is the string that will be sent to the server. If the value is not specified, the string on will be sent by default.
checked
Boolean
No
If true, it specifies that the <radio> element should be pre-selected (checked) when the page loads. Accepted values: true and false.
The text node of the MessageML will be converted to the <label> tag. This will preserve the formatting tags <i> and <b>, if present.
Radio buttons are presented in radio groups (a collection of radio buttons describing a set of related options). Only one radio button in a group can be selected at the same time. Note: The radio group must share the same name (the value of the name attribute) to be treated as a group. Once the radio group is created, selecting any radio button in that group automatically deselects any other selected radio button in the same group.
A form can have a maximum of 50 radio buttons. Note: The limit in previous versions was set to 20, so this limit may still apply when sending messages to customers with an earlier version of Symphony (before 20.10).
Once the user has selected a radio option, it can be deselected only by clicking on another radio option. The only way to deselect all the radio options is by clicking the reset button.
The following example shows radio buttons being used. It shows how developers can use the checked parameter with the value01 preselected when the form is sent. It also shows how users can select another radio button and how it automatically unselect any other value checked, as the 3 radio buttons have the same name and therefore are part of the same group "groupId".
Symphony users can interact with the OpenChat functionality via their keyboard using either "Enter" of "Space" to trigger the click action, once the UI component used for the OpenChat (i.e. button element) is in focus. Symphony users can move from one Element to another using "Tab".
The following examples show the OpenChat functionality being used as follows:
The first open-im shows how the Symphony user may interact with a primary button that is empowered with the OpenChat functionality that opens a specific stream on the side of the current chat. Note that the trigger and side-by-side attributes are not mentioned, as they are not mandatory: they are then defined by their default behaviour.
The second open-im shows how the Symphony user may interact with a secondary button that is empowered with the OpenChat functionality that opens an IM with a specific user on the side of the current chat.
The third open-im shows how the Symphony user may interact with a tertiary button that is empowered with the OpenChat functionality that opens a chat with a specific list of users on the side of the current chat.
The fourth open-im shows how the Symphony user may interact with a destructive button that is empowered with the OpenChat functionality that opens a specific stream that replaces the current chat.
The max length of any ui-action attribute is 256 except user-ids attribute which max length is set to a list 15 ids.
The OpenChat functionality is not supported in forms (see Symphony Elements).
Please note that the attribute type of the button is not supported when wrapped by a <ui-action> tag.
When using user-ids attribute with 2 or more ids in the list, the functionality will always create a new chat between the considered users; it will not reopen an existing chat between these same users. This is a known limitation that might change in the future.
In case the side-by-side attribute is set to true, when the Symphony user interacts with the OpenChat component, the IM/Chatroom appears on the side of current module in focus. In case the current module is not part of a workspace, then clicking on the button automatically creates workspace and focuses automatically to the desired IM/chat.
The OpenChat feature is supported in popped-out mode with the following behaviour:
Current chat/IM on focus is popped-out independently from a workspace:
In case the side-by-side attribute is set to false, the popped-out module is replaced by the desired one
When opening a specific chatroom where the user is not part of, then:
If it is a private room, a modal dialog will appear informing the user he cannot perform the action
If it is a public room, then the user is automatically added to the room and the considered stream is opened
The side-by-side attribute set to false is meaningful only for users in Client 2.0
Your pod must be configured for Symphony's REST API, and you must have the Agent, the component used for handling encryption and decryption of messages and content, set up.
Your Agent must be version 1.51 or later.
You must have an X.509 identity certificate for your bot service user for REST API authentication, where the common name on the certificate matches your service user's username.
To build renderer applications for displaying your structured object:
You need to have an extension application created and enabled on your pod.
Structured Objects are placed into Symphony messages and have two components:
Any message in Symphony can contain zero or more Structured Objects.
A message will always contain message presentation, in MessageML v2 format, with the optional object presentation of the Structured Objects it may contain.
If the message contains any structured objects, it will contain JSON data with all object data of the structured objects it may contain.
You can create an object by invoking the Create Message endpoint. You need to include:
The message parameter, which contains the message presentation, with the object presentation for each Structured Object.
The data parameter, which contains JSON data with the object presentation for each structured object.
Message presentation is represented in MessageML format. For example:HTML
To add an object to a message, include a div or a span tag with a unique data-entity-id attribute:HTML
The data-entity-id tag refers to a specific object in the JSON data, which needs to include:
The data type.
The data version of that type. Both are needed to build renderer applications which can render this type of that version.
This data can be used by applications in the web client to provide a rich display or end-user interactivity. In case no specific renderer application is available, you must provide a default presentation in the div or a span tags.HTML
You can read objects using any of the endpoints designed to read messages, for example, the Read Message endpoint. This endpoint will let you read both the message presentation and object data fields.
Renderer Applications leverage the Extension API to dynamically replace the presentation of a structured object.
To create a renderer application:
Your application needs to use the entity service, which will allow you to:
Register your application as being able to render a specific type, using the registerRenderer function.
Render the object itself, by implementing the .
To learn more about building Extension Applications that leverage structured objects, continue here:
Definition
<messageML>
Hello <mention email="user@music.org" />. Here is an important message
</messageML>
<messageML>
Hello <mention email="user@music.org" />. Here is an important message with an
<div class="entity" data-entity-id="object001" />
included.
</messageML>
<messageML>
Hello <mention email="user@music.org" />. Here is an important message with an
<div class="entity" data-entity-id="object001">object</div>
included.
</messageML>
Prerequisites
Sending Structured Objects in Messages
Message and Object Presentation
Reading objects
Note:
As described in , messages with can be created using the shorthand tags or the full tags. When they are read, the message presentation always contain the full tags, which are a subset of HTML tags.
Renderer Applications
Go further...
. If you use
SYMPHONY.services.register()
for large services, you will have to call
service.implement()
passing an object to it. As a result, all the methods will be public and the code might look unorganized.
Parameter
Description
name
The name of the service being created
context
The object instance, usually this
Creates a new local service and register it to be used by a specific application view or your application controller:
Parameter
Type
Description
serviceName
String
The name of the service to register
Finds a service - either local or remote - that has been registered and returns it. Returns false if the service does not exist.
In order to use a service, it must have been requested by your application during application.register() or application.connect() .
Parameter
Type
Description
serviceName
String
The name of the service to subscribe to
Takes an existing local service and makes it available remotely. Use this to make services available between multiple application views or between your application view and controller:
Parameter
Type
Description
serviceName
String
The name of the existing local service to make available remotely
Imports a remote service and makes it available locally. Returns a promise which resolves to a reference to a service. This service would now be available in your registry using SYMPHONY.services.subscribe:
Parameter
Type
Description
serviceName
String
The name of the remote service that you would like to access locally.
class Navigation {
implements = ['ready', 'select'];
serviceName = 'sample-navigation';
register() {
SYMPHONY.services.make(this.serviceName, this, this.implements, true);
}
ready() {
this.nav = SYMPHONY.services.subscribe('applications-nav');
this.nav.add('sample', 'My App', this.serviceName)
}
select() {
// do something here
}
}
var service = new Navigation();
service.register()
register: function(serviceName)
// hello:controller is a service implemented by my application
var helloControllerService = SYMPHONY.services.register("hello:controller");
subscribe : function(serviceName)
// modules is a service provided by the Client Extensions API
var modulesService = SYMPHONY.services.subscribe("modules");
register : function(serviceName)
subscribe : function(serviceName)
SYMPHONY.services.register()
SYMPHONY.services.register() is an alternative method for creating a new local service and it is recommended only when creating small services.
For Object-Oriented Applications, the use of the SYMPHONY.services.make() is recommended since it uses the class as a prototype for implementing the service methods.
Local services should be namespaced using a string representing the application followed by a colon. For example: hello:controller.
SYMPHONY.services.subscribe()
SYMPHONY.remote.register()
SYMPHONY.remote.subscribe()
For example, the template and data below could be used to display a link within a Symphony message:
Use the following flow control tags to support entities that have conditional logic or recursive data:
Tag
Description
<if>
Use this tag to conditionally use the enclosing template. This tag must include an id attribute. If there is data at the key specified by the id, then the enclosing template will be used, otherwise it will be skipped.
<if:last>
Use this tag within an iteration to conditionally use the enclosing template. If the current iteration is the last item in the iterated list, the enclosing template will be used.
Use the following tags to have interactivity on messages by implementing methods that are called to execute business logic:
Tag
Description
<action>
Use this tag to enable clicks on entities. For more information on how to use the action tag, refer to .
The following steps show examples on how to use actions.
Add the <action> tag to an entity template.
The data field of the entity must have objects that match the actions ids. For these objects, we can provide an icon, a label and a service name for the action.
Implement an action method for the service of the entity renderer. This method will be called once the <action> tag is clicked.
<!-- A <text> primitive must be used to inject
text objects from the JSON data into the template -->
<messageml>
<a id="url"><text id="text"></a>
</messageml>
<entity id="survey-voting-template" class="template">
<card id="card">
<h3>How did you like today's <text id="type"/> from <text id="venue"/>?</h3>
<p>
Please provide feedback by clicking one of the stars below to rate the meal.
</p>
<p>
<action id="onestar"/>
<action id="twostars"/>
<action id="threestars"/>
<action id="fourstars"/>
<action id="fivestars"/>
</p>
<p>
Voting ends at <text id="end"/>
</p>
</card>
</entity>
The id of your application. For partner apps, this is an alphanumeric string chosen by the partner. For custom enterprise apps, this is generated when creating the app in the Admin Portal.
servicesWanted
Array of Strings
A list of names of remote services that your application wants to subscribe to
servicesSent
Array of Strings
A list of names of local services your application wants to make available remotely (any implemented methods on this service will be made available remotely)
Returns
Type
Description
userReferenceId
String
A unique anonymized identifier for the user in context that will perpetuate until the user uninstalls the application
Connect an application view to an existing application that has been registered with Symphony. Additionally, subscribe the application to remote services and register local services that can be used remotely. Returns a promise that will be fulfilled when connection is complete.
Parameter
Type
Description
id
String
The id of your application. For partner apps, this is an alphanumeric string chosen by the partner. For custom enterprise apps, this is generated when creating the app in the Admin Portal.
servicesWanted
Returns
Type
Description
userReferenceId
String
A unique anonymized identifier for the user in context that will perpetuate until the user uninstalls the application
// Register the "hello" application with the Symphony client
// Subscribe our application to Symphony's services
// Register the "hello" app's controller service (this service must be registered using SYMPHONY.services.register())
SYMPHONY.application.register(
"hello",
["modules", "applications-nav", "ui", "share", "commerce"],
["hello:controller"]
).then(function(response) {
var userId = response.userReferenceId;
}));
// Connect an application view to the "hello" application
// Subscribe our application to Symphony's services
// Register the "hello" app's view service (this service must be registered using SYMPHONY.services.register())
SYMPHONY.application.connect(
"hello",
["modules", "applications-nav", "ui", "share", "commerce"],
["hello:app"]
).then(function(response) {
var userId = response.userReferenceId;
}));
SYMPHONY.application.connect()
rerender
hide
The following picture is an example of what you will be able to create with this service - this module will overlay onto the entire Symphony client window:
Presents a modal dialog to the user:
Parameter
Type
Description
id
String
A unique id for the dialog.
serviceName
Changes the contents of the dialog. This is usually invoked when the user has performed some action:
Parameter
Type
Description
id
String
The id of the dialog that should be updated.
template
Parameters
Type
Description
id
String
The id of the dialog to close.
function show(id, serviceName, template, data, options)
const dialogsService = SYMPHONY.services.subscribe("dialogs");
dialogsService.show(
"my-dialog",
"hello:controller",
`<dialog>
<div class="container">
<div class="header">
<h1>Configuration</h1>
<br/>
<div class="headerError">
<text id="title"/>
</div>
<p class="value">Please check if the public and private
key files match and if they are correctly configured in
Jira's application link section.</p>
</div>
</div>
</dialog>`,
"undefined",
{
title: "Application Configuration"
}
);
function rerender(id, template, data)
function close(id)
show()
rerender()
close()
This is the information that you will receive if your button is pressed inside of an IM or on a users Profile:
{threadId,// id of the conversation. Also known as streamId or conversationId
You must implement the trigger() method on your application service in order to handle clicks on the registered extensions. This is a sample trigger method that will allow you to receive a user's phone number and email address as an authenticated extension app:
This is the information that you will receive if your button is pressed inside of a MIM or a room:
{
isCopyDisabled, //if copy is disabled in the room returns true
isWriteAllowed, //if the user can send a message in the room, returns true
isCrossPod, //if it is a cross pod room, returns true
roomName, //room name
threadId, //id of the conversation. Also known as streamId or conversationId
userCount, //number of users returned
users : [ { //users information
id, //user id
isCrossPodUser, //if this is a cross pod user, returns true
isOwner, //if the user is owner of the room, returns true
emailAddress, //user email
username, //user name
displayName, //user display name
firstName, //user first name
lastName, //user last name
phone, //user phone number
mobile, //user mobile phone number
}]
}
// The application service that willbe used to handle clicks on UI extensions
var helloControllerService = SYMPHONY.services.register("hello:controller");
// Displays a button on 1-1 instant messages
uiService.registerExtension(
"single-user-im",
"hello-im",
"hello:controller",
{
label: "IM Button",
data: {"datetime": Date()}
}
);
// Implement the trigger method on your application service
helloControllerService.implement({
trigger: function(uiClass, id, payload, data) {
if (uiClass == "single-user-im") {
console.log('IM button was clicked on ' + data.datetime + '.');
// This acquires the user's phone number from the payload
var userPhone = payload.user.phone;
// You can do this for any field in the prior section, such as emailAddress
var userEmail = payload.user.emailAddress;
// You can now pass the user's phone number and email to your system.
}
}
});
Sample Objects
This is the information that you will receive if your button is pressed inside of a MIM or a room with less than 20 users. If there are more than 20 users, the users list will be returned empty.
You can follow the same steps as the Java process below for WDK.
For Python you can also follow these steps except instead of using keytool to import the certificates, simply concatenate all the certificates into a single file.
Automatic: Convenience Shell Script
Manual: Collating Certificates in Windows
Certificate Authentication Workflow
This pages describes the implementation of certificate-based Authentication. For the API reference of Certificate Session Authenticate and Certificate Key Manager Authenticate, see the following API endpoints:
Note: The following authentication sequence is provided out of the box by our dedicated BDK and WDK toolkits. To learn more about authenticating using the SDKs or BDK proceed to one of following configuration guides:
Overview of Certificate-Based Authentication
Symphony Messaging allows you to authenticate on the Pod and Key Manager with a client certificate that is signed by a trusted root certificate. When a bot calls the Session Authenticate endpoint, the Pod examines the client certificate provided in the TLS session to identify the bot user and return a Session Token. The same process occurs when a bot authenticates on the Key Manager.
All Symphony Messaging network communications take place over TLS-protected HTTP. The network uses authentication methods that require a client-authenticated TLS connection.
Client certificate authentication in TLS is configured at the port level. Two distinct ports are required for client-authenticated and non-client-authenticated connections. The web and mobile endpoints listen on port 443 (the default port number for HTTPS connections). The API endpoints require a separate port, typically port 8444.
The Admin upload a Signing certificate or Root certificate using the Admin portal.
The Admin provides to the developer a child client certificate derived from the Signing or Root certificate
The developer authenticates the Bot using the client certificate.
Note: It is also possible to directly upload a Client certificate in the Admin portal instead of a Signing or Root certificate.
Once you have obtained a copy of your Root Certificate Authorities (CA) Public "Signing Certificate", you can upload it using the following steps:
Navigate to the Symphony Admin Console for your Pod (e.g. ), then log in with your credentials
Once logged in click the Manage Certificates button then select Import
Drag and drop your Certificate file into the popup window:
Once you have uploaded the certificate file, click Import. If successful you will receive a confirmation message saying that the certificate has been uploaded successfully.
You can use the following commands to generate the service account certificate. The certificate must use 4096 bits length.
USERNAME = Service account username
PASSWORD = Service account key password
CA_CERT = CA certificate file
The following table shows the information you will need to provide to your PKI team:
Details
Example Values
The Symphony Messaging Admin then creates a service user with a username that matches the Common Name of the certificate, as you can see in the example below:
To authenticate on the Pod the bot must call the Session Auth endpoint: . Pass along the client certificate provided in the TLS session, returning a Session Token:
A successful response:
To authenticate on the Key Manager, the bot must call the Key Manager Auth endpoint: . Pass along the client certificate provided in the TLS session, returning a Key Manager Token:
A successful response:
Pass the Session Token and Key Manager Token as headers for all subsequent API requests.
Content Grouping
Tags
MessageML supports the following tags for grouping information within a message:
Tag
Description
Optional attributes
<h1>, <h2>, <h3>, <h4>, <h5>, <h6>
Heading text. 6 levels.
Here after you can find an example of a message sent by a bot and containing these content grouping tags as well as the structure of the messageML sent:
Please note that you can use content grouping tags mixed with other messageML tags such as Interactive Elements Forms. See the following example including forms in expandable-cards.
Tags and mentions
Tags
MessageML supports the following tags to embed additional information into messages:
Tag
Description
Optional attributes
<mention uid="123456789"/>
Insert a mention for the user whose Symphony userid is 123456789.
Here after you can find an example of a message sent by a bot and containing these tags specific to Symphony Messaging as well as the structure of the messageML sent:
Below several examples of financial instruments, using different types of identifiers and filters.
When identifiers and filters are not sufficient to identify a unique match, or when an instrument is not found in our reference database, an error is returned, except if a fallback-ticker is specified.
Enhanced tags notice
This page describes the changes introduced by the new enhanced tags for Symphony developers
Introduction to the enhanced tags
Symphony users can now tag financial instruments using the Enhanced Tag feature.
Instrument lookup type-ahead by ticker, name, ISIN, etc.
It displays a typeahead when the user presses # in a chat conversation. The upper section of the typeahead shows regular hashtags previously exchanged with that user and the lower section, under INSTRUMENTS shows Stocks, ADRs, ETFs and Indices.
By hovering over the Enhanced Tag, users can see essential reference data like company name, identifiers, exchange and currency.
New hovercard for the enhanced tags
The enhanced tags replace the existing $cashtags. This means that moving forward your apps and bots will need to handle enhanced tags instead of $cashtags.
Understanding the impact of the new tags
The impact of the enhanced tags on existing bots & apps has been carefully reviewed to ensure that there is no backward compatibility issue.
However, we strongly recommend that you conduct some tests to validate the change.
Please read below to understand the changes introduced with the new enhanced tags.
Existing bots can still produce legacy $cashtags both using the short tag notation (<tag cash="AAPL"/>), and using a Standard Entity ("type": "org.symphonyoss.fin.security")
Existing bots can easily include enhanced tags in messageML now. To do so, you will need to cuse the <tag> and provide one or several identifiers for that instrument. The instrument will then be resolved against our reference database, and properly formatted in the message. More information is available .
Bots consuming existing $cashtags in received messages are not impacted if they rely on the structured object (entityJSON). When they receive an enhanced tag, the exact same structure and properties will be present. There will be additional properties though, and the version field will be set to "2.0" instead of "1.0".
Bots that rely on the text representation of the tags (message field instead of the entityJSON field) will also not be impacted. However, this is not a recommended practice as this text representation may change to match the enhanced tag displayed symbol instead of the existing ticker in the future (e.g., text would change from "$TSLA" to "TSLA US"). If you rely on the text representation of the $cashtag instead of the structured data, you should consider updating the bot to rely on the structured data included in the entityJSON instead.
Existing signals will continue to work with the new enhanced tags. Messages containing the new tags will still match with the existing signals, meaning a signal matching "cash: AAPL" will match messages containing both "AAPL" and "AAPL US" for example.
For now, it is not yet possible to create signals based on the newly introduced properties of the enhanced tags, but this will change in the coming months. For example, it is not yet possible to create a signal that will match only on "TSLA US", but if you create a signal that matches on "TSLA", it will match messages containing "TSLA US" as well.
Existing apps that register a UI extension on $cashtag hovercards continue to receive the existing object for new enhanced tags.
However, whenever your app is notified of a user click on the hovercard, the app will receive in addition to the existing object a new structure containing the new enhanced tags properties.
If you decide to upgrade your app to leverage the new properties of the enhanced tags, please consider that you may still encounter legacy $cashtags for a long period of time, so should build around that. To detect if you are receiving a legacy tag or an enhanced one, you can rely on the version field included in the structure (org.symphonyoss.fin.security.version). It is set to "2.0" for the new enhanced tags.
Please note below the differences between the structures of the enhanced tags and the legacy $cashtags.
BDK is a library of tools and intelligent API bindings that provides an ultra simplified configuration and authentication setup, intuitive message and room management, customizable message templating, and a new activities API that makes it easy to facilitate bot workflows. The BDK and bot project generated by the Symphony Messaging Generator makes it super easy to get started!
To begin let's open up the code generated for you by the Symphony Messaging Generator in your favorite IDE. Navigate to the BotApplication.java file:
Note:
As you can see below on line 32, we are leveraging the Activities API to register a slash command ("/gif"). While this functionality is provided out of the box, we will be building a new datafeed listener to keep it simple at first. For a more in depth look at the provided activity and Activities API, continue .
The above snippet is listening for all incoming messages that contain "/hello". To see a full list of datafeed listeners provided by the BDK, navigate . If the message received by the bot contains "/hello", the bot will respond by sending a message to the stream or conversation in context. Run your bot and let's see it in action:
As you can see, it's super easy to access the message, room, and user context from an incoming event. The V4Initiator and V4MessageSent classes provide convenience methods that make it easy to orchestrate workflows. For a more detailed overview of how to leverage the BDK's message, room, and user management classes, continue .
Above, we showed you a simple example of how to leverage the BDK to build a conversational bot. To see more advanced usage of the BDK in order to build complex financial workflows, continue on to our dedicated BDK Certification course:
Buttons
Buttons are the Symphony elements responsible for submitting a form to the bot. As a result, all Symphony form elements are required to have at least one button where `type=action`. When an end-user clicks this button, the form and the value of each of the elements inside will be submitted to the bot via the datafeed and presented as a JSON payload.
In addition, some forms can contain reset buttons. These buttons are used to reset a form back to its original state.
Buttons support six different styles: primary, primary-link, secondary, tertiary, destructive
Applications-Nav Service
The Applications navigation section is found at the bottom of the left-hand sidebar of the Symphony client workspace. Use the applications-nav service to create a navigation item for your application:
The following methods are available on the applications-nav service:
add
userCount,// number of users returned
isCrossPod,// if cross pod, returns true
isDeactivated,// if an IM has been deactivated, returned on IMs only
user:{// user information
id,// user identifier
emailAddress,// user email
username,// user name
displayName,// user display name
firstName,// user first name
lastName,// user last name
phone,// user phone number
mobile,// user mobile phone number
isDeactivated,// user is deactivated, returned for profile only
},
}
retry
the specific retry configuration can be used to override the global retry configuration. If no retry configuration is defined, the global one will be used.
initialIntervalMillis
the initial interval between two attempts
maxIntervalMillis
the limit of interval between two attempts. For example, if the current interval is 1000 ms, multiplier is 2.0 and the maxIntervalMillis is 1500 ms, then the interval for the next retry will be 1500 ms.
In case the side-by-side attribute is set to true, the popped-out module remains in place and the desired one opens in the main Symphony client
Current chat/IM on focus is part of a popped-out workspace (Capital Markets view only): same behaviour as if the workspace was not popped out: if the specific chat to be opened is not part of the workspace, it is automatically added, and then opened either on the side or in the place of the previous focused chat depending on the side-by-side attribute.
user-ids
List of Integers
Exclusive with stream-id
List of ids of the users with whom the MIM must be opened when the Symphony user triggers the OpenChat functionality.
stream-id
String
Exclusive with user-ids
The id of the room/IM that must be opened when the Symphony user triggers the OpenChat functionality.
NB: Please note that the stream-id is the exact Conversation ID that you can find in the UI, and not the URLSafe64 converted id (see more details inOverview of Streams)
side-by-side
Boolean
No.
Default to true
If set to false, the current chat will be replaced by the new chat to be opened when the Symphony user triggers the OpenChat functionality.
Not working
methods
The names of the methods of this object that will be available on the created service
makeEventHandlers
If true, the methods listen and fire will be added to this instance. Calling the listen or fire objects will do so on the service.
Array of Strings
A list of names of remote services that your application wants to subscribe to
servicesSent
Array of Strings
A list of names of local services your application wants to make available remotely (any implemented methods on this service will be made available remotely)
<if:not-last>
Use this tag within an iteration to conditionally use the enclosing template. If the current iteration is not last item in the iterated list, the enclosing template will be used. This is useful to add commas between items in a list, without adding one to the last item.
<iterate>
Use this tag to loop through the items in an array. The template between the opening and closing <iterate> tag will be used for each item in the array. The data for the template will reference the data in current the list item. This tag must include an id attribute. This must be the key to an array in the data object.
1. Upload a Signing Certificate or Root Certificate
Please note the below steps can only be performed by a Symphony Messaging Pod Administrator as they will have the necessary administrator privileges to access the Administration Portal.
The certificate should be concerted to a CER or PEM format before it is uploaded
2. Generate a Client Certificate
Creating a Certificate Signing Request (CSR):
The Common Name (CN) value must match the name of the Symphony Service Account you created, this should also use the same case value.
If you plan to upgrade your bot to leverage the new properties of the enhanced tags, please consider that you may still encounter legacy $cashtags for a long period of time, so should build around that. To detect if you are receiving a legacy tag or an enhanced one, you can rely on the version field included in the structure (org.symphonyoss.fin.security.version). It is set to "2.0" for the new enhanced tags.
The Signal API has not changed. In the coming months the API may change to adapt to the new tags and in that case this change will be introduced following a notice period provided that there is an impact on the API contract.
// Presentation ML content of the message
<div data-format="PresentationML" data-version="2.0" class="wysiwyg">
<p><span class="entity" data-entity-id="0">$SAN</span></p>
</div>
// Entities (entityJSON field in the message):
{
"0": {
"id": [
{
"type": "org.symphonyoss.fin.security.id.ticker",
"value": "SAN"
}
],
"type": "org.symphonyoss.fin.security",
"version": "1.0"
}
}
. Each of those has different colors to suit different actions (to convey meaning). Use the
class
attribute to specify the style.
Primary: use the Primary button when there is a clear primary action on a message. You can use it for the submit button, for example.
Secondary: use the Secondary button when there are multiple actions of the same importance or some actions with less importance than a single primary action.
Destructive: use the Destructive button when an action results in the removal of an item or if it can result in a potentially serious negative consequence.
Primary-link, Tertiary and Destructive-link: These styles are variations respectively of the Primary, Secondary and Destructive buttons but without borders. They are low prominence options that can be used alongside a Primary or as standalone buttons with the ability to read more information.
Attribute
Type
Required?
Description
name
String
Yes
Identifies the clicked button.
If class is not defined, the action button assumes the primary class by default. Action buttons should be used for affirmation or confirmation actions.
Reset buttons have the secondary class set by default. Reset buttons should be used when the content of the fields need to return to their original state.
The following example shows the use of the Reset and the Submit button when sending a text inserted in a Text Field.
Add a new navigation item to the Applications section of the left-hand sidebar:
Parameter
Type
Description
id
String
A unique id for this navigation item (must be unique across all navigation items of a given application)
Eithertitleor{title, icon}
Remove an existing application navigation item:
Parameter
Type
Description
id
String
The id of the navigation item that should be removed
Set the badge (notification) count on an application navigation item:
Parameter
Type
Description
id
String
The id of the navigation item that should have its count updated
count
Change the title of an existing application navigation item.
Note that this only changes the title of a specific navigation item -- not to all navigation items created by the application:
Parameter
Type
Description
id
String
The id of the navigation item that should be renamed
Eithertitleor{title, icon}
Focus an existing application navigation item:
Parameter
Type
Description
id
String
The id of the application navigation item to focus
// To use the applications-nav service, you must subscribe to it from your application
var navService = SYMPHONY.services.subscribe("applications-nav");
function add(id, title, serviceName)
// The application service that will be used to handle left navigation item clicks
var helloControllerService = SYMPHONY.services.register("hello:controller");
navService.add("hello-nav", "Hello World App", "hello:controller");
// Implement the select method on your application service
helloControllerService.implement({
select: function(id) {
if (id == "hello-nav") {
console.log("hello-nav was selected.");
}
}
});
function remove(id)
navService.remove('hello-nav');
function count(id, count)
navService.count("hello-nav", count);
function rename(id, title)
navService.rename('hello-nav', 'New Left Nav Title');
function focus(id)
navService.focus("hello-nav");
add()
Note: You must implement the select method on your application service in order to handle clicks on the created left navigation item.
remove()
count()
rename()
focus()
String
The name of a local application-implemented service implemented.
template
String
The extensionML for the dialog content.
data
String
The data for the extensionML.
options
Object
The data for the extensionML
String
The new extensionML content to display.
data
String
The data for the extensionML.
• class
<p>paragraph</p>
Paragraph formatting.
• class
<hr />
Horizontal rule.
None.
<ul><li>list item</li></ul>
Unordered or bullet list.
Cannot be empty, must contain at least one child <li> item.
• class
<ol><li>list item</li></ol>
Numbered list.
Cannot be empty, must contain at least one child <li> item.
• class
<div>paragraph</div>
Block of text.
• This tag can be used to specify visual styles, by adding a class attribute.
• This tag is used to create Structured objects.
• This tag is also the root of any message read through the API.
• class: color options
• data-entity-id
• data-icon-src
• data-accent-color
• See below for list of translated PresentationML attributes.
<card> (see example below)
Inserts a card. It contains two different sections:
• the <header> (always visible)
• the <body> (hidden)
• iconSrc: image will be resized to 28 pixels by 28 pixels, use spacious mode. (.jpg, .png and .gif)
• accent: use background color values to select the accent color of the card.
<expandable-card> (see example below)
Inserts a card with new styles and multiple levels of display within the card
• state (mandatory) in <expandable-card> can take 3 values:
- "collapsed": only header is visible
- "cropped": card expanded but the body is cropped
- "expanded": card fully expanded
• variant (optional) in <body>: defines the style of the card. It can be either "default" for the default blue style, or "error" for the red error style
<messageML>
<form id="form_id">
<h1>expandable-cards</h1>
<h2>1st expandable-card</h2>
<expandable-card state="collapsed">
<header><h3>Header Content (always visible)</h3>This is a <b>collapsed</b> expandable-card with the <b>default</b> variant</header>
<body>
<h3>Body Content</h3>
It is possible to use Elements in the body as you can see below:
<text-field name="id1" placeholder="Enter your name..."/>
<text-field name="id2" placeholder="Enter your age..."/>
<button type="reset">Reset</button>
</body>
</expandable-card><br/>
<h2>2nd expandable-card</h2>
<expandable-card state="expanded">
<header><h3>Header Content (always visible)</h3><text-field name="id_header" label="Text-field in the header" placeholder="Type your input..."/>This is an <b>expanded</b> expandable-card with the <b>default</b> variant and with a <b>Symphony Element</b> in the header</header>
<body>
<h3>Body Content</h3>
When expanded, the whole body content is displayed in the expandable-card.
<text-field name="id3" placeholder="Enter your name..."/>
<text-field name="id4" placeholder="Enter your age..."/>
</body>
</expandable-card><br/>
<h2>3rd expandable-card</h2>
<expandable-card state="cropped">
<header><h3>Header Content (always visible)</h3>This is a <b>cropped</b> expandable-card with the <b>error</b> variant</header>
<body variant="error">
<h3>Body Content</h3>
When cropped, the body content is displayed in the expandable-card until a certain limit. A show more button allows to expand the card and display the rest of the body.
</body>
</expandable-card>
<button name="form_id_submit">Submit</button>
</form>
</messageML>
Examples
<messageML>
<h1>Heading texts</h1>
<h1>This is a h1 heading text</h1>
<h2>This is a h2 heading text</h2>
<h3>This is a h3 heading text</h3>
<h4>This is a h4 heading text</h4>
<h5>This is a h5 heading text</h5>
<h6>This is a h6 heading text</h6><br/>
<h1>Paragraphs</h1>
<p>This is a paragraph.</p>
<div style="color:red;">
<p>This is a paragraph enclosed in a div that allows its text to be red.</p>
</div><br/>
<h1>Horizontal Rule</h1>
Below you can see an horizontal rule<hr /><br/>
<h1>Lists</h1>
This is an unordered/bullet list:
<ul>
<li>Item 1</li>
<li>Item 2</li>
</ul>
This is a numbered list:
<ol>
<li>Item 1</li>
<li>Item 2</li>
</ol><br/>
<h1>Cards</h1>
<card accent="tempo-bg-color--blue">
<header>This is the header of a card</header>
<body>This is the body of a card</body>
</card>
<expandable-card state="expanded">
<header>This is the header of an expanded expandabled-card</header>
<body variant="error">This is an error variant of the body of an expanded expandable-card</body>
</expandable-card>
</messageML>
<mention email="user@music.org"/>
Insert a mention for the user whose email address is user@music.org.
• strict=true, the API will throw an error if no user of that email address exists. (default)
• strict=false . Message is accepted even if the user cannot be resolved.
<hash tag="label"/>
Insert "label" as a free-text hashtag.
<cash tag="ticker"/>
Insert "ticker" as a free-text cashtag. Important: when sending numeric cashtags as signals, add a * after the $ sign, for example, $_122450. <messageML> `<cash tag="$_122450"/> `\
Note: Cashtags are deprecated. Please use the <tag /> notation for financial instruments.
<tag />
Insert a financial instrument (enhanced tag) in your message, coming from our reference database.
The following instruments are supported: Stocks, ETFs, Indices and currency pairs.
To identify an instrument, you'll need to provide at least one identifier (e.g. an ISIN), and optionally some filters if your identifier is not specific enough.
You can also specify a fallback-ticker that will act as a free-text tag (workaround) if we are not able to find the instrument referenced.
Note: No other content (even line breaks) is permitted with a <chime/> tag. Please see an example of the messageML to send a chime below.
<messageML>
<br/><span>Mention with an email: </span>
<mention email="pierre.neu@symphony.com"/>
<br/><span>Mention with a user Id: </span>
<mention uid="71811853190567"/>
</messageML>
<messageML>
<table class="pasted-table">
<thead>
<tr>
<th>Identifiers and filters</th>
<th>Tag</th>
<th>Comment</th>
</tr>
</thead>
<tbody>
<tr>
<td>FullBBGCompTicker</td>
<td><tag fullbbgcompticker="TSLA US Equity"/></td>
<td># unique if found</td>
</tr>
<tr>
<td>Figi</td>
<td><tag figi="BBG000N9P426" fallback-ticker="TSLA"/></td>
<td># unique if found</td>
</tr>
<tr>
<td>BBG Comp ticker on Market sector</td>
<td><tag bbgcompticker="TSLA US" bbgmarket-sector="Equity" fallback-ticker="TSLA"/></td>
<td># unique if found</td>
</tr>
<tr>
<td>Figi ticker</td>
<td><tag figi-ticker="TSLA UW" fallback-ticker="TSLA"/></td>
<td># likely unique, may need filters</td>
</tr>
<tr>
<td>BBG Comp ticker</td>
<td><tag bbgcompticker="TSLA US" fallback-ticker="TSLA"/></td>
<td># likely unique, may need filters</td>
</tr>
<tr>
<td>US Code</td>
<td><tag us-code="88160R101" fallback-ticker="TSLA"/></td>
<td># likely NOT unique listing for stocks, need filters.</td>
</tr>
<tr>
<td>US Code on Main listing</td>
<td><tag us-code="88160R101" return-main-listing="true" fallback-ticker="TSLA"/></td>
<td># ask SYM to return the instrument listed on primary exchange</td>
</tr>
<tr>
<td>ISIN</td>
<td><tag isin="US88160R1014" fallback-ticker="TSLA"/></td>
<td># likely NOT unique listing for stocks, need filters.</td>
</tr>
<tr>
<td>ISIN on Main listing</td>
<td><tag isin="US88160R1014" return-main-listing="true" fallback-ticker="TSLA"/></td>
<td># ask SYM to return the instrument listed on primary exchange</td>
</tr>
<tr>
<td>Local code</td>
<td><tag local-code="TSLA" fallback-ticker="TSLA"/></td>
<td># likely NOT unique listing for stocks, need filters.</td>
</tr>
<tr>
<td>Local code with Country</td>
<td><tag local-code="TSLA" country-code="US" fallback-ticker="TSLA"/></td>
<td># likely unique listing for US stocks</td>
</tr>
<tr>
<td>Local code with MIC</td>
<td><tag local-code="TSLA" operational-mic="XNAS" fallback-ticker="TSLA"/></td>
<td># likely unique listing</td>
</tr>
<tr>
<td>Local code with MIC and instrument class</td>
<td><tag local-code="TSLA" operational-mic="XNAS" instrument-class="equity" fallback-ticker="TSLA"/></td>
<td># likely unique listing</td>
</tr>
<tr>
<td>Fallback ticker</td>
<td><tag fallback-ticker="TSLA"/></td>
<td>Always include a fall back to ensure the message will be accepted.</td>
</tr>
</tbody>
</table>
</messageML>
<messageML><chime/></messageML>
Examples
Mentions
Free-text Tags
Enhanced tags (Financial instruments)
Chime
App Authentication
Note: This guide is a conceptual overview of how Symphony performs secure app authentication. While you can implement the following workflow on your own, the BDK (Bot Developer Kit) provides an out of the box implementation of app authentication making it easy to get started building authenticated apps.
In order to create a secure connection between your app and the Symphony client, apps need to perform app authentication. Upon successful authentication, Symphony extension apps establish a bidirectional trust, allowing for secure and authorized access to user data by leveraging the Symphony Extension API.
In order to perform app authentication, your app must perform a combination of frontend and backend authentication calls to the Symphony client and pod respectively. The following steps provide an overview of the frontend and backend calls your App needs to make:
Note: Many Extension Apps' backend take the form of Symphony bots. The implementation of app authentication provided out of the box by the BDK (Bot Developer Kit) leverages this architectural design.
1. Initialize your Extension App
The first step of app authentication is a frontend call that leverages the Symphony Extension API to initialize your app. This should be used to initialize the connection to the Client Extension API from your application controller:
SYMPHONY.remote.hello()
Note: Each extension app will contain a unique app id that is registered on the Pod. You can learn more about this along with other setup prerequisites in the section.
2. Initiate Backend Authentication
The next step of app authentication is to perform a backend authentication call to the authentication endpoint on the pod:
Your backend should store this token pair as they will be used for subsequent validation steps in the following authentication process.
The next step of the authentication workflow is to register your app on the Symphony client using the Symphony Extension API. Registering your app requires the following frontend call to be performed in your application controller:
Parameter
Type
Description
Response:
Parameter
Type
Description
The next step in the authentication workflow is to:
validate the App Token JWT returned from the backend API call in step 2
validate the Symphony JWT Token that was passed to you through the frontend against the JWT Symphony JWT Token previously attained from executing the backend API call shown in step 2.
While the implementation of this token validation is up to the developer, a sample implementation of both app token and symphony token validation is provided out of the box by the BDK. In this sample implementation, the app frontend sends both the App Token and Symphony Token to the backend where it verifies that the token pair exists in the token cache.
At this point, your app is fully authenticated and has established a bi-directional trust between itself and the Symphony client.
Once you have successfully authenticated and validated your tokens, you can obtain user data through the Extension API:
The Extension API provides an extended-user-info service that contains a getJwt() method. In order to leverage this method, your app must first subscribe to the extended-user-info service:
Once subscribed, you app can leverage the getJwt() method as follows:
This method returns a base-64 encoded JWT token for the user in context, containing the following data when decoded:
At this point, your authenticated app has access to sensitive user data such as the Symphony user ID, username, email address, displayName, company, location, etc. Extension apps can leverage this user data in order to create user-specific workflows and automations.
If you wish to take this a step further, your app can take the JWT returned in the last step and perform authentication on behalf of (OBO) the user in context. If you wish you learn more about OBO authentication and OBO enabled workflows, continue here:
To learn how to properly configure and authenticate your extension app using the BDK, complete the following configuration tutorial:
The Symphony Messaging datafeed provides a stream of real-time messages and events for all conversations that a bot is a member of. Any event that occurs within a bot's scope will be captured and delivered to the bot by the datafeed. The datafeed forms the basis of all interactive and conversational bot workflows as it allows bots to directly respond to Symphony Messaging messages and events.
Symphony Messaging provides a Datafeed API that allows bots to easily and datafeeds.
Once a bot has created a datafeed, it has access to all of the within its scope, acting as a secure channel between a bot and all activity happening in the Symphony Messaging Pod. Additionally, all messages and events within a bot's scope are encrypted by the Agent before reaching your bot. That way the bot is the only one who can access the contents of these events and messages being delivered.
The following illustrates the relationship between your bot, datafeed, and Symphony Messaging's components:
Masked Text Field
see Text Field for more information
The masked text input is a single-line plain text editor control in which the text is masked by replacing each character with a dot (•) symbol, providing a way for the user to enter data without people over their shoulder being able to see what they are entering.
Use the maxlength and minlength attributes to specify the maximum and minimum length of the value that can be entered.
Text Area
The textarea element is a field for multi-line text input, allowing users to edit multiple lines of plain text. Text areas are useful to collect or edit runs of text like messages, opinions, reviews, articles, etc.
Person Selector
The Person Selector is an element used for finding and selecting people. Person Selectors are used in many places within Symphony, so you should be familiar with how they work.
When a user types the person's name, a drop-down will be displayed with the results found for the data the user entered. The following example shows how three people with the same name (Vincent) have been found.
country-code
operational-mic
String or Object
Either the title of the left navigation item as a string or an object with the keys title and icon where the value of title is a string and the value of icon is the url of a square SVG (recommended), or the url of a square png/jpg image. Recommended size is 32x32.
serviceName
String
The name of a local service implemented by your application that will be invoked when a user action is performed relating to the application navigation
Integer
The new badge count number. Specifying 0 will hide the badge count.
String or Object
Either the title of the left navigation item as a string or an object with the keys title and icon where the value of title is a string and the value of icon is the url of a square SVG (recommended), or the url of a square png/jpg image. Recommended size is 32x32.
servicesSent
Array of Strings
A list of names of local services that your application wants to make available remotely
appToken
string
Token generated by the application.
authToken
string
A JWT containing the caller's username and an expiration date, signed by the caller's private key.
appData
Object
Object containing both your appID and your app token.
servicesWanted
Array of Strings
Registration Promise
Object
Object containing both your appID and Symphony JWT Token
Request Body
3. Register your App
4. Validate Tokens returned by Symphony Frontend
5. Obtain User Identity
Deprecated Field
The username field has been changed in version 1.55.3, it now returns <email address> instead of <Symphony username>. Please note that this change has been done to help the transition for Applications that were relying on the username field and that the username field will be entirely removed in an upcoming version.
Known Issue
Currently, calling getJwt() without having completed the application authentication sequence will return Undefined. We will be addressing this in an upcoming release so that userReferenceId will correctly be returned if application authentication has not been completed. In the interim, userReferenceId can still be obtained from the Register and Connect methods.
{
"aud" : "<id of app>",
"iss" : "Symphony Communication Services LLC.",
"sub" : "<Symphony user ID>",
"exp" : "<expiration date in millis>",
"user" : {
"id" : "<Symphony user ID>",
"emailAddress" : "<email address>",
"username" : "<email address>",
"firstName" : "<first name>",
"lastName" : "<last name>",
"displayName" : "<display name>",
"title" : "<title>",
"company" : "<company>",
"companyId" : "<company (pod) ID>",
"location" : "<location>",
"avatarUrl" : "<URL for user's avatar>",
"avatarSmallUrl" : "<URL for user's small avatar>"
}
}
Bot creates datafeed via Symphony Messaging’s REST API
Agent creates secure upstream connection with the Symphony Messaging Pod
End user sends a message to a bot in a chatroom
Pod delivers ‘MESSAGESENT’ event to Agent
Bot reads datafeed via REST API
Agent delivers ‘MESSAGESENT’ event payload to the Bot
Events are delivered to your bot via the datafeed as JSON objects. Each type of Symphony Messaging event corresponds to a different JSON payload.
For example, if a user sends your bot a message, an event of type 'MESSAGESENT' will be delivered to your bot through the datafeed:
Notice how each event returned by the datafeed has important metadata and attributes such as messageId, timestamp, (event) type, initiator, as well as the contents of the message itself inside of the payload object. Additionally, you can find the streamID corresponding to the message and also information regarding externalRecipients.
For a full list of the JSON payloads corresponding to each event type, continue here:
The BDK (Bot Developer Kit) comes bootstrapped with a DatafeedEventService class that handles all of the logic for creating/reading datafeeds via the API, has best practices for maintaining datafeeds, and also provides event handling architecture that makes it easy to orchestrate complex workflows and introduce custom business logic to your bot.
As a bot developer, all you have to do is to implement generic EventHandler classes, passing in a given event type as the type parameter for that class.
After the DatafeedEventService creates/reads from the datafeed API, it categorizes each event based on its event type seen above, and dispatches the event downstream to a generic event handler class. For example, If a user sends a message to bot inside a chatroom, the event will be read by the datafeed, and dispatched downstream to the EventHandler class that that takes MessageEvent in as a type parameter. Further the handle() method belonging to your EventHandler class will be called each type that event type is read by the datafeed.
The following diagram shows the event handling workflow:
Bot creates datafeed via Symphony Messaging’s REST API
Agent creates secure upstream connection with the Symphony Messaging Pod
End user sends a message to a bot in a chatroom
Pod delivers ‘MESSAGESENT’ event to Agent
Bot reads datafeed via REST API
Agent delivers ‘MESSAGESENT’ event payload to the Bot
Bot routes event to appropriate event listener/handler
Inside of onMessageSent() is where you implement your own business logic such as accessing a database, connecting to an external API, or reply back to your user by leveraging the Symphony Messaging API/BDK methods:
public class Example {
public static void main(String[] args) {
// create bdk entry point
final SymphonyBdk bdk = new SymphonyBdk(loadFromClasspath("/config.yaml"));
// create listener to be subscribed
final RealTimeEventListener listener = new RealTimeEventListener() {
@Override
public void onMessageSent(V4Initiator initiator, V4MessageSent event) {
log.info("Message sent");
}
};
// subscribe a listener
bdk.datafeed().subscribe(listener);
// start reading the datafeed
bdk.datafeed().start();
}
}
from symphony.bdk.core.config.loader import BdkConfigLoader
from symphony.bdk.core.symphony_bdk import SymphonyBdk
from symphony.bdk.core.service.datafeed.real_time_event_listener import RealTimeEventListener
class RealTimeEventListenerImpl(RealTimeEventListener):
async def on_message_sent(self, initiator, event):
# message received, interact with it
pass
async def run():
async with SymphonyBdk(BdkConfigLoader.load_from_symphony_dir("config.yaml")) as bdk:
datafeed_loop = bdk.datafeed()
# subscribe your listener
datafeed_loop.subscribe(RealTimeEventListenerImpl())
# start reading the datafeed
await datafeed_loop.start()
As you can see, the datafeed acts as the backbone of your Bot. In many cases your Bot will be waiting for events to come in through the datafeed, which it constantly 'reads'. When an event or message comes through the datafeed, your bot will 'listen' for the event, extract the relevant data from the JSON payload and kick off its intended workflow.
While you can write all of this datafeed logic yourself, our dedicated BDK toolkits provide out-of-the-box datafeed support and event handling logic making it easy to bootstrap your bot and add custom business logic.
The legacy agent/v4/datafeed API, also known as Datafeed 1, is out of support since April 30, 2023 and is replaced by the /agent/v5/datafeeds APIs.
To facilitate this transition, a datafeedbridge has been introduced in June 2022 in the API Agent so consumers of the deprecated APIs keep a functioning service. This bridge is however deprecated and will no longer function starting in March 2026.
As a result you are required to migrate your bots to the new /agent/v5/datafeeds. If you use the BDK in Java or Python, the migration between v4 and v5 is requires a simple configuration change. We advise you to take this opportunity to migrate your bots to the BDK if you haven’t done so.
If you are not using the Symphony BDK, migrating requires changes in your code, as the endpoints are different. The mapping of the API endpoints between the two versions is the following:
Path /agent/v4/datafeed (deprecated)
Via a POST on the endpoint /agent/v4/datafeed/create, the datafeed is created and then the ID is persisted in a file, which is by default datafeed.id on the bot side
The bot subscribes to this ID to retrieve datafeed events; if it cannot be retrieved by using this ID, a new datafeed is created
Via a GET on the endpoint /agent/v4/datafeed/{id}/read, the list of events within the specific datafeed identified with {id} is returned
Deleting a datafeed is not supported
Path /agent/v5/datafeeds
Via a GET on the endpoint , is returned the list of already created IDs for a service account
Via a POST on the endpoint , the datafeed is created and the ID is not persisted on the bot side → Even if the bot is stale, a GET on the same endpoint will retrieve the ID to which the service account is subscribed
Deprecation Notice v4/datafeed(known as Datafeed 1)
The legacy Datafeed 1 service is not supported since April 30, 2023. The datafeed bridge, introduced for service continuation, will stop working in March 2026. More information on the changes required is available below.
Please reach out to your Technical Account Manager or to the Support team for more information.
Specifies a short hint that describes the expected value of the input field.
required
Boolean
No
If true, it specifies that the input field must be filled out before submitting the form. Accepted values; true and false.
masked
Boolean
Yes
In case you want to include a text field with masked characters [hidden by asterisk (*) symbols] , you must set maskedas true. If true, it creates a masked text field with hide/show options.
maxlength
Integer
No
The maxlength attribute allows you to specify a maximum number of characters that the user can input.
minlength
Integer
No
The minlength attribute allows you to specify a minimum number of characters that the user can input.
pattern
String
No
Regex String to match for input validation
pattern-error-message
String
No
Error message returned to user if pattern parameter matches user input
title
It accepts a simple text and \n for line breaks
No
The description that will be displayed when clicking the tooltip icon located on top of the Masked Text Field Element. Max length: 256 characters. Available from Symphony v20.8 and above.
label
String
Not required but it is recommended if title is defined
Definition of the label that will be displayed on top of the Masked Text Field Element. Available from Symphony v20.8 and above.
With Symphony v20.6, bot developers can use Regex to validate text fields and text areas using the pattern and pattern-error-message attributes.
For more information and examples, refer to Regular Expressions - Regex.
The masked text field has a max number of 128 characters.
The masked text field must be a self-closing tag or have no children.
The masked text field is a feature that only hides the content in the UI. Even though it is masked in the UI, the text will be submitted in clear and processed & encrypted the same way as any other text entered in Symphony.
Compliance Officers have access to the content of the masked text field.
The following examples show masked text-fields being used as follows:
The first masked text-field (init) shows how to display a default text ("With initial value"). Note that the default text would have been sent to the payload if it had not been deleted before submitting the form.
The second masked text-field (placeholder) shows how a placeholder text ("Only Placeholder") is displayed in the UI. Please note the placeholder text is not masked nor sent in the payload if no text has been entered in the field by the enduser.
The third masked text-field (noreq) shows how a user can interact with a non-required field. Even if the field is empty (only a placeholder text is present but does not count as a value), it does not prevent the enduser from submitting the form.
The fourth masked text-field (req) shows the behaviour of the unique required field of the form, which cannot be submitted in case it is not filled; an error is displayed under the field in case the user submits the form with this empty field.
The fifth masked text-field (regex) shows the behaviour of the field when a regex pattern is entered. You can note that the pattern-error-message is displayed under the field if the input does not follow the pattern required by the bot developer.
The sixth masked text-field (min) shows how to force users to enter an input with a minimum number of characters, and how an error message is displayed under the field if the input does not respect the minlength required.
The seventh masked text-field (label) shows how a label text ("My Label") is displayed.
The eighth masked text-field (tooltip) shows how a title text ("My Tooltip/n With a second line") is inserted in the UI under the (i) icon, and how the text entered in the title parameter is displayed when the enduser clicks on the icon.
Specifies a short hint that describes the expected value of the text area.
required
Boolean
No
If true, it specifies that the text area must be filled out before submitting the form. Accepted values; true and false.
pattern
String
No
Regex String to match for input validation
pattern-error-message
String
No
Error message returned to user if pattern parameter matches user input
title
It accepts a simple text and \n for line breaks
No
The description that will be displayed when clicking the tooltip icon located on top of the Masked Text Field Element. Max length: 256 characters. Available from Symphony v20.8 and above.
label
String
Not required but it is recommended if title is defined
Definition of the label that will be displayed on top of the Masked Text Field Element. Available from Symphony v20.8 and above.
rows
Number
No
Specify the number of rows (height) of the text area that will be displayed by default.
cols
Number
No
Specify the number of columns (width) of the text area that will be displayed by default.
With Symphony v20.6, bot developers can use Regex to validate text fields and text areas using the pattern and pattern-error-message attributes.
For more information and examples, refer to Regular Expressions - Regex.
The text field must be a self-closing tag or have no children.
You can add a default text in your text area by including it between the <textarea></textarea> tags. Note that unlike the placeholder text, the default text will be sent with the form if not edited by the user. Refer to Examples for more information.
The following example shows two textareas being used as follows:
The first textarea (id1) shows how to display a default text ("With initial value"). Note that the default text would have been sent to the payload if it had not been deleted before submitting the form.
The second text-field (req) shows how a placeholder text ("Required, with a placeholder, a regex, a label, and a tooltip") is displayed in the UI. Please note the placeholder text is not sent in the payload if no text has been entered in the field by the enduser. It shows as well the behaviour of a required textarea in a form, which cannot be submitted in case it is not filled; an error is displayed under the textarea in case the user submits the form with this empty field. The textarea presents how a label text ("My Label") as well as a title text ("My Tooltip/n With a second line") are displayed in the UI. Finally, it shows how users can interact with a regex pattern which does not allow the form to be submitted if the input does not follow the pattern required by the bot developer.
<messageML>
<form id="form_id">
<h2>textareas</h2>
<textarea name="id1" >With initial value</textarea>
<textarea name="req" required="true" label="My label" title="My title\nWith second line" pattern="^[a-zA-Z]{3,3}$" pattern-error-message="My error message - must contain exactly 3 letters" placeholder="Required, with a placeholder, a regex, a label, and a tooltip"></textarea>
<button name="textarea">Submit</button>
</form>
</messageML>
Specifies a short hint that describes the expected value of the input field.
required
Boolean
No
If true, it specifies that the person selector must be filled out before submitting the form, which means that at least one person must be "selected" Accepted values; true and false.
title
It accepts a simple text and \n for line breaks
No
The description that will be displayed when clicking the tooltip icon located on top of the Element. Max length: 256 characters.
label
String
Not required but it is recommended if title is defined
Definition of the label that will be displayed on top of the Masked Text Field Element.
value
Array of
long
No
Default value that will be preselected in the person-selector when the user receive the form from the bot.
The Person Selector element supports multi-user selection which means that you can search for more than one person using the same selector.
The following examples show person selectors being used as follows:
The first person-selector (placeholder) shows how a placeholder text ("My Placeholder") is displayed in the UI. Please note the placeholder text is not sent in the payload if no option from the dropdown menu has been selected by the enduser.
The second person-selector (placeholder) shows how the bot can introduce a default value in the person selector. It shows as well how a Symphony user can interact with the clear all functionality.
The third person-selector (noreq) shows how a user can interact with a non-required field. Even if nobody is selected by the user, it does not prevent the enduser from submitting the form.
The fourth person-selector (req) shows the behaviour of the unique required field of the form, which cannot be submitted in case nobody from the person selector is selected by the user; an error is displayed under the field in case the user submits the form with this empty field. An auto-filtering behaviour allows the user to see less options as he digits some input. Also, it shows how Symphony users can remove some of the selected users with the cross associated to that specific user.
The fifth person-selector (label) shows how a label text ("My Label") is displayed.
The sixth person-selector (tooltip) shows how a title text ("My Tooltip/n With a second line") is inserted in the UI under the (i) icon, and how the text entered in the title parameter is displayed when the enduser clicks on the icon.
The result returned by the datafeed for the selected users is an array of user Ids, which is an array of long.
Versions and Compatibility
type
String
No.
Default:action
Indicates whether the button is an action button or a reset button. When clicked, the action button sends the form information to the datafeed. On the other hand, the reset button resets the form-data to its initial values.
Accepted values: action and reset.
class
String
No.
Default: primary
Toggle between new palette of colors: primary, secondary, destructive, primary-link, tertiary and destructive-link.
icon
String
No
Adds an icon before the button name. Only icons from our UI Toolkit list are supported. Each icon is identified by its name.
formnovalidate
Boolean
No.
Default: False
Indicates if this submit button bypasses the form validation (required fields and regular expressions). This can be useful in some situations such as "Cancel" buttons that user should still be able to click even if other form is not in a valid state.
Reset features behaviour is to show back the initial value of the form
2.55.9
Since first version
Since first version
New styles:
• New designs for the buttons
• Styles primary destructive and secondary destructive are deprecated
• Styles tertiary and destructive are introduced
20.6
Since first version
Since first version
New styles: primary-link and destructive-link
Support for icons.
23.11
23.12
Supported
formnovalidate
25.6
25.9
Not supported yet.
Getting Started with BDK
The Bot Developer Kit (BDK) is the preferred tooling for Java or Python developers to get started building bots on Symphony Messaging.
Generate your Bot
The Symphony Messaging Generator offers a fast way to bootstrap your Symphony Messaging BDK project in Java and Python.
Prerequisite: Install NodeJS first, either or via
First, install yeoman and the Symphony Messaging Generator. Then, create a directory for your new bot project. Finally, launch the generator.
$ npm i -g yo @finos/generator-symphony
$ mkdir my-bot && cd $_
$ yo @finos/symphony
This will prompt you with a number of questions about your bot and pod configuration. Type in your bot's information, using arrow keys to scroll and press enter to move on to the next prompt.
When prompted for Select your type of application, choose Bot Application.
The Symphony Messaging Generator creates a basic configuration file that works for fully cloud-hosted pods. If you have additional network requirements like a web proxy or an on-premise Key Manager and API Agent, refer to the complete configuration guide below for more details.
For any bot to work, it requires a service account with a matching username and public key. The Symphony Messaging Generator creates a configuration file based on the answers supplied, including the bot username and the path to the generated key pair. These can be changed by modifying the config.yaml file. If you do not already have a service account set up, follow the instructions on this page to continue.
Open the project in your preferred IDE and use the IDE's launch/debug feature to start the bot. Alternatively, continue using the command-line to launch the bot using the appropriate command.
The bot should start up successfully and the following log indicates that it is up and listening:
[main] INFO com.symphony.bdk.core.service.datafeed.impl.DatafeedLoopV2 - Start reading events from datafeed
Now that you have a basic bot project ready, you can proceed to find out more about building bots using the respective kits:
Application Manifest Bundle
Each application's metadata is represented by a manifest file called bundle.json. You must create a manifest file for your application and submit it to either your pod administrator for internal apps, or Symphony for apps meant for the public marketplace.
To create and upload a file:
Create the manifest file that your application requires.
Upload the manifest file to Symphony: drag and drop the file into the application creation window of the administrative portal.
The following bundle file is only applied for Developer Mode. Note that it is an array of apps, allowing you to load multiple apps at once.
The table describes the required and additional optional fields.
Service Interface
Both the Client Extensions API services and your application services use the same interface. The service interface consists of the following methods:
Create a method on a service and specify the implementation.
Alternately, create several methods on a service at once by specifying an object consisting of multiple functions:
Call a method on a service. Any extra parameters passed to this method will be sent as arguments to the service method:
Fire an event from a service. Any extra parameters passed to this method will be passed to the callbacks defined by services that listen to this event:
Subscribe a service to an event that is fired by another service (or itself). This method returns a handle that can later be used to remove the listener:
Unsubscribe a service from an event:
Entity Service
Use the entity service to allow your app to render a Structured Object created by the REST API within a message:
var entityService = SYMPHONY.services.subscribe("entity");
The following methods are available on the entity service:
You must implement the render() method on the specified application service. This method will be invoked when the associated entity is rendered in the Symphony client.
Renders an entity given its type and data values:
The render method returns an object with the following fields:
Effectively re-renders an entity with new template and data objects given its entityInstanceId:
The 'pause' and 'resume' methods are optional. If you choose to use the methods, implement them on the renderer service. These methods will be invoked when the associated entity is rendered in the Symphony client.
Entities are checked periodically (every two seconds) if they are visible on the screen.
If an entity is completely visible, a resume event is triggered to the renderer service of this entity. If an entity is partially visible or completely hidden, a pause event is triggered instead.
Example:
• Pause event: responsible for stopping/pausing a video transmission (video iframe).
• Resume event: responsible for playing the video.
In addition to tags, iframe tags are also supported in the template parameter:
The BDK is a library of tools and intelligent API bindings that provides an ultra simplified configuration and authentication setup, intuitive message and room management, customizable message templating, and a new activities API that makes it easy to facilitate bot workflows. The BDK and bot project generated by the Symphony Messaging Generator makes it super easy to get started!
To begin let's open up the code generated for you by the Symphony Messaging Generator in your favorite IDE. Navigate to the BotApplication.java file:
Let's take a closer look at the code responsible for sending Symphony Messaging Elements in our BotApplication.java:
// Register a "slash" activity
bdk.activities().register(slash("/gif", false, context -> {
Template template = bdk.messages().templates().newTemplateFromClasspath("/templates/gif.ftl");
bdk.messages().send(context.getStreamId(), Message.builder().template(template).build());
}));
// Register a "formReply" activity that handles the Gif category form submission
bdk.activities().register(new GifFormActivity(bdk.messages()));
Here we are using the Activities API to register a new slash command that listens to "/gif". To learn more about creating your own slash commands or how to leverage the Activities API, continue here. If an incoming message contains ("/gif), the bot builds a new message template which is provided out of the box for you:
The above freemarker template contains messageML that represents a Symphony Messaging Element. To learn more about Symphony Messaging Elements, continue . When a message is sent to the bot containing "/gif" the following Symphony Messaging Element is sent to the user in the conversation or stream in context:
Bots need someway to capture the data submitted within this form. Bots can easily do so by registering a new type of Activity class:
Open up your GifFormActivity class. Here you will see that GifFormActivity extends the FormReplyActivity class. A form activity is only triggered when an end-user replies or submits an Elements form. To learn more about creating your own FormReplyActivity classes, continue .
Inside of the GifFormActivity class you will see an ActivityMatcher matcher() method:
Using the context variable, your bot can access information about the context of the form submission including the form values and the form Id. To learn more about using FormReplyActivities, continue .
Inside of the matcher() function, the bot is performing a validation check. If the formId of the submitted form is equal to "gif-category-form", then the bot calls the onActivity() trigger function and executes its business logic. If there is not a match, the bot does nothing and continues to listen for incoming events. As we see in our gif.ftl template above, the formId matches, so the following onActivity() trigger function executed:
Run your bot and execute the following to see it in action:
Above, we showed you a simple example of how to leverage the BDK and Symphony Messaging Elements to build an interactive bot. To understand more advanced usage of the BDK, continue on to our dedicated BDK Certification course:
Build a Headless Bot
Prerequisites
Complete the Getting Started guide:
Note that for this tutorial, we've configured our bot project using the Spring Boot integration provided out of the box by the BDK. When generating your bot using the Symphony Messaging Generator, simply select 'Spring Boot' when prompted to 'Select Your Framework'.
The BDK is a library of tools and intelligent API bindings that provides an ultra simplified configuration and authentication setup, intuitive message and room management, customizable message templating, and a new activities API that makes it easy to facilitate bot workflows. The BDK and bot project generated by the Symphony Messaging Generator makes it super easy to get started!
To begin let's open up the code generated for you by the Symphony Messaging Generator in your favorite IDE. Navigate to the BotApplication.java file:
Notice how our BotApplication class is very simple. The idea is you have Component classes (annotated by @Component) that do the bulk of the work (see the generated GifSlashHandler , GifFormActivity, and OnUserJoinedRoomListener classes) while the main entry point is meant to really simple. The initialization of your bot project and auto-wiring of your beans (component classes) is taken care of by the BDK Spring Boot stater through the @SpringBootApplication annotation.
The following Component class, for example, is provided out of the box by the BDK and Symphony Messaging Generator:
To learn more about the BDK's Spring Boot Integration continue or to our dedicated BDK Developer Certification course where you will learn in depth about how to build bots using the BDK and Spring Boot:
For our headless bot workflow, we will create a RESTful Web Service that is able to handle HTTP GET/POST requests and read its JSON body payloads. Creating and bootstrapping our RESTful service is super easy since our bot application is already an integrated Spring Boot project. To get started, lets define a simple RestController class for our bot:
Here we annotate our class with the @RestControllerannotation, and use the @GetMapping annotation to map the HTTP GET request from our base path to a specific handler method, index().
Go ahead and start your bot application, and navigate to in a web browser of you choice. You should see the following displayed in your browser:
Now that we have a basic RESTful service setup, let's add some Symphony Messaging specific functionality. Specifically, let's create another handler method that handles the following POST request and sends a message into a specific conversation or stream:
To create this handler method, let's add to our existing HelloController class:
Line 11: Inject the BDK's provided MessageService (this is the equivalent as bdk.messages())
Line 13-15: Initialize HelloController with an instance of MessageService.
The postNotificationMessage() handler expects a streamId path parameter and also a Notification (message) as a part of the request body.
Now the only missing detail here is that we do not have the Notification Java class into which the incoming JSON will be mapped by Spring Framework's @RequestBody annotation. To do so, create the following POJO:
Now, Spring will create an instance of Notification Java class, and will set object properties with the values specified in the JSON body.
Run your bot once more and identify a streamID to use.
Send the following POST request using either curl or postman:
You should see the following in your designated stream or chatroom:
Above, we showed you how to leverage the BDK and the Spring Boot integration to build a headless bot. To see more advanced usage of the BDK and Spring Boot, continue on to our dedicated BDK Developer Certification course:
Elements Interactive Forms
Symphony Messaging Elements Forms enable bots to send messages that contain interactive forms with pre-designed text fields, dropdown menus, person selectors, buttons and more. This allows bots to interact with users in a very easy and guided way.
By reusing our pre-designed standard UX component libraries, Elements provide developers with out-of-the-box tools to easily create interactive bot messages that look and feel like they belong in Symphony Messaging. To use the Elements, you just need to call the endpoint with your bot, using the MessageML format.
Here after, you will find a brief introduction of how to send Elements, then an update of the message flow for Elements, and finally the form specifications.
To start using Symphony Messaging Elements, you first need to create a form element using the <form> MessageML tag. The form element can be considered the "frame" of a message, containing elements that will be sent by the bot and subsequently read by the datafeed.
Table Select
The Table Select is not an Element itself but an example of what can be achieved by using Elements with the templates. This way, it is possible to build tables which contain a special column that allows users to select one or more rows, either with the or the Element.
The following image shows three different tables. The first table shows the use of checkboxes to select rows, positioned to the right side of the table. The second example also shows checkboxes, but they are positioned to the left side. The last table shows buttons positioned to the right.
The following example shows how to create a Table Select structure using the template and a JSON file.
In the JSON data, you can configure the type of the Element that will be added to the Table Select and its position
Modules Service
A module is a new window inside the Symphony client workspace, such as a chatroom or an instant message. Use the modules service to create application-specific modules.
The following methods are available on the modules service:
UI Service
Use the ui service to extend various parts of the Symphony client user interface. For example, add buttons on IM (1-1 chat) and chatroom modules or add links to the #hashtag and $cashtag hovercards:
Extension apps can receive stream participant information when an end user clicks on a button added by the app. For more information, refer to .
The following methods are available on the ui service:
openIMbyStreamID
AI agent studio
This page describes how to create your first agent using the AI agent studio. Before you begin, the following prerequisites must be met:
Symphony has enabled AI Agent Studio for your tenant.
Your admin has installed AI Agent Studio for your user.
To start creating your own AI agent, click the Create agent button in AI Agent Studio.
Message Format - ExtensionML
ExtensionML is a special form of markup that a front end app can use to perform custom rendering of an entity, instead of relying on Symphony to perform the default presentation.
ExtensionML is generated from a given entity and emitted by a built-in or third-party renderer. It is similar to but is used for interactive presentation.
While similar to PresentationML, ExtensionML consists of a template and corresponding data. Each tag in the template can have an ID that references a value stored in the data, binding the data to whatever is being rendered. For example, multiple paragraphs in the template can reference a sentence stored in the data by ID, allowing for reuse of that sentence in multiple places within the template being rendered.
A number of standard HTML tags are supported within templates: b, u, i
The function that will be called when the event is fired
The handle returned by the call to listen
Parameter
Type
Description
methodName
String
The name of the method to create on your service
implementation
Parameters
Type
Description
implementations
Object
An object containing one or more functions to create on this service, where the keys are the names of the functions and the values are the implementations
Parameters
Type
Description
methodName
String
The name of the method to call on the service
Parameters
Type
Description
eventName
String
The name of the event to fire
Parameters
Type
Description
eventName
String
The name of the event to listen for
callback
Parameters
Type
Description
eventName
String
The name of the event to unsubscribe from
handle
implement()
invoke()
fire()
listen()
The listen namespace is the same as the namespace for methods, thus names must be unique across both service methods and events.
__ __ ___ _
\ \ / /__ / __|_ _ _ __ _ __| |_ ___ _ _ _ _
\ V / _ \ \__ \ || | ' \| '_ \ ' \/ _ \ ' \ || |
|_|\___/ |___/\_, |_|_|_| .__/_||_\___/_||_\_, |
|__/ |_| |__/
Welcome to Symphony Generator v2.7.1
Application files will be generated in folder: /home/user/code/my-bot
______________________________________________________________________________________________________
? Enter your pod host mycompany.symphony.com
? Enter your bot username my-bot
? Select your type of application Bot Application
? Select your programing language Python
Generating RSA keys...
create rsa/publickey.pem
create rsa/privatekey.pem
create requirements.txt
create resources/logging.conf
create .gitignore
create readme.md
create resources/config.yaml
create resources/gif.jinja2
create src/__main__.py
create src/activities.py
create src/gif_activities.py
No change to package.json was detected. No package manager install will be executed.
You can now update the service account my-bot with the following public key:
-----BEGIN RSA PUBLIC KEY-----
MIICCgKCAgEA059e0WKgmDVyazFxszs0Xty17iLemhyIrghwfn9XGEwvK40q/dE0
...
ST7yvzUeAy5Xkhad6ySvSviK9dt2Zl+FLVu3uwg1bMfMzXN2T44afp0CAwEAAQ==
-----END RSA PUBLIC KEY-----
Please submit these details to your pod administrator.
If you are a pod administrator, visit https://mycompany.symphony.com/admin-console
Your Python project has been successfully generated !
Install environment: python3 -m venv env
Activate virtual environment: source env/bin/activate
Install all required packages with: pip3 install -r requirements.txt
And run your bot with: python3 -m src
# Maven + No Framework
# Edit package and main class if changed
./mvnw exec:java -Dexec.mainClass=com.mycompany.bot.BotApplication
# Maven + Spring
./mvnw spring-boot:run
# Gradle + No Framework
./gradlew run
# Gradle + Spring
./gradlew bootRun
# For the first run, create a virtual environment and install requirements
python3 -m venv env
pip3 install -r requirements.txt
# For subsequent runs,
source env/bin/activate # macOS or Linux
env\Scripts\activate.bat # Windows
# Run the bot
python3 -m src
function implement(methodName, implementation)
var helloAppService = SYMPHONY.services.register("hello:app");
helloAppService.implement("helloWorld", function() {
console.log("Hello World!");
});
var helloAppService = SYMPHONY.services.register("hello:app");
helloAppService.fire('myEvent');
function listen(eventName, callback)
var uiService = SYMPHONY.services.subscribe("ui");
// themeChangeV2 is an event fired by the UI service when the user changes his theme or font. The themeV2 object which contains the theme name and font size is also passed along with the event.
uiService.listen("themeChangeV2", function() {
themeColor = data.themeV2.name;
themeSize = data.themeV2.size;
console.log("The user changed his theme color to " + themeColor " and font size to " + themeSize ".");
});
function remove(eventName, handle)
var uiService = SYMPHONY.services.subscribe("ui");
// themeChangeV2 is an event fired by the UI service when the user changes his theme or font. The themeV2 object which contains the theme name and font size is also passed along with the event.
var handle = uiService.listen("themeChangeV2", function() {
themeColor = data.themeV2.name;
themeSize = data.themeV2.size;
// Styling is achieved by specifying the appropriate classes on the app module's body element.
document.body.className = "symphony-external-app " + themeColor + " " + themeSize;
console.log("The user changed his theme color to " + themeColor " and font size to " + themeSize ".");
});
uiService.remove("themeChangeV2", handle);
Via a POST on the endpoint with a parameter ackId (empty string at the first query), the endpoint returns: the list of events, a new ackId string → This ackId permits acknowledgement of the last query and retrieve all events since the last one. All events received between the last payload and the new request are queued and therefore retrieved.
Via a DELETE on , the datafeed specified with the {id} is deleted.
/agent/v5/datafeeds
/agent/v5/datafeeds
name
The name of your app, which will be displayed in the Symphony Market.
Required
String
description
The description of your app, which will be displayed in the Symphony Market.
Optional
String
publisher
The publisher of your app, which will be displayed in the Symphony Market.
Optional
String
loadUrl
The location of the app's controller, which will be displayed in a hidden iframe. Value must start with https://.
Note: Do not specify this value for On Behalf Of (OBO) applications.
Required, except for OBO applications
URI
domain
The domain for your app, which should match the controller file URL.
Required
URI
iconUrl
An icon for your app (32x32 px), which will be displayed in the Symphony Market.
Optional
URI
notification
Fields required in order to receive webhook callback containing pod information (ie. pod, authentication and Agent URLs).
Optional
Object
url
URL which the pod will call to send pod information to the application
Optional
String
apiKey
Secret key used to validate the pod when calling the notification URL.
Optional
String
permissions
List of permissions the application requires. See Permissions details for .
Optional
List
certificate
Certificate for the application. See
Optional
String
rsaKey
Applied for version 1.54 onwards. RSA key for the application. See
Optional
String
allowOrigins
The origin or origins that this application is allowed to receive cross-domain requests from.
For more information, see the AllowedOrigin description in .
Optional
URI
type
Applied for 1.52 and prior versions.This field should be set to sandbox, which indicates that this is a standalone app, embedded within Symphony's client.
Required
String
id
Applied for 1.52 and prior versions. The unique identifier for your app.
Note: Do not use a colon (:) in this field, or you will receive a 401 Unauthorized error.
Required
String
blurb
Applied for Developer Mode.
Field for display in the Symphony Market and Admin Portal.
Optional
String
icon
Applied for Developer Mode.
An icon for your app (32x32 px), which will be displayed in the Symphony Market.
Optional
String
{
"appGroupId": "testapplication",
"name": "Application name",
"description": "Enter the application description, as it will appear in the Symphony Market",
"publisher": "Symphony",
"loadUrl": "https://symphony.myapplication.com:4000/controller.html",
"domain": ".myapplication.com",
"iconUrl": "https://symphony.myapplication.com/icon.png",
"notification": {
"url": "https://symphony.myapplication.com:4000/podInfo",
"apiKey": "super-secret-key"
},
"permissions": [
"ACT_AS_USER",
"GET_BASIC_CONTACT_INFO",
"GET_PRESENCE"],
"certificate": "-----BEGIN CERTIFICATE-----\nMIICpTCCAY2gAwIBAgIBATANBgkqhk...sCPV2jH\n0hFUK5JHPrGO\n-----END CERTIFICATE-----\n",
"allowOrigins": "myapplication.com",
"rsaKey": "-----BEGIN PUBLIC KEY-----\nMIICIjANBgkqhkiG9w0BAQEFAAOCAg8AMIICCgKCAgEA1QGTGazbI/\n-----END PUBLIC KEY-----"
}
Applied for version 1.53 onwards. The unique identifier for your app. The ID must not match any existing app IDs or user names.
It consists of alphanumeric characters [0-9,A-Z, a-z], underscores (_), and dashes.
Note: Do not use a colon (:) in this field, or you will receive a 401 Unauthorized error.
Required
String
Application Manifest Bundle File Sample
AC Portal x Developer Mode
In the following examples, the bundle files are applied for the AC Portal. Note that they are different than the one applied for Developer Mode.
Fields details
{"applications": [{"type":"sandbox","id":"hello","name":"Hello World","blurb":"This is a hello world app with a few example extension API invocations!","publisher":"Symphony","url":"https://localhost:4000/controller.html","domain":"localhost","icon":"https://localhost:4000/icon.png"} ]}
Reserved for future use.
serviceName
String
The name of the application service that will be used to render this entity.
The data for the specific entity being rendered. This data is specified when the message is created.
An object containing the data referenced by the template. Described in .
entityInstanceId
String
A unique identifier used to reference a specific entity.
The updated string that specifies the object presentation.
data
Object
The data for the entity being updated
function registerRenderer(type, options, serviceName)
Parameter
Type
Description
type
String
The type of entity that will be rendered by your application. Entities are namespaced using reverse domain name notation, e.g. com.symphony.address.
options
render: function(type, data) {}
Parameter
Type
Description
type
String
The type of entity to be rendered.
data
Parameter
Type
Description
template
String
An ExtensionML string that specifies the object's presentation.
In addition to ExtensionML tags, iframe tags are also supported.
package com.symphony.java;
import com.symphony.bdk.core.activity.command.CommandContext;
import com.symphony.bdk.core.service.message.MessageService;
import com.symphony.bdk.core.service.message.model.Message;
import com.symphony.bdk.spring.annotation.Slash;
import com.symphony.bdk.template.api.Template;
import org.springframework.stereotype.Component;
@Component
public class GifSlashHandler {
private final MessageService messageService;
private final Template template;
public GifSlashHandler(MessageService messageService) {
this.messageService = messageService;
this.template = messageService.templates().newTemplateFromClasspath("/templates/gif.ftl");
}
@Slash(value = "/gif", mentionBot = false)
public void onSlashGif(CommandContext context) {
this.messageService.send(context.getStreamId(), Message.builder().template(this.template).build());
}
}
package com.symphony.java;
import com.symphony.bdk.gen.api.model.V4Message;
import org.springframework.web.bind.annotation.*;
import com.symphony.bdk.core.service.message.MessageService;
@RestController
public class HelloController {
@GetMapping("/")
public String index() {
return "Greetings from Spring Boot!";
}
}
To easily identify a streamID, create an IM conversation with your bot, and type a message. Click on the timestamp next to the sender or recipients username and copy the streamID presented in the side panel. For this exercise you must also encode your streamID.
StreamID before encoding: n6Xl9xAZpvsJdaVPSZq8h3///omhaFQfdA==
StreamID after encoding: n6Xl9xAZpvsJdaVPSZq8h3___omhaFQfdA
For more information on encoding your streamID, continue here.
You can see below an example of how a user can interact with a form that was sent by a bot, as well as the messageML structure of the message that was sent by the bot, and the payload that is generated and therefore delivered to the bot via the datafeed, containing the information completed and submitted by the user. Please use the tabs to navigate between these 3 documents.
To begin leveraging Symphony Messaging Elements in your bot workflows continue onto our Available Elements that you can find in the subpages.
Every message exists as part of a flow, in a continuum of events that results in user interaction.
Here is that flow in colorful diagram form, for you to know more about each stage of the message:
A Bot sends a message with Symphony Messaging Elements in a form
The message/from is visible to users. Users interact with the elements
Once submitted, the data is submitted to the bot
Bots can access the data, by reading the datafeed.
Forms are represented by the <form> tag, as you can see in the examples above.
Attribute
Type
Required?
Description
id
String
Yes
Identifies the form.
The form element can be considered the "frame" of a message, containing elements that will be sent by the bot and subsequently read by the datafeed.
To be considered valid, the form tag must contain at least one action type "Button" as a child. For more information, refer to Buttons.
All of the data within a form element will be sent to a bot via the datafeed when a user clicks one of the action buttons in that form. The name attribute of the button will be the value of the action field within the datafeed payload. That way the bot manager can know which button triggered the submission of that form. Starting with Agent 23.11, the auto-submit feature allows to submit the form with a TextField, or with a DropDown Menu.
If there is more than one element in the form having the same name attribute, the value is converted to an array. Every index of the array is related to a specific element value. The index order is not guaranteed, so the developer needs to iterate through this array and collect the values.
When a form is submitted and multi-submit attribute is not specified, all the elements within it will be disabled, not being possible to edit or resend the same form. However, if the page is refreshed, the user can fill out the form again and submit it as a new form.
The attribute multi-submit allows the us to submit the form several times even without needing to refresh the page. It can take 2 different string values:
reset which resets the form to the default value when enabling it again for the user,
When designing forms, it is important to consider the message size limit. For more information refer to
The following example shows three forms being used as follows:
The first form (default) shows how Symphony Messaging users interact with a form, and how the Elements are disabled once the form is submitted.
The second form (multi-submit-reset) shows how to create a form that can be submitted several times and which resets all its Elements to their default value once the user submits it. You note the Elements are first disabled while loading, then the button shows the user the form has been submitted, before the form is enabled back to its default value for the user to submit it again.
The third form (multi-submit-no-reset) shows how to create a form that can be submitted several times and which keeps last submitted values once the user submits it. You note the Elements are first disabled while loading, then the button shows the user the form has been submitted, before the form is enabled back to its last submitted value for the user to submit it again.
<messageML>
<form id="default">
<text-field name="test"> This form becomes disabled once submitted</text-field>
<button name="default">Submit</button>
</form>
<hr/>
<form id="multi-submit-reset" multi-submit="reset">
<text-field name="test" label="Resets values to default"> This form can be submitted more than once</text-field>
<button name="multi-submit-reset">Submit</button>
</form>
<hr/>
<form id="multi-submit-no-reset" multi-submit="no-reset">
<text-field name="test" label="Keeps last submitted values"> This form can be submitted more than once</text-field>
<button name="multi-submit-no-reset">Submit</button>
</form>
</messageML>
Once the user has submitted the form, it becomes disabled. However, if the conversation is reloaded, the form resets and the user is able to send a new reply. If your workflow requires a single reply per user, please implement this control on the Bot side.
Message Flow (for Forms)
Form specification
MessageML Tag
Attributes
Rules and Limitations
Examples
Versions and Compatibility
:
Attribute
Type
Required?
Description
type
String
Yes
The typeattribute determines if a table will display a special column with or within it. Note that a table can have only one of the two possible types, being button or checkbox. For more information, see the Example below.
In this example, the table type is set as button and the position is set as left.
Note that the FreeMarker template is being used to create the messageML that is rendering the Table.
A unique id for this module (must be unique across all modules of a given application)
Eithertitleor{title, icon}
Hide an existing application module:
Parameter
Type
Description
id
String
The id of the module that should be hidden.
Change the title of an existing application module:
Parameters
Type
Description
id
String
The id of the module for which the title should be changed
Eithertitleor{title, icon}
Focus an existing application module:
Parameter
Type
Description
id
String
The id of the module to focus
Opens a link from your application in a new tab in the user's default browser. This method should be used to open links, rather than <a href="..." target="_blank">...</a>.
Parameter
Type
Description
url
String
The URL to be opened
Reloads the content of the module at the new URL.
The Client Extensions API is designed for single-page applications. Use this method with multi-page applications to load new content when users navigate to another page:
Parameter
Type
Description
id
String
The unique identifier for the module. A module with this id must already exist.
url
// To use the modules service, you must subscribe to it from your application
var modulesService = SYMPHONY.services.subscribe("modules");
modulesService.setTitle("hello", "New Module Title");
function focus(id)
modulesService.focus("hello");
function openLink(url)
// This code will live in your application view.
// Assume there is a button element with id "link" on the application module
// If that button is clicked, open a Google link.
var linkButton = document.getElementById("link");
linkButton.addEventListener("click", function(){
modulesService.openLink("https://www.google.com");
});
Note that this only changes the title of a specific module, not all titles of all modules created by the application.
focus()
openLink()
redirect()
openIMbyUserIDs
registerExtension
unregisterExtension
The following events are fired by the ui service:
themeChangeV2
Open an existing conversation in a new module.
Released in version 20.10.
Parameter
Type
Possible Values
Description
streamID
String
The stream ID or conversation ID to be opened.
Open a conversation with one or more users in a new module.
Released in version 20.10.
Parameter
Type
Possible Values
Description
userIds
String[]
Array of userIds.
Add an action button to the Symphony user interface.
Action buttons are added to various places in the UI, such as in the header of chat modules, in #hashtag or $cashtag hovercards, on the profile of users and more.
Parameter
Type
Description
uiClass
String
The location within the Symphony application where the action button should be placed. Possible values:
- single-user-im : Button added to the header of 1-1 chats
- multi-user-im : Button added to the header of group chats
- room : Button added to the header of chatrooms
- hashtag : Link added to the hovercard that appears when hovering over a hashtag (e.g. #symphony)
- cashtag : Link added to the hovercard that appears when hovering over a cashtag (e.g. $GOOG)
- settings : Link added to detail card of the application in the Marketplace
- profile : Link added to the user profile page and profile hovercard
id
You must implement the trigger method on your application service in order to handle clicks on the registered action buttons:
Remove a previously registered action button.
This will remove all instances of a particular extension - for example, from all single chat modules or all #hashtag and $cashtag hovercards.
Parameter
Type
Possible Values
Description
uiClass
String
single-user-im
multi-user-im
room
The location within the Symphony application where the action button was registered.
This event is fired when the user's font size or theme is changed.
Use the listen method on this service to subscribe to this event and specify a callback that will be executed when the event is fired. The callback should change the styling of your application to match the user's new theme.
// To use the ui service, you must subscribe to it from your application
var uiService = SYMPHONY.services.subscribe("ui");
function registerExtension(uiClass, id, serviceName, options)
// The application service that will be used to handle clicks on UI extensions
var helloControllerService = SYMPHONY.services.register("hello:controller");
// The application service that will handle the filter on UI extensions
var helloFilterService = SYMPHONY.services.register("hello:filter");
// Displays a button in the header of 1-1 chats
uiService.registerExtension(
"single-user-im",
"hello-im",
"hello:controller",
{
label: "IM Button",
data: {"datetime": Date()}
}
);
// Implement the trigger method on your application service
helloControllerService.implement({
trigger: function(uiClass, id, payload, data) {
if (uiClass == "single-user-im") {
console.log('IM button was clicked on ' + data.datetime + '.');
}
var uiService = SYMPHONY.services.subscribe("ui");
uiService.listen("themeChangeV2", function() {
themeColor = data.themeV2.name;
themeSize = data.themeV2.size;
// Styling is achieved by specifying the appropriate classes on the app module's body element.
document.body.className = "symphony-external-app " + themeColor + " " + themeSize;
});
openIMbyStreamID()
openIMbyUserIDs()
registerExtension()
trigger()
unregisterExtension()
themeChangeV2 event
Essential information configures the AI agent's identity in Symphony. In particular:
Name: How the agent appears in Symphony's directory.
Ownership: The users who are entitled to modify this agent.
Visibility: Whether the agent appears in Symphony's marketplace, so that users can install it autonomously.
Models: Configures which model runs behind the scenes. Off the shelf, Symphony provides access to Google Gemini's supported models.
Creativity level: Controls the level of randomness in the AI agent's answers (maps to the underlying model's temperature / top-p settings).
Thinking: Allows the AI agent to reason step by step, and include that reasoning in its answer.
Coming soon: Connect AI agents from Agent Studio to your own AI provider or self-hosted models.
System instructions guide how the AI agent answers, and provide up-to-date, contextual information that always holds true when an agent is interacting with a user.
The following variables are supported in system instructions, giving the agent personalization context about who it's talking to and where the request came from:
Variable
Syntax
Resolves to
User display name
#{ #tools.v1.vars.userDisplayName() }
Display name of the user talking to the agent
User email
#{ #tools.v1.vars.userEmail() }
Email of the user talking to the agent
Here's an example system prompt for an AI agent:
Permissions control which actions the AI agent can take on behalf of the user. See for the full list of available permissions.
Agent Studio supports several tools out of the box that augment your AI agents with more sophisticated capabilities.
Lets an AI agent natively send a TradingView graph as an inline message in Symphony Messaging. The agent looks for a valid TradingView ticker based on the user's query and returns the appropriate graph. Supported graph types:
The Symphony charting tool lets the AI agent send charts directly in a Symphony Messaging chat room. Supported chart types:
Bar chart
Line chart
Multi-line chart
Pie chart
Bubble chart
This tool is especially useful for rendering financial data in combination with custom data sources integrated via custom MCP servers.
Standard tools that let the AI agent fetch information from the web.
Lets the AI agent use Symphony's MCP server to retrieve Symphony-specific information, send messages, or create chat rooms.
You can add and configure additional MCP servers for use by a given agent. AI Studio currently supports remote MCP servers authenticated via non-personal API key tokens only (OAuth and personal-token authentication are not yet supported).
First, a tenant administrator with the Connector manager role must create a new connection in the Symphony Messaging Admin Portal.
Create a new connector containing everything needed to connect to the remote MCP server via API key:
Type: Must be set to MCP server; sub-type can be set to custom.
Readers (by role): Set to "AI agent" if any AI agent should be able to use this MCP server.
Readers (by user): Set to specific AI agents if only a subset of agents should have access.
Some key value properties can be added to customize the connector behavior.
Key
Description
Value example
icon
Icon used for the MCP server.
Once created, MCP servers can be enabled per AI agent on the studio via the MCP server panel.
Predefined prompts let agent designers create repeatable workflows that users can easily discover and trigger. Predefined prompts support variables, so users can pass inputs to the prompt; Symphony's system variables (see the table above) can also be used inside predefined prompts.
Predefined prompts can be combined with the Symphony Messaging chat context: when both a chat context and a predefined prompt are passed to the agent, both are resolved and sent to the AI model together.
Users access predefined prompts by mentioning the AI agent directly in the AI agent room:
When a prompt template expects variables, Symphony Messaging automatically sends the user a form to fill in before processing starts.
This example creates an AI agent that adds two numbers.
Prompt template definition:
Predefined prompt using the variables above:
Create a new AI agent
Essential information
## Identity
You are **Sample agent**, a sample agent.
---
## Current User
You are speaking with:
- **Name:** #{ #tools.v1.vars.userDisplayName() }
- **Email:** #{ #tools.v1.vars.userEmail() }
- **User ID:** #{ #tools.v1.vars.userId() }
Refer to this user in the second person ("you"). Do not repeat their name or ID back unless directly relevant.
---
## Current Context
- **Stream ID:** #{ #tools.v1.vars.roomId() }
- **Timestamp:** #{ #tools.v1.vars.currentTimestamp() }
Use the stream ID when taking actions that require a target room or conversation. Use the timestamp to ground any time-sensitive reasoning (e.g. "this morning", "yesterday").
---
## Conversation Context
You may receive additional context from other Symphony conversations the user is involved in. Treat this as background information — use it to give more relevant and informed responses.
Context room Ids : #{ #tools.v1.vars.contextRoomIds() }
Add the two numbers {a} and {B}, then send a message containing only the result in this exact format:
A + B = result
Example:
Input: A = 3, B = 7
Output: 3 + 7 = 10
AI models
System instructions
Example
Permissions
To allow an AI agent to work with a user's specific chat context it must be granted with at least the following permissions:
Act as user
Get user messages
Symphony tools
TradingView
Charting
Webfetch & Websearch
Messaging (coming soon)
All actions performed via this tool are done by the AI agent on behalf of the user, inheriting the permissions set for the agent.
MCP servers
Add a non personal MCP server
Predefined prompts
Example
,
strong
,
br
,
ul
,
ol
,
li
,
span
,
div
,
table
,
th
,
tr
, and
td
.
These behave like their HTML counterparts but must be properly-formatted XML. So, for example, rather than <br> you must use <br/>.
The following tags present text in different ways. Most of these require data to specify their content, but some can also use the content between the opening and closing tags.
Tag
Description
Attributes
<formatted>
Adds text formatted with HTML markup. This must be properly formatted XML See for information on converting HTML to XHTML.
• id (Required): The key of a string within the template data.
<text>
The following HTML tags are handled in a slightly modified way:
Tag
Description
Attributes
<a>
Inserts a link.
• id (Optional): The tag must include either an id attribute or an href attribute. If id is specified, it must be a key to a string specifying the URL of the link. If no id attribute is specified, the href attribute is used.
<hr>
Tag
Description
Attributes
<mention>
Insert a mention.
• id (required): The key to an object with the following members:
- id: The unique ID of the user being mentioned.
- name: The pretty name that is displayed for the mentioned user.
<hashtag>
The following flow control tags are used for entities that have conditional logic or data that can be iterated upon:
Tag
Description
Attributes
<if>
Conditionally uses the enclosing template.
• id (required): The key to the data. If there is data at the specified key, the enclosing template is used; otherwise it is skipped.
<if:not-last>
The following example shows the XML template for an entity with flow control logic and corresponding data:
var data = {
"content" = {
"guildName": "Loyal Order of Water Buffalo",
"webpageLink": "https://www.waterbuffalo.net/bedrock",
"webpageName": "The Loyal Order of Water Buffalo, Bedrock Chapter",
"people": [{
"name": "Fred Flintstone",
"notes": "Yabba Dabba Dooooo!"
},
{
"name": "Barney Rubble",
"notes": "Fred's sidekick"
},
{
"name": "Dino",
"notes": "He's kind of like a dog, but also a small sauropod. Yaps a lot.<br/> Really odd, he spoke in his first appearance."
}]
}
}
Text Tags
Extended HTML Tags
Special Entity Tags
Flow Control Tags
Generating Properly Formatted XML
Regex
20.6
Since first version
Regex validation not enforced but field can be submitted
Label
20.7
Since first version
Label displayed and form can still be submitted
Tooltip (title)
20.7
Since first version
Tooltip not displayed but form can still be submitted
row and col
23.11
24.1
Not supported.
Label
20.7
Since first version
Label displayed and form can still be submitted
Tooltip (title)
20.7
Since first version
Tooltip not displayed but form can still be submitted
Value
20.12
21.7
For client 1.5, it displays the person-selector as if there was no default value
User ID
Text Field
Symphony provides two types of elements for text input fields: Text fields are for a single-line input; and Text area is for multi-line input.
Attributes
Attribute
Type
Required?
Description
With Symphony v20.6, bot developers can use Regex to validate text fields and text areas using the pattern and pattern-error-message attributes.
For more information and examples, refer to .
The text field has a max number of 128 characters. For larger texts, use .
The text field cannot have children tags but it can have a default text (initial value) between the <text-field></text-field> tags. See Examples below for more details.
Text fields are grouped at a max of 4 per row, depending on the screen size. For more information, refer to .
The following examples show text fields being used as follows:
The first text-field (init) shows how to display a default text ("With initial value"). Note that the default text would have been sent to the payload if it had not been deleted before submitting the form.
The second text-field (placeholder) shows how a placeholder text ("Only Placeholder") is displayed in the UI. Please note the placeholder text is not sent in the payload if no text has been entered in the field by the enduser.
The third text-field (
Please note that several text-fields are aligned next to another. Note also that this behaviour is reactive to the screen size, the number of text-fields on the same line decreasing until one per row, as the screen gets smaller (see in the example below).
Main features introduced
Agent needed to parse message sent by the bot
Client 2.0 release
Mobile
Dropdown Menu
Allows the user to select an option among a static list of items.
The dropdown menu is represented as a set <options> items nested into a <select> tag.
Each <option> element have a value attribute containing the data value to submit in the form when that option is selected; You can also include a selected attribute on an <option> element to make it selected by default when the page first loads.
Attributes
The <select> tag:
Select tags only accept <option> tags as children. The <select> tag must contain at least one <option> tag.
By default, a user can select only one option from the dropdown menu. However, using the attribute multiple set to true together with min and max attributes, users will be able to select several options from the dropdown. Please see below the examples to know how to use these attributes.
The <option> tag:
The <option> tag contains a required text node, which specifies the text that will be displayed for that option inside the dropdown menu.
The only valid attributes of the <option> tag are value and selected.
If neither the selected or data-placeholder attributes are set, the default text (title) of the dropdown menu will be "Dropdown".
The following examples show dropdown menus being used as follows:
The first dropdown (init) shows how to display a default preselected option ("opt2": "With selected option"). Note that the preselected option is sent to the payload when submitting the form.
The second dropdown (data-placeholder) shows how a placeholder text ("Only data-placeholder") is displayed in the UI. Please note the placeholder text is not sent in the payload if no option from the dropdown menu has been selected by the enduser.
The third dropdown (
Features introduced
Agent needed to parse message sent by the bot
Client 2.0 release
Mobile
Timezone Picker
Do you need users to pick a timezone as part of an interactive flow? With the Timezone Picker, Symphony users can easily select a timezone from a selection of possible values. It recognises both cities and countries so the user can quickly filter and find the right timezone.
MessageML tag
The Timezone Picker is represented by the <timezone-picker> tag, as you can see in the examples at the bottom of the page.
Designs
You can see below the designs of the timezone picker.
Timezone Picker designs
For a list of all the available elements, refer to .
Attributes
For the purpose of accessibility, Symphony users can interact with the timezone picker via their keyboard:
First, using "Tab" to enter the component
Using "Enter", "Arrow-up", or "Arrow-down" to open the timezone list
Using "Arrow-up" and "Arrow-down" to navigate in the list
The max length of any timezone picker attribute is 256 characters except disabled-timezone attribute which max length is set to 1024 characters.
All timezone values are displayed in English only.
You can add a default timezone in your text field by including it in the value
The following examples show the timezone picker being used as follows:
The first timezone-picker (init) shows how to display an empty timezone-picker ("With empty default value"). Note in the messageML sent the value was enforced to empty with value="".
The second timezone-picker (specific_value) shows how to display, by default, a value specifically chosen by the developer. Note that the default value would have been sent to the payload if it had not been deleted before submitting the form. You can see how users can remove a pre-selected value from the timezone-picker, thanks to the cross on the right side of the input.
The possible values of the timezone-picker are restricted to the Canonical values of the .
Please note in the examples above that the values are displayed to users according to the following rules:
The country name only is displayed if it has a single timezone (see Israel)
A list of cities are displayed under their country title if this country has multiple timezones (see United States of America)
Date Picker
Do you need users to pick a date as part of an interactive flow? With the Date Picker element, Symphony users can easily select a date from a calendar-style UI component.
The Date Picker offers to Symphony users the possibility to enter the date in two different ways:
Populating the field directly with the keyboard, following the appropriate format
Clicking on the wished day from the calendar UI in a monthly display
Time Picker
Do you need users to pick a time as part of an interactive flow? With the Time Picker element, Symphony users can easily select a time from a list of possible values.
The Time Picker offers to Symphony users the possibility to enter the time in two different ways:
Populating the field directly with the keyboard, following the appropriate format and the list of possible values (see attributes strict, min, max, and disabled-time)
Clicking on the wished time from the dropdown displayed
String or Object
Either the title of the module as a string
or an object with the keys title and icon
The value of title is a string
The value of icon is the url of a square SVG image (recommended), or the url of a square png/jpg image. Recommended size is 32x32.
serviceName
String
The name of a local service implemented by your application that will be invoked when a user action is performed relating to this module
iframe
String
The URL for the content of the module (must be an HTTPS URL)
options
Object
An object, which can contain:
canFloat: if set to true, a menu item will be added to the More menu (found under the (…) on the module frame) that, when clicked, will pop the module out into its own browser window
parentModuleId: if set to the ID of a module opened by an application, the specified module will not be closed when this module is shown
String or Object
Either the title of the module as a string
or an object with the keys title and icon
The value of title is a string
The value of icon is the url of a square SVG image (recommended), or the url of a square png/jpg image. Recommended size is 32x32.
String
The URL of the new iframe to load in the module.
hashtag
cashtag
settings
messageID
String
Either a messageID, or the null value
The messageId can be used in addition to the streamId to focus on a specific message of the conversation.
Use "null" as parameter value to jump to the latest message of the conversation.
String
A unique identifier for this extension (can be used to unregister).
serviceName
String
The name of a local service implemented by your application that will be invoked when a user clicks on your action button.
options
Object
An object, containing:
icon: the url of an image that will be displayed on the action button. Recommended format is a square SVG.
label: a label associated with the action button.
data: an opaque block of data that will be passed along with the trigger event
id
String
The id of the UI extension that should be removed.
Specifies regular text to be inserted into the entity. This text is inserted as is, without processing any HTML markup.
• id (Optional): The key of a string within the template data. If no id is specified, it uses the contents between the opening and closing tags.
<label>
Inserts a label. Labels are like text tags but are styled differently.
• id (Optional): The key of a string within the template data. If no id is specified, it uses the contents between the opening and closing tags.
<color-text>
Inserts a colored text. Supported colors: red, purple, green, darkGreen, blue, darkBlue, orange, grey, and yellow.
id (Optional): The key of an object with two members:
• text specifies the text to be used
• color is one of the listed colors.
<pill>
Inserts text with a colored background and rounded corners. Supported colors: red, purple, green, darkGreen, blue, darkBlue, orange, grey, and yellow.
id (Optional): The key of an object with two members:
• text specifies the text to be used
• color is one of the listed colors.
Inserts a horizontal line.
<icon>
Displays a 16x16 pixel icon.
• id (Required): The key to a text string specifying the URL to the image to display.
<small-icon>
Displays a 13x13 pixel icon.
• id (Required): The key to a text string specifying the URL to the image to display.
<img>
Displays a 128x128 pixel image.
• id (Optional): The tag must include either an id attribute or an src attribute. If id is specified, it must be a key to a string specifying the URL of the link. If no id attribute is specified, the src attribute is used.
<iframe>
Inserts an iframe.
• src (Required): The URL to the iframe.
• height (Optional): If not specified, the default height of the iframe will be 50px. The maximum height is 1000px.
• width (Optional): If not specified, the default width of the iframe will be 100%. The maximum width is 300px.
Inserts a hashtag.
• id (required): The key to a string specifying the hashtag. The string must be prefixed with '#'.
<cashtag>
Inserts a cashtag.
• id (required): The key to a string specifying the cashtag. The string must be prefixed with '$'.
Conditionally uses the enclosing template within an iteration. If the current iteration is not the last item in the iterated list, the enclosing template is used. This is convenient when you want to add commas between list items without adding one after the last item.
<if:last>
Conditionally uses the enclosing template within an iteration. If the current iteration is the last item in the iterated list, the enclosing template will be used.
<iterate>
Loops through the items in an array. The template between the opening and closing iterate tag is used for each array item. The data for the template references the data in the current list item.
• id (Required): The key to an array in the data object.
Specifies that the form can be submitted several times by the user and the reset behavior. See the possible values and behaviors in Rules and Limitations below.
You can add a default text in your text field by including it between the <text-field></text-field> tags. Note that unlike the placeholder text, the default text will be sent with the form if not edited by the user.
Input Validation - Pattern: the max length for all attributes is set to 256.
noreq
) shows how a user can interact with a
non-required
field. Even if the field is empty (only a placeholder text is present but does not count as a value), it does not prevent the enduser from submitting the form.
The fourth text-field (req) shows the behaviour of the unique required field of the form, which cannot be submitted in case it is not filled; an error is displayed under the field in case the user submits the form with this empty field.
The fifth text-field (regex) shows the behaviour of the field when a regex pattern is entered. You can note that the pattern-error-message is displayed under the field if the input does not follow the pattern required by the bot developer.
The sixth text-field (min) shows how to force users to enter an input with a minimum number of characters, and how an error message is displayed under the field if the input does not respect the minlength required.
The seventh text-field (label) shows how a label text ("My Label") is displayed.
The eighth text-field (tooltip) shows how a title text ("My Tooltip/n With a second line") is inserted in the UI under the (i) icon, and how the text entered in the title parameter is displayed when the enduser clicks on the icon.
Regex
20.6
Since first version
Since first version
Label
20.7
Since first version
Since first version
Tooltip (title)
20.7
Since first version
Since first version
auto-submit
23.11
23.12
Not supported yet.
formnovalidate
25.6
25.9
Not supported yet.
name
String
Required
Identifies the text field.
placeholder
String
Optional
Specifies a short hint that describes the expected value of the input field.
required
Boolean
Optional
If true, it specifies that the input field must be filled out before submitting the form.
masked
Boolean
Optional
If true, it creates a masked text field with hide/show options when its value is "true". For more information, refer to Masked Text Field.
maxlength
Integer
Optional
The maxlength attribute allows you to specify a maximum number of characters that the user can input.
minlength
Integer
Optional
The minlength attribute allows you to specify a minimum number of characters that the user can input.
Optional but if pattern is defined, the pattern-error-message attribute is mandatory.
Error message returned to user if pattern parameter matches user input
title
It accepts a simple text and \n for line breaks
Optional
The description that will be displayed when clicking the tooltip icon located on top of the Text Field Element. Max length: 256 characters. Available from Symphony v20.8 and above.
label
String
Not required but it is recommended if title is defined
Definition of the label that will be displayed on top of the Text Field Element. Available from Symphony v20.8 and above.
auto-submit
Boolean
Optional.
Default false.
When enabled, typing <enter> key in the field will submit the form.
formnovalidate
Boolean
Optional.
Default false.
Only valid when auto-submit is true.
When set to true, this submit field bypasses the form validation (required fields and regular expressions), meaning that the user can submit this field even if the form validation is in error.
Optional attribute of the <select> tag. it is a Boolean attribute indicating that an option with a non-empty string value must be selected.
value
String
Yes
Required attribute of the <option> tag. It contains the data value to submit to the server when that option is selected.
selected
Boolean
Optional
You can include a selected attribute on an <option> element to make it selected by default when the page first loads. Accepted values: true and false.
data-placeholder
String
Optional
Text displayed in the dropdown menu before an option is selected. It can be a short hint or a title for the dropdown menu.
title
It accepts a simple text and \n for line breaks
Optional
The description that will be displayed when clicking the tooltip icon located on top of the Masked Text Field Element. Max length: 256 characters.
label
String
Not required but it is recommended if title is defined
Definition of the label that will be displayed on top of the Masked Text Field Element.
multiple
String
Boolean
Optional
Default is false
Allows users to select multiple values and the developer to send dropdown with multiple preselected options.
min
String
Integer ≥ 2 and ≤ max attribute
Optional
Can be used only if multiple attribute is set to true
Minimum number of options to be selected by the Symphony user.
NB: If undefined, no minimum option needs to be selected. Please use required attribute if you want to set min to 1.
max
String
Integer ≥ 2
Optional
Can be used only if multiple attribute is set to true
Maximum number of options to be selected by the Symphony user.
NB: If undefined, user will be able to select as many options as wished. Please use multiple attribute set to false if you want to set max to 1.
auto-submit
Boolean
Optional
Default is false
When enabled, selecting a value will submit the form.
formnovalidate
Boolean
Optional
Default is false
Only valid when auto-submit is true.
When set to true, this submit menu bypasses the form validation (required fields and regular expressions), meaning that the user can submit using this drop down menu even if the form validation is in error.
Only one <option> of a given select can have the attribute selected as true.
noreq
) shows how a user can interact with a
non-required
field. Even no option is selected by the user, it does not prevent the enduser from submitting the form.
The fourth dropdown (req) shows the behaviour of the unique required field of the form, which cannot be submitted in case no option from the dropdown menu is selected by the user; an error is displayed under the field in case the user submits the form with this empty field.
The fifth dropdown (label) shows how a label text ("My Label") is displayed.
The sixth dropdown (tooltip) shows how a title text ("My Tooltip/n With a second line") is inserted in the UI under the (i) icon, and how the text entered in the title parameter is displayed when the enduser clicks on the icon.
The seventh dropdown (multiple) shows how to combine multiple attribute with min/max rules to guide users selecting between 3 and 5 options.
20.6
Since first version
Since first version
Tooltip (title)
20.7
Since first version
Since first version
Multiple (with min and max) attributes
20.14
21.12
Since first version
auto-submit
23.11
23.12
Not supported yet.
formnovalidate
25.6
25.9
Not supported yet.
Attribute
Type
Required?
Description
name
String
Yes
Required attribute of the <select> tag. It identifies the dropdown menu.
When designing forms with dropdown menus that include a very large number of options you may hit the characters limit of a Symphony message. For more information about message size limits, refer to Message Size Limits.
Examples
Versions
required
Label
Using any key to erase the field and write in it
Using "Enter" to set the selected timezone and close the list
Using "Escape" to keep pre-selected value and close the list
Finally using "Tab" to exit the component
parameter. Please note that unlike the
placeholder
text, the
default timezone
will be sent in the formReply when the form is submitted if not edited by the user.
Please note that if the default timezone (value attribute) matches a value from the disabled-timezone array, then the value is left empty.
The timezone-picker will be supported on the following versions of clients:
20.14 for Client 2.0
20.13 for Client 1.5 (a beta version is released in Client 20.12 for Client 1.5)
The third timezone-picker (default_value) shows how to display, by default, the user browser timezone value. Note that the default value is sent to the payload when submitting the form.
The fourth timezone-picker (placeholder) shows how a placeholder text ("Only Placeholder") is displayed in the timezone-picker. Please note the placeholder text is not sent in the payload if no value has been chosen by the enduser.
The fifth timezone-picker (label) shows how a label text ("My Label") is displayed.
The sixth timezone-picker (tooltip) shows how a title text ("My Tooltip/n With a second line") is inserted in the UI under the (i) icon, and how the text entered in the title parameter is displayed when the enduser clicks on the icon.
The seventh timezone-picker (noreq) shows how a user can interact with a non-required field. Even if the field is empty (only a placeholder text is present but does not count as a value), it does not prevent the user from submitting the form.
The eighth timezone-picker (req) shows the behavior of the unique required field of the form, which cannot be submitted in case it is not filled; an error is displayed under the field in case the user submits the form with this field as empty.
The ninth timezone-picker (disabled) shows how users interact with disabled values from the timezone-picker.
Initial release
20.12
20.14
Not supported (except for 20.12 client 1.5)
Attribute
Type
Required?
Description
name
String
Yes
Identifies the timezone picker.
value
String
Restricted to the tz database timezones + empty string
No
Timezone displayed by default when the user receives or resets the form.
Please note that if it is not defined by the developer, the value will be based on the user's browser setting. You need to enter value="" to enforce the timezone to be empty.
title
String (accepting \n for line break)
No
The description that will be displayed when clicking the tooltip icon located on top of the timezone picker Element.
label
String
Not required but it is recommended if title is defined
Definition of the label that will be displayed on top of the timezone picker Element.
required
Boolean (true or false)
No
If true, it specifies that a timezone must be picked by the user before submitting the form.
placeholder
String
No
Specifies a short hint in the timezone picker input.
Accepts any string value but is overridden by the value if a value is defined: it will show only if value attribute is enforced to empty.
Please note that a default placeholder is displayed as: "Choose a timezone".
disabled-timezone
Array of Strings
No
Items can be disabled from the timezone picker list so that the user cannot pick them.
See the examples below for more details.
Important: single quote ' should wrap the array of strings
Please note that if you want to propose only a list of a few timezones to the users, then a simpledropdown menumight be more adequate.
<messageML>
<form id="form_id">
<h2>timezone-pickers</h2>
<timezone-picker name="init" value="" label="With empty default value" />
<timezone-picker name="specific_value" value="America/Fortaleza" label="With specific default value" />
<timezone-picker name="default_value" label="With default value from the user browser"/>
<timezone-picker name="placeholder" placeholder="Only Placeholder..." value="" />
<timezone-picker name="label" label="My Label" />
<timezone-picker name="tooltip" label="With Tooltip" title="My Tooltip\n With a second line" />
<timezone-picker name="noreq" placeholder="Not required" value="" />
<timezone-picker name="req" required="true" placeholder="Required" value="" />
<timezone-picker name="disabled" label="With Disabled values" value="America/Indiana/Vincennes" disabled-timezone='["America/Detroit", "America/Indiana/Marengo", "America/Indiana/Petersburg"]' />
<button name="timezone-picker">Submit</button>
</form>
</messageML>
The Date Picker is represented by the <date-picker> tag, as you can see in the examples at the bottom of the page.
You can see below the designs of the date picker.
The main points to be highlighted are the following:
A dot is displayed under the today date
A disabled date is displayed in grey and stroke through
An highlighted date is displayed in blue
For a list of all the available elements, refer to .
Date Picker designs
Attribute
Type
Required?
Description
name
String
Yes
Identifies the date picker.
For the purpose of accessibility, Symphony users can interact with the calendar UI with their keyboard:
Using "Enter" to open/close the calendar UI
Then using "Tab" to navigate in the different functionalities of the calendar: day selection; then "today" button; then "previous year" button; then "previous month" button; then "next month" button; then "next year" button; and finally going back to the day selection panel
Once in the day selection area, using the arrows from the keyboard allows navigating in the month to select the right day
Finally, using "Enter" allows to close the panel with the day selected or to trigger one of the functionalities selected (buttons)
In the day selection area, some more keyboard controls are available in the date picker:
"Home" key: Moves focus to the first day (e.g. Sunday) of the current week
"End" key: Moves focus to the last day (e.g. Saturday) of the current week
"Page Up" key: Moves to the previous month, with focus on the same day of the same week (or either previous or next week if it does not exist)
"Page Down" key: Moves to the next month, with focus on the same day of the same week (or either previous or next week if it does not exist)
"Shift" + "Page Up" key: Moves to the previous year, with focus on the same day of the same week (or either previous or next week if it does not exist)
"Shift" + "Page Down" key: Moves to the next year, with focus on the same day of the same week (or either previous or next week if it does not exist)
The max length of any date picker attribute is 256 except disabled-date and highlighted-date attributes which max length is set to 1024 characters.
The date picker is displayed differently to the end user depending on the language chosen in the settings specific of each user. Please note that if a format is specified, then the format overrides the default format chosen based on the settings.
English: the calendar-UI is in English, the weeks start on Sunday, the default format is MM-dd-yyyy, and the date picker accepts value to be entered with the keyboard in English only (i.e. August)
French: the calendar-UI is in French, the weeks start on Monday, the default format is dd/MM/yyyy, and the date picker accepts value to be entered with the keyboard in French only (i.e. Août)
Japanese: the calendar-UI is in Japanese, the weeks start on Monday, the default format is yyyy日MM月dd年, and the date picker accepts value to be entered with the keyboard in Japanese only
If the user enters the value of a valid day and month combination with his keyboard, then the current year is preselected. If he continues entering another year, then this last one will be selected.
If the format entered by the user is not correct or if the date entered is a disabled date, then an error message is displayed to the user. Note that it is not possible for the user to submit the form with an invalid format or disabled date.
You can add a default date in your text field by including it in the value parameter. Please note that unlike the placeholder text, the default date will be sent in the formReply when the form is submitted if not edited by the user.
The following examples show the date picker being used as follows:
The first date-picker (init) shows how to display a default date, as an initial value is entered as parameter. Note that the default text will be sent to the payload given that it was not deleted before submitting the form.
The second date-picker (placeholder) shows how a placeholder is displayed in the UI. Please note that any text is accepted as input. However, if you compare with the next date-pickers present in the form, you can notice that a default placeholder is generated (with a hint of the correct format to accepted by the date-picker field) in case no placeholder is mentioned in parameter.
The third date-picker (label) shows how a label is displayed. In the GIF below, it shows also the interaction with the form when the user directly writes an input with an incorrect format: an error message is displayed and the form cannot be sent.
The fourth date-picker (tooltip) shows how the title attribute is displayed. Note that when a user enters the month and the date in the correct format, the current year is automatically preselected. It can be modified if the user continues writing the year in the input field.
The fifth date-picker (req) shows the behaviour of the unique required field of the form, which cannot be submitted in case it is not filled. Also note the use of the "today" button.
The sixth date-picker (format) shows the way the placeholder evolves to adapt to a new format transmitted thanks to the format parameter. Also please note the accessible interaction with the date-picker via the keyboard.
The seventh date-picker (rules) shows how to interact with the following parameters: min, max, disabled, and highlighted. Please note that a disabled date cannot be entered manually.
Not working: date-picker is not displayed but the form can be sent
MessageML tag
Designs
Attributes
Accessibility
Rules and Limitations
Note that currently, if a date is entered in the disabled and highlighted parameters at the same time, it cannot be selected via the calendar UI first. However, it can be enabled if the user enters this particular date manually. This behaviour will be fixed in the next versions and the date will then be considered as disabled and displayed as such.
Examples
Versions and Compatibility
The Time Picker is represented by the <time-picker> tag, as you can see in the examples at the bottom of the page.
You can see below the designs of the time picker.
Time Picker designs
Attribute
Type
Required?
Description
name
String
Yes
Identifies the time picker.
For the purpose of accessibility, Symphony users can interact with the time picker via their keyboard:
First, using "Tab" to enter the component
Using "Enter" or "Space" to open the dropdown when focus is on the icon, or just "Enter" when focus is on the input
Using "Arrow up" or "Arrow down" to navigate within the dropdown list and using "Enter" to select the preselected value
Either "Typing" or pressing "Tab" to go from the hours to the minutes, and then from the minutes to the seconds
Either "Deleting" or pressing "Shift+Tab" to go back from the seconds to the minutes, and then from the minutes to the hours
Finally using "Tab" to exit the component
The max length of any time picker attribute is 256 except disabled-time attribute which max length is set to 1024 characters.
If the format entered by the user is not correct or if the time entered is a disabled time, then an error message is displayed to the user. Note that it is not possible for the user to submit the form with an invalid format or disabled time.
You can add a default time in your text field by including it in the value parameter. Please note that unlike the placeholder text, the default time will be sent back to the Bot in the user reply when the form is submitted if it is not edited by the user.
The time-picker will be supported on the following versions of clients:
20.14 for Client 2.0
20.13 for Client 1.5
The following examples show the time picker being used as follows:
The first time-picker (init) shows how to display a default time, as an initial value is entered as parameter. Note that the default value is present in the user reply as it has not been deleted before submitting the form.
The second time-picker (placeholder) shows how a placeholder is displayed in the UI. Please note that any text is accepted as input. However, if you compare with the next time-pickers present in the form, you can notice that a default placeholder is generated (with a hint of the correct format to accepted by the time-picker field) in case no placeholder is set.
The third time-picker (label) shows how a label ("My Label") is displayed.
The fourth time-picker (tooltip) shows how the title attribute ("My Tooltip/n With a second line") is displayed.
The fifth time-picker (noreq) shows how a user can interact with a non-required field. Even if the field is empty (only a placeholder text is present but does not count as a value), it does not prevent the user from submitting the form.
The sixth time-picker (req) shows the behaviour of the unique required field of the form, which cannot be submitted in case it is not filled.
The seventh time-picker (format) shows the way the placeholder evolves to adapt to a new format transmitted thanks to the format parameter. Also please note the accessible interaction with the time-picker via the keyboard.
The eighth time-picker (step) shows how to modify the step between 2 consecutive values in the list of times. Please note that a Symphony user can select any other existing time by populating the field with his keyboard.
The ninth time-picker (strict_step) shows how to enforce the user to choose among the non-disabled values displayed in the dropdown, thanks to the strict attribute.
The tenth time-picker (rules) shows how to interact with the following parameters: min, max, and disabled-time. Please note that a disabled time cannot be entered manually.
Please note that a limited amount of values are displayed in the dropdown of the time picker (see attribute step which minimum is 10 min). However, you can note that the time picker supports a precision to the second (see format attribute). Also, if you don't use the attribute strict, then user will be able to populate the field via their keyboard with any other non-disabled and existing time value than proposed in the list.
Examples
Versions and Compatibility
position
String
Yes
This attribute indicates how the buttons and checkboxes must be aligned inside the column. Accepted values: left or right. For more information, refer to the JSON example below.
Chat bots can embed dialog buttons in chat messages. When the dialog button is clicked, a dialog opens and displays the content that has been predefined.
This can be useful to make long messages much more concise, or progressively disclose a form only if it is relevant to the user for example.
MessageML tags
The Dialog component is structured in two sections:
<ui-action action='open-dialog'> tag. This tag defines where and how the button will be displayed, and it references the dialog that will open using the target-id attribute;
<dialog> tag that defines the content of the dialog that will be displayed when the button is clicked.
The <ui-action> tag wraps a single <button> children tag. The button tag supports the usual styles (primary, secondary, tertiary). Examples are available at the bottom of this page.
The <ui-action> tag supports the following attributes:
Each <dialog> is split in three areas (children tags):
<title> - mandatory: specifies the title of the dialog and is always displayed at the top of it in a fixed and non scrollable position.
<body> - mandatory: specifies the content of the dialog that is displayed in the middle of it and can be scrollable when the content is too big to be contained in the view height.
The <dialog> tag supports the following attributes
The following gif shows an example that contains two dialogs:
The first dialog is embedded in a form. You will notice that the button used to trigger the dialog is positioned where the <ui-action> tag is coded.
As soon as the associated <dialog> is at its same nesting level, it can be placed anywhere before or after the ui-action.
You can also notice that users can interact with the form as well as submit it.
However, the dialog only contains text as it cannot contain any interactive Form Elements. Please note that a cancel button can be included in the dialog as it is not considered as an interactive Form Element: you can use it to offer another option for the user to close the dialog.
The second dialog embeds a form instead.
After having started to fill-in the form, if the user closes the dialog and opens it back, the values of the fields will not reset to their original values, as long as the user does not refresh the page.
Also, when submitting a form that is in a dialog, the dialog will automatically close after a certain delay. If the user opens back the dialog without refreshing the page, then the values of the form and its state are persisted.
Below are simpler examples with and without the use of forms.
The max length of any ui-action or dialog attribute is 256.
Please note that the attribute type of the button is not supported when wrapped by a <ui-action> tag.
The dialog and ui-action tags must be both present in the same message, at the same nesting level, and they must share the same and unique
OBO Authentication
OBO or On-Behalf-Of authentication allows an authenticated extension app to perform the following operations on behalf of a given user:
List the streams of a given user
Initiate connection requests to and determine connection status with other users
Get the presence state of other connected users
Initiate IMs with other users
Send messages and attachments
Set the context user's own presence
For a full list of OBO-Enabled endpoints, click .
For OBO apps, authentication is a two-fold process:
The app itself must be authenticated using its RSA public Key. The app authenticates only if it is enabled for the pod and its key is trusted. Upon successful OBO app authentication, the app receives an app sessionToken.
The app must request to authenticate on behalf of a particular user, using its app sessionToken. The app authenticates only if it is installed for the user and its app sessionToken is valid. Upon successful OBO user authentication, the app receives the user's sessionToken.
Once the app has obtained the user's sessionToken, it can make REST API calls with this sessionToken to perform activities on behalf of the session user.
Before proceeding, check out the OBO App permissions required for a given workflow:
In order to perform an OBO operation, you need to first create an extension application manifest bundle.json file and upload to the Pod.
Upload the manifest bundle.json to the Admin Portal -> App Management -> Add Custom App -> Import Application Bundle File
Add your App Backend's (Bot) RSA public key in the Authentication section under App Management.
Give your Application the following Permissions:
Once your App is created, make sure that it is enabled:
Admin Portal -> App Settings -> Locate your App and toggle its 'Global Status' to be 'Enabled'
Toggle 'Visibility' to be 'Visible'
The BDK makes it super simple to create an OBO based workflow, To do so, simply, simply instantiate an OBO Session in your Bot project. The BDK allows you to instantiate your OBO session from a username or user ID.
In the following code snippet, the Bot authenticates on behalf of a given user and then prints a list of Streams (Type = ROOM) that the user in context is apart of:
The application can send messages for the logged-in user.
Messaging
SUPPRESS_MESSAGES
The application can suppress messages for the logged-in user.
Get Connections
GET_USER_CONNECTIONS
The application can get connection requests for the logged-in user.
Send Connections
REQUEST_USER_CONNECTIONS
The application can send connection requests for the logged-in user.
Get Presence
GET_PRESENCE
The application can only get presence for the logged-in user.
Set Presence
SET_PRESENCE
The application can only set presence for the logged-in user.
Primary User Identity
GET_BASIC_USER_INFO
The application can get information about the logged-in user.
Primary Contacts Access
GET_BASIC_CONTACT_INFO
The application can get information about other users through user look-up and search.
List User's Streams
LIST_USER_STREAMS
The application can list the streams in which the logged-in user is a member.
id
String
Required
The unique identifier for your app. Note: Do not use a colon (:) in this field, or you will receive a 401 Unauthorized error.
name
String
Required
The name of your app, which will be displayed in the Symphony Market.
blurb
String
Optional
Applied for Developer Mode. Field for display in the Symphony Market and Admin Portal.
publisher
String
Optional
The publisher of your app, which will be displayed in the Symphony Market.
url
String
Optional
URL which the pod will call to send pod information to the application
domain
String
Required
The domain for your app, which should match the controller file URL.
icon
String
Optional
An icon for your app (32x32 px), which will be displayed in the Symphony Market.
ACT_AS_USER
Toggle 'Installation' to be 'Manual'
The last step is to make sure that the application is installed for the appropriate users. If the installation is set to 'Manual', make sure end-users install the extension application manually via the Symphony Marketplace. If not, make sure Symphony Admin installs this application on behalf of a given list of users.
Category
Permission
Description
On Behalf Of
ACT_AS_USER
Required. This required permission allows an application to act on behalf of a user via any of the other permissions.
Note: This permission does not display to administrators on the Admin Portal because all apps can act on behalf of a user and therefore have the ACT_AS_USER permission by default.
Messaging
Parameter
Type
Required
Description
type
String
Required
This field should be set to sandbox, which indicates that this is a standalone app, embedded within Symphony's client.
OBO use cases differ from bot use cases in that activities are performed as if end users had initiated actions directly from within Symphony themselves.
OBO App Permissions
Getting Started
Application Manifest Bundle File Sample:
Note: Give your extension application the appropriate permissions corresponding to your OBO workflow. For example, if you Bot will perform an OBO workflow to list a user's streams, grant your application with the LIST_USER_STREAMS permission.
{
"applications": [
{
"type": "sandbox",
"id": "hello",
"name": "Hello World",
"blurb": "This is a hello world app with a few example extension API invocations!",
"publisher": "Symphony",
"url": "https://localhost:4000/controller.html",
"domain": "localhost",
"icon": "https://localhost:4000/icon.png"
}
]
}
public class BotApplication {
/** The Logger */
private static final Logger log = LoggerFactory.getLogger(BotApplication.class);
public static void main(String[] args) throws BdkConfigException, AuthInitializationException, AuthUnauthorizedException, Exception {
// Initialize BDK entry point
final SymphonyBdk bdk = new SymphonyBdk(loadFromClasspath("/config.yaml"));
final AuthSession oboSessionUsername = bdk.obo("user.name");
final AuthSession oboSessionUserId = bdk.obo(123456789L);
// finally, start the datafeed read loop
bdk.datafeed().start();
}
}
public class BotApplication {
private static final Logger log = LoggerFactory.getLogger(BotApplication.class);
public static void main(String[] args) throws BdkConfigException, AuthInitializationException, AuthUnauthorizedException, Exception {
// Initialize BDK entry point
final SymphonyBdk bdk = new SymphonyBdk(loadFromClasspath("/config.yaml"));
final AuthSession oboSessionUsername = bdk.obo("user.name");
// list streams OBO user "user.name"
List<StreamAttributes> x = bdk.streams().listStreams(oboSessionUsername, new StreamFilter());
System.out.println(x);
List<StreamAttributes> y = x.stream()
.filter(item -> item.getStreamType().getType().toString().equals("ROOM"))
.collect(Collectors.toList());
System.out.println(y);
// finally, start the datafeed read loop
bdk.datafeed().start();
}
}
target-id
String
Yes
Id of the dialog that must be opened when user will trigger this ui-action.
See the id attribute in the <dialog> tag.
<footer>
- optional: specifies the footer of the dialog and is always displayed at the bottom in a fixed and non scrollable position.
width
String
No.
Default to medium
Specifies the width of the dialog.
NB: values can be: small, medium, large, or full-width.
Please note the scrolling behaviour of the body whereas both title and footer are placed in a fixed position.
id
/
target-id
.
Please note it is possible to have several dialogs in the same message as soon as each dialog has a different id.
The dialog feature is supported in popped-out mode. The dialog will open in the popped-out window.
Dialogs can be contained inside forms. However, if contained in a form, the dialog cannot contain any interactive Element (such as button, text-area, etc.)
Dialogs can contain a form. The <form> tag should wrap the entire content of the dialog, including the <title> ,<body> and <footer> tags, as you can see in the examples below. This is useful when you want the submit button not to be hidden and always appear in the footer of the dialog whereas the rest of the form content is contained in the scrollable body area.
Please also note that users can close the dialog thanks to the cross (x) displayed at the top-right corner of it, as well as with a new type of that has been created for that purpose: <button type="cancel">. You can also specify the class attribute of the button which is by default set to "tertiary" for this new button.
A dialog cannot be embedded in another dialog.
Not working - entire message is not rendered
Attribute
Type
Required?
Description
action
String
Yes
For Dialogs, always set to action='open-dialog'.
Attribute
Type
Required?
Description
id
String
Yes
Id of the dialog that will be triggered thanks to the ui-action it is associated to. See target-id attribute in <ui-action> tag.
<messageML>
<form id="wrapping_dialog">
<h4>First part: form wrapping a dialog</h4>
<p>Here is the beginning of the form containing the dialog hiding some large text</p>
<text-field name="input1" label="This is an interactive Element in the form but outside of the dialog" />
<p>Please click on the following button in order to open the dialog and see the hidden information</p>
<ui-action action="open-dialog" target-id="dialog_in_form">
<button class="secondary">Open the dialog contained in the form</button>
</ui-action>
<text-field name="input2" label="This is an interactive Element in the form but outside of the dialog" />
<button name="wrapping_dialog">Submit Button of the Form</button>
<dialog id="dialog_in_form">
<title>
This is a title
</title>
<body>
Lorem ipsum dolor sit amet, consectetur adipiscing elit. Nullam congue viverra interdum. Integer quam odio, gravida ultricies pharetra ac, tempor eget leo. Duis vitae arcu sed turpis faucibus feugiat a at ipsum. Nulla facilisi. Phasellus egestas, leo et malesuada porttitor, felis turpis viverra tortor, quis suscipit orci nibh at augue. Curabitur erat libero, accumsan vitae ipsum eleifend, tincidunt bibendum purus. Curabitur ultricies lorem tincidunt rutrum viverra. Sed mattis dui at suscipit auctor. In rutrum neque urna, vitae lacinia turpis blandit eget. Nullam eu dignissim purus. Sed ut ante lorem. Duis quis mi nec enim imperdiet consectetur. Phasellus aliquet accumsan ipsum non ullamcorper.<br/><br/>
Praesent convallis odio tortor, sit amet vulputate nulla tincidunt vitae. Donec ultrices eros suscipit mauris condimentum iaculis. Ut posuere finibus quam a consequat. Vestibulum ante ipsum primis in faucibus orci luctus et ultrices posuere cubilia curae; Nam aliquet dapibus vehicula. Nunc vel lectus congue, finibus felis ut, laoreet est. Maecenas eleifend gravida metus, nec viverra mi egestas eu. Pellentesque scelerisque mattis nibh, eu condimentum nulla finibus ut.<br/><br/>
Ut dignissim varius libero ac volutpat. Sed hendrerit nec libero ut ullamcorper. Nunc et risus sed purus luctus faucibus nec eu est. Praesent id justo ante. Sed sed enim velit. Ut ac mauris magna. Fusce bibendum ullamcorper diam quis semper. Aenean mattis auctor ultricies. Mauris dui enim, vehicula sit amet finibus non, consectetur eu ante. Fusce at mi a ipsum gravida rhoncus.<br/><br/>
Lorem ipsum dolor sit amet, consectetur adipiscing elit. Nullam congue viverra interdum. Integer quam odio, gravida ultricies pharetra ac, tempor eget leo. Duis vitae arcu sed turpis faucibus feugiat a at ipsum. Nulla facilisi. Phasellus egestas, leo et malesuada porttitor, felis turpis viverra tortor, quis suscipit orci nibh at augue. Curabitur erat libero, accumsan vitae ipsum eleifend, tincidunt bibendum purus. Curabitur ultricies lorem tincidunt rutrum viverra. Sed mattis dui at suscipit auctor. In rutrum neque urna, vitae lacinia turpis blandit eget. Nullam eu dignissim purus. Sed ut ante lorem. Duis quis mi nec enim imperdiet consectetur. Phasellus aliquet accumsan ipsum non ullamcorper.<br/><br/>
Praesent convallis odio tortor, sit amet vulputate nulla tincidunt vitae. Donec ultrices eros suscipit mauris condimentum iaculis. Ut posuere finibus quam a consequat. Vestibulum ante ipsum primis in faucibus orci luctus et ultrices posuere cubilia curae; Nam aliquet dapibus vehicula. Nunc vel lectus congue, finibus felis ut, laoreet est. Maecenas eleifend gravida metus, nec viverra mi egestas eu. Pellentesque scelerisque mattis nibh, eu condimentum nulla finibus ut.<br/><br/>
Ut dignissim varius libero ac volutpat. Sed hendrerit nec libero ut ullamcorper. Nunc et risus sed purus luctus faucibus nec eu est. Praesent id justo ante. Sed sed enim velit. Ut ac mauris magna. Fusce bibendum ullamcorper diam quis semper. Aenean mattis auctor ultricies. Mauris dui enim, vehicula sit amet finibus non, consectetur eu ante. Fusce at mi a ipsum gravida rhoncus.
</body>
<footer>
This is a footer
<button name="cancel1" type="cancel">Close</button>
</footer>
</dialog>
</form>
<br/>
<br/>
<h4>Second part: message with a dialog hiding a form</h4>
<p>Here is the beginning of the message containing the dialog hiding some large form</p>
<dialog id="dialog_containing_form" width="large">
<form id="wrapped_in_dialog">
<title>
This is a title
</title>
<body>
<text-field name="input3" label="This is an interactive Element in the form which is contained in the dialog" />
<textarea name="textarea" label="Other interactive Element in the dialog" />
Lorem ipsum dolor sit amet, consectetur adipiscing elit. Nullam congue viverra interdum. Integer quam odio, gravida ultricies pharetra ac, tempor eget leo. Duis vitae arcu sed turpis faucibus feugiat a at ipsum. Nulla facilisi. Phasellus egestas, leo et malesuada porttitor, felis turpis viverra tortor, quis suscipit orci nibh at augue. Curabitur erat libero, accumsan vitae ipsum eleifend, tincidunt bibendum purus. Curabitur ultricies lorem tincidunt rutrum viverra. Sed mattis dui at suscipit auctor. In rutrum neque urna, vitae lacinia turpis blandit eget. Nullam eu dignissim purus. Sed ut ante lorem. Duis quis mi nec enim imperdiet consectetur. Phasellus aliquet accumsan ipsum non ullamcorper.<br/><br/>
Praesent convallis odio tortor, sit amet vulputate nulla tincidunt vitae. Donec ultrices eros suscipit mauris condimentum iaculis. Ut posuere finibus quam a consequat. Vestibulum ante ipsum primis in faucibus orci luctus et ultrices posuere cubilia curae; Nam aliquet dapibus vehicula. Nunc vel lectus congue, finibus felis ut, laoreet est. Maecenas eleifend gravida metus, nec viverra mi egestas eu. Pellentesque scelerisque mattis nibh, eu condimentum nulla finibus ut.<br/><br/>
Ut dignissim varius libero ac volutpat. Sed hendrerit nec libero ut ullamcorper. Nunc et risus sed purus luctus faucibus nec eu est. Praesent id justo ante. Sed sed enim velit. Ut ac mauris magna. Fusce bibendum ullamcorper diam quis semper. Aenean mattis auctor ultricies. Mauris dui enim, vehicula sit amet finibus non, consectetur eu ante. Fusce at mi a ipsum gravida rhoncus.<br/><br/>
Lorem ipsum dolor sit amet, consectetur adipiscing elit. Nullam congue viverra interdum. Integer quam odio, gravida ultricies pharetra ac, tempor eget leo. Duis vitae arcu sed turpis faucibus feugiat a at ipsum. Nulla facilisi. Phasellus egestas, leo et malesuada porttitor, felis turpis viverra tortor, quis suscipit orci nibh at augue. Curabitur erat libero, accumsan vitae ipsum eleifend, tincidunt bibendum purus. Curabitur ultricies lorem tincidunt rutrum viverra. Sed mattis dui at suscipit auctor. In rutrum neque urna, vitae lacinia turpis blandit eget. Nullam eu dignissim purus. Sed ut ante lorem. Duis quis mi nec enim imperdiet consectetur. Phasellus aliquet accumsan ipsum non ullamcorper.<br/><br/>
Praesent convallis odio tortor, sit amet vulputate nulla tincidunt vitae. Donec ultrices eros suscipit mauris condimentum iaculis. Ut posuere finibus quam a consequat. Vestibulum ante ipsum primis in faucibus orci luctus et ultrices posuere cubilia curae; Nam aliquet dapibus vehicula. Nunc vel lectus congue, finibus felis ut, laoreet est. Maecenas eleifend gravida metus, nec viverra mi egestas eu. Pellentesque scelerisque mattis nibh, eu condimentum nulla finibus ut.<br/><br/>
Ut dignissim varius libero ac volutpat. Sed hendrerit nec libero ut ullamcorper. Nunc et risus sed purus luctus faucibus nec eu est. Praesent id justo ante. Sed sed enim velit. Ut ac mauris magna. Fusce bibendum ullamcorper diam quis semper. Aenean mattis auctor ultricies. Mauris dui enim, vehicula sit amet finibus non, consectetur eu ante. Fusce at mi a ipsum gravida rhoncus.
</body>
<footer>
<button name="cancel2" type="cancel">Close</button>
<button name="wrapping_dialog">Submit Button of the Form</button>
</footer>
</form>
</dialog>
<ui-action action="open-dialog" target-id="dialog_containing_form">
<button class="secondary">Open the dialog containing the form</button>
</ui-action>
</messageML>
<messageML>
<ui-action trigger="click" action="open-dialog" target-id="dialogId">
<button>Simple dialog</button>
</ui-action>
<dialog id="dialogId">
<form id="formId">
<title>A Simple dialog</title>
<body>
This is a simple dialog.
</body>
<footer>
<button type="cancel" name="cancel-button">Close</button>
</footer>
</form>
</dialog>
</messageML>
<messageML>
<ui-action trigger="click" action="open-dialog" target-id="dialogId">
<button>Open the Dialog</button>
</ui-action>
<dialog id="dialogId">
<form id="formId">
<title>My Form in a Dialog</title>
<body>
<text-field name="input" />
</body>
<footer>
<button type="action" name="send-form">Submit</button>
<button type="reset">Reset</button>
<button type="cancel" name="cancel-form">Close</button>
</footer>
</form>
</dialog>
</messageML>
<messageML>
<form id="formId">
<text-field name="input" />
<ui-action trigger="click" action="open-dialog" target-id="dialogId">
<button>Open the Dialog</button>
</ui-action>
<dialog id="dialogId" width="small">
<title>A Dialog</title>
<body>
<expandable-card state="expanded">
<header>Dialog can include any other messageML component except Interactive Elements Forms</header>
<body>This does not contain any interactive element</body>
</expandable-card>
</body>
<footer>
Some text in the footer
<button type="cancel" name="cancel-form">Close</button>
</footer>
</dialog>
<h3>Actions</h3>
<button name="send-answers" type="action">Submit</button>
<button type="reset">Reset Data</button>
</form>
</messageML>
Even if this possible, please avoid embedding more than one form in a single dialog.
Versions and Compatibility
Not working
value
String "yyy-MM-dd"
No
Date with ISO_8601 format to be displayed by default by the date picker when rendered for the Symphony user.
Overrides the placeholder value.
title
String (accepting \n for line break)
No
The description that will be displayed when clicking the tooltip icon located on top of the date picker Element.
label
String
Not required but it is recommend if title is defined
Definition of the label that will be displayed on top of the date picker Element.
required
Boolean (true or false)
No
If true, it specifies that a date must be picked before submitting the form.
placeholder
String
No
Specifies a short hint that describes the expected format of the date picker.
Accepts any string value but is overridden by the value if a value is entered.
If not set, the accepted format will be displayed.
Note: be careful as adding a placeholder might bring confusion to the end user. Therefore we recommend to use the default one as much as possible, to use the label if context is needed, or the title if instructions are needed.
min
String "yyy-MM-dd"
No
Specifies the earliest acceptable date with ISO_8601 format.
max
String "yyy-MM-dd"
No
Specifies the latest acceptable date with ISO_8601 format.
disabled-date
Json array (in a String format)
No
Dates or ranges of dates that cannot be selected by the Symphony user.
Maximum length of 1024 characters.
There are 3 different patterns:
1. range of date: {"from": "yyyy-MM-dd", "to": "yyyy-MM-dd"},
2. date: {"day": "yyyy-MM-dd"},
3. recurring day in the week: {"daysOfWeek": [0, 1, 6]},
Important: single quote ' should wrap the xml parameter. See the examples below for more details.
Note: for the daysOfWeek: 0 always corresponds to Sunday, 6 to Saturday.
See the examples below for more details.
highlighted-date
Json array (in a String format)
No
Dates or ranges of dates that are highlighted to the Symphony user.
Maximum length of 1024 characters.
There are 3 different patterns:
1. range of date: {"from": "yyyy-MM-dd", "to": "yyyy-MM-dd"},
2. date: {"day": "yyyy-MM-dd"},
3. recurring day in the week: {"daysOfWeek": [0, 1, 6]},
Important: single quote ' should wrap the xml parameter. See the examples below for more details.
Note: for the daysOfWeek: 0 always corresponds to Sunday, 6 to Saturday.
See the examples below for more details.
format
String
No
Format in which the date will be displayed to or should be entered by the Symphony user.
Only accepts the letters 'y', 'M', and 'd'.
• 'd' defines the day of the month. It can be either 'd' or 'dd' to define the minimum of digits displayed (i.e. corresponding to "3" or "03" for the third day)
• 'M' defines the month. Use one or two ('M' or 'MM') for the numerical month; three 'MMM' for the abbreviation (i.e. "Sep"); four 'MMMM' for the full name (i.e. "September"); or five 'MMMMM' for the narrow name (i.e. "S")
• 'y' defines the year. Use n of it to define n minimum of digits displayed (i.e. use 'yyyyy' to display the year 2020 as 02020)
Note: be careful as many combinations may be possible, may have a weird display for the Symphony user, and are not restricted in the messageML. Therefore, we strongly recommend to use the default value as much as possible.Note 2: The format only impacts what the end user will see. It does not affect how you have to specify the value, disabled-date, highlighted-date, or the format of the response.
Date as disabled and highlighted
Elements
value
String "HH:mm:ss"
No
Time with ISO_8601 format to be displayed by default by the time picker when rendered for the Symphony user.
Overrides the placeholder value.
title
String (accepting \n for line break)
No
Description that will be displayed when clicking the tooltip icon located on top of the time picker Element.
label
String
Not required but it is recommended if title is defined
The text of the label that will be displayed above the time picker field.
required
Boolean (true or false)
No
If true, it specifies that a time must be picked before submitting the form.
placeholder
String
No
Specifies a short hint that describes the expected format of the time picker field.
If the attributevalue is entered, the placeholder will not be displayed.
If the placeholder is not set, the accepted time format will be displayed by default.
Note: We recommend to use the default placeholder. It is better to rely on the label if context is needed, or the title if instructions are needed.
min
String "HH:mm:ss"
No
Specifies the earliest acceptable time with ISO_8601 format.
Note: Times earlier than the min are not displayed in the time picker.
max
String "HH:mm:ss"
No
Specifies the latest acceptable time with ISO_8601 format.
Note: Times later than the max are not displayed in the time picker.
disabled-time
Json array (in a String format)
No
Times or ranges of times that cannot be selected by the Symphony user.
Maximum length of 1024 characters.
There are 2 different patterns:
1. range of times: {"from": "HH:mm:ss", "to": "HH:mm:ss"},
2. specific time: {"time": "HH:mm:ss"}.
Important: single quote ' should wrap the xml parameter. See the examples below for more details.
Note: Disabled times are displayed as disabled values in the time picker.
format
String
No
Format in which the time will be displayed to or should be entered by the Symphony user.
Only accepts the letters 'h', 'H', 'm', 's', and 'a' as well as ':' or space as separator.
• 'h' (for 12-hour format) and 'H' (for 24-hour format) define the hour. You can use either 1 ('h'; 'H') or 2 ('hh'; 'HH') to define the minimum number of digits displayed (i.e. corresponding to "3" or "03" for the third hour)
• 'm' defines the minutes. Similarly to the hours, you can use one or two ('m' or 'mm')
• 's' defines the seconds. Similarly to the hours and minutes, you can use one or two ('s' or 'ss')
• 'a' (usually placed after a space) allows to display 'AM' for morning times and 'PM' for afternoon times
Note 1: We recommend the use of the default value as much as possible.Note 2: The format only impacts what the end user will see. It does not affect how you have to specify the value, min, max, disabled-time, or the format of the user reply.
step
Number
No
Default is 900 (corresponding to15 min)
The stepping interval (in seconds) for the times displayed in the dropdown menu.
Min value: 600 (corresponding to 10 min)
Max value: 43 200 (corresponding to half a day)
strict
Boolean
No
Default is false
Enforce that the user cannot select a time that is not in the proposed list (e.g. we want him to only select an hour, he can’t decide to set the field to 9:15, even with the keyboard).
Please note that in addition to this, the value picked will be validated against attributes min, max, and disabled-time.
Share Service
Use the share service to allow users to share content from your application into Symphony conversation:
// To use the share service, you must subscribe to it from your application
var shareService = SYMPHONY.services.subscribe("share");
When the share function is invoked, a modal dialog is launched and populated with the shared object content (for example, the article options). The end user can then select conversations (IMs or chatrooms) into which to share the article.
Once the article is shared, it appears in the conversation view in a card format. The article will be linked either to a webpage (if the href option is provided) or deep linked into the app (if the id option is provided).
In order to view article contents in an application (for example, if the article id is provided), the user must have the application installed.
If the recipient of a shared article does not have the application installed, the user will be prompted to install the application (provided that the user's enterprise has that application enabled).
If the recipient of a shared article does not have the application installed, and the application is not enabled for the user's enterprise, the user can view the content via the link (if href is provided). If a link is not provided, the user will be notified that the article cannot be viewed because the application is disabled for the enterprise.
The following methods are available on the share service:
Launches the "Share on Symphony" modal from your application, allowing the user to share content from your application into a Symphony conversation (IM or chatroom):
The following JavaScript shows an example of an article being shared:
The following table shows the article content:
The following table shows the share options:
The share function can also be used to share custom, third-party entity types. In this case, the data parameter must be populated with the following fields:
The following JavaScript shows an example of a custom third party entity being shared:
In this example, the following modal dialog is launched and populated with the shared object content:
You must specify your own application service for handling clicks on shared articles using handleLink if you use the id field for deep linking articles into your application.
You must implement the link method on your application service in order to handle clicks on shared articles in conversations.
content
Object
Yes
An object that describes the content being shared. For a list of objects see .
options
Object
No
An object that describes options that can be used to enhance the share service
subTitle
No
String
The subtitle of the article
blurb
No
String
A summary of the article to display
date
No
Date of publication
publisher
No
String
Name of the publisher
author
No
String
Name of the author
thumbnail
No
URL (could be a data url)
Image to be displayed - 106px-106px
id
Must provide either id or href, or both
String
An identifier used by the application to deeplink to the article
href
Must provide either id or href, or both
URL
URL to the article (opened in a new browser window)
The default presentation of the entity using . This will be seen by everybody who does not have an app with a custom renderer for the given type.
entityJSON
The object being shared.
format
The format of the message being sent. This must be set to "com.symphony.messageml.v2".
function share(type, content, options)
Parameter
Type
Required
Description
type
String
Yes
The type of content that is being shared.
// This code will live in your application view.
// Assume there is a button element with id "share" on the application module
// If that button is clicked, launch the Share modal.
var shareButton = document.getElementById("share");
var articleContent = {
title: "Symphony Launches Mobile App",
subTitle: "Application is mobile device management (MDM) compatible.",
blurb: "Symphony Communication Services, a Palo Alto, Calif.-based messaging startup, announced its enterprise-ready mobile app for Apple iPhone is now available for download.",
date : new Date("07 June 2016").getTime() / 1000,
publisher: "Waters Technology",
author: "Dan DeFrancesco",
id: "symphony-article",
thumbnail: 'https://symphony.com/example/image.png',
href: 'https://symphony.com'
};
var shareOptions = {
prepopulateUsers: ['71811853190920', '71811853190903']
};
// Launch Symphony's share modal when the Share button is clicked
shareButton.addEventListener("click", function(){
shareService.share(
"article",
articleContent,
shareOptions
);
});
Field
Required
Format
Description
title
Yes
String
The headline of the article
Field
Required
Format
Description
prepopulateUsers
No
Array of strings
The users (UserIds) who will be listed initially as recipients in the share modal.
Available only for authenticated apps, and only for Client 2.0.
It is recommended to limit the number of pre-populated users so the Symphony end user can easily review the list of recipients before sharing.
Field
Description
inputAutofill
Use this to fill the comment field in the share dialog to provide initial text. Cash tags and hash tags that are specified in the text will be converted to the correct entity.
plaintext
The markdown representation of the entity, supporting a limited set of markdown features. The value of this field will be displayed on mobile devices and other older clients.
share : function(gameNbr, time)
{
var fullTime = time;
var hours = Math.floor(time / 60 / 60 / 1000);
time -= hours * 60 * 60 * 1000;
var minutes = Math.floor(time / 60 / 1000);
time -= minutes * 60 * 1000;
var seconds = Math.floor(time / 1000);
var duration = hours.toString() + ':' + minutes.toString().pad(2, '0', 'left') + ':' + seconds.toString().pad(2, '0', 'left');
var title = 'Somebody you know won at Mah Jongg Solitaire';
var blurb = 'try to beat their time of ' + duration;
var date = new Date().getTime() / 1000;
var thumbnail = this.thumb;
var id = JSON.stringify({gameNbr: gameNbr, time: fullTime});
var presentationML =`
<entity>
<table><tr>
<td><img src="${thumbnail}" /></td>
<td>
<h1>${title}</h1>
${blurb}
</td>
</tr></table>
</entity>`;
var entityJSON = {
date: date,
thumbnail: thumbnail,
results: id,
time : time,
gameNbr : gameNbr,
};
var data = {
plaintext: `*${title}*\n${blurb}\n`,
presentationML : presentationML,
entityJSON: entityJSON,
entity: {},
format: 'com.symphony.messageml.v2',
inputAutofill : 'I ROCK!',
}
this.shareService.share('com.symfuny.invite.won', data);
}
// This code will live in your application controller.
// The application service that will be used to handle clicks on shared articles
var helloControllerService = SYMPHONY.services.register("hello:controller");
// Assume you have registered your application with the Symphony client and subscribed to the Share service.
shareService.handleLink("article", "hello:controller");
helloControllerService.implement({
// You only need to implement this function if you intend to deeplink articles into your app by specifying an id for the article. If you use href, then article links will open in a new browser window.
link: function(type, articleId) {
if(type == "article") {
// Implement this
// For example, you might launch a new application module with a url that includes the articleId in the query parameters
console.log("Article with id: " + articleId + " was clicked.");
}
}
});
An array of one or more of the following objects: org.symphonyoss.fin.security.id.ticker org.symphonyoss.fin.security.id.isin org.symphonyoss.fin.security.id.cusip org.symphonyoss.fin.security.id.openfigi More information about these objects is provided below.
value
Yes
String
The name/ID of a ticker.
value
Yes
String
The entity's ID.
value
Yes
String
The entity's ID.
value
Yes
String
The entity's ID.
version
Yes
String
The version.
format
Yes
String
The data format. Must be set to image.
url
Yes
String
The URL of the image.
version
Yes
String
The object's version.
id
Yes
Array of objects
An array of one or more of the following objects:
• com.symphony.user.userId
More information about these objects is provided below.
value
Yes
String
The ID of a user.
version
Yes
String
The version.
format
Yes
String
The video's format. Must be set to youtube or vimeo.
url
Yes
String
The URL of the video.
id
Yes
String
The unique ID of the video (can be extracted from the video URL).
Application authentication establishes bidirectional trust between an application and the Symphony client.
This process must be used by enterprise or partner app developers who wants to:
Create a secure connection between an app and Symphony
Access user identity information from the app
Partner applications need to implement a clear process to inform and ensure that their customers have approved that users' identities will be communicated by Symphony to the partner application. Please contact the Symphony Partner team for more details.
Because apps run as iframes within the Symphony client and interact with the client via JavaScript, creating a secure connection requires interaction between an app's backend and Symphony's backend.
Backend trust is established using a JWT signed by a RSA key, as you can see in the .
This section outlines the full app authentication sequence, covering operations that take place on the app side and the Symphony side.
The following diagram shows the trust relationships developed through the application authentication flow.
The flow utilizes two tokens, Ta and Ts, which are generated by the app and Symphony backends after the servers mutually authenticate each other using certificates. A circle of trust is established by passing the tokens in opposite directions so that each backend server receives matching tokens via two separate paths.
The diagram below shows the interaction between the actors in the Application Authentication flow (the app frontend and backend, the Symphony frontend and backend). This flow starts after the user has logged into the Symphony client (establishing the identity of the user and trust between the Symphony client and backend). The flow begins after the user loads the partner application.
You will need an RSA key pair. The public/private key pair for signing authentication requests requires the following:
• An RSA512 algorithm with a key length of 4096 bits.
• An X.509 format for public keys and PKCS#1 or PKCS#8 for private keys.
• PEM-encoded keys.
Generate a valid key pair by running the following generate_rsa_keys.sh script:Shell
Note: The script requires the openssl package.
Generate the PKCS#1 keys manually using the following commands:Shell
Generate the PKCS#8 keys manually using the following commands. Provide your username as the Common Name (CN).Shell
The file publickey.pem is the public key. Import this into the pod.
Sign the authentication request using either privatekey.pkcs8 or privatekey.pem, depending on the support available in the JWT library.
You should familiarize yourself with (JWT) which are the format used for passing user identity information from Symphony to your app.
Your app will need to implement verification of the JWT shared by Symphony.
Partner and enterprise app developers will need to implement the following sequence within their app on the frontend and backend:
Upon completion of this process, your app will know it is interacting with a valid Symphony client and can trust any user identity information it obtains from Symphony.
You will identify the Symphony pod against which to authenticate from the existing Extension API method.JavaScript
The pod ID will be useful to partner developers in building a mapping of customers to auth URL. As described in the Prerequisites section above, partners can receive the customer's auth URL through the callback.
If you are an enterprise developer building an internal custom app, you will not need to use the pod ID, since you will always use your own auth URL.
Once you have identified the pod where your app is being run on, you will initiate the app authentication flow. You will use the auth URL previously obtained and a JWT signed by your app RSA key. The endpoint to be used is as follows
In addition to specifying the JWT during this call, your app backend must generate an app token (Ta) to pass in the POST body parameters of the request. The app token must be a unique string for each authentication request. The token is opaque to Symphony.
In the response, Symphony will return back the appId, the previously presented app token, as well as a Symphony-generated token (Ts). The Symphony token is short-lived and will expire within five minutes.
Your app backend should store this token pair as they will be used for subsequent validation steps in the authentication process.
You should now register your app using not just your appId, but an object containing both your appId and tokenA.
The method will now accept either an appId string or appData object.JavaScript
SYMPHONY.application.register will now return a promise that will be fulfilled with an object containing the members appId (your appId) and tokenS (the Symphony token).
Once your app has registered, your app will need to validate the Symphony token that was passed to you through the frontend against the Symphony token you previously obtained through the Symphony backend.
The validation implementation is up to you. The implementation in the sample application provided by Symphony assumes a stateless app backend. The app frontend sends both the app and Symphony tokens back and verifies that the pair exists in the token cache. (If the partner app and server maintained a sticky session, you could pass back only the Symphony token since the app token would already have been saved in the session.)
Once the token pair match has been found, your application knows that it is interacting with a valid Symphony client.
User identity information can be obtained through the getJwt() method on the extended-user-info service.
Returns identity information for the user in context in the form of a (JWT). The JWT has been signed by the private key of the pod and can be verified using the pod's public key.
Note that this method will only return user identity information if Steps 1-15 of the application authentication sequence have been completed (i.e. Symphony frontend trusts app frontend). If not completed, then the JWT will only contain userReferenceId, an anonymous identifier for the user.
The JWT will be returned as a base-64 encoded string, with the following format when it is decoded:
Your app backend can validate the authenticity of the JWT returned by Symphony's frontend using the public certificate that was used to sign the JWT. The following endpoint can be used to obtain the certificate:
Using this certificate, you can verify that the JWT has not been tampered with. The signing algorithm is RS512. You should check that the algorithm specified in the header reflects this to protect against some known exploits of JWTs. The JWT can be decoded on the backend to obtain the user's identity. The decoded JWT will have the following format:
This information can then be used by to authenticate the user on the app backend.
It depends.
If you are a partner developing a premium app for Symphony and want to know user identity information, you will need to implement application authentication. For example, you may need user identity information in your app if you have entitlements or access control maintained outside of Symphony that that is tied to a user's email address.
However, if you are simply looking for a unique identifier that will allow you to map user preferences, you can do this without app authentication - by using the anonymous userReferenceId provided by Symphony.
The architecture of apps built using Symphony's Extension API poses a unique challenge. These apps run as iframes within the Symphony client and interact with the client via JavaScript. Before Symphony can share any user identity information with the app, Symphony must be certain that the app is a verified partner application. The partner application also must be certain that the user identity information is coming from Symphony, which isn't obvious with the insecure iframe model. Mechanisms like OAuth and SAML do not establish this bidirectional trust in a way that would make this possible. While getting user identity via oAuth or SAML provides a way to securely identify the user, this does not address the lack of trust between the app and Symphony frontends.
Yes, you can test app authentication using developer mode, so long as there is a certificate that has been imported and trusted on your pod that matches the appId in your bundle file.
Integrate a Bot with an Identity Provider
By default, Symphony Messaging provides secure authentication and authorization for all users. However, if you already have an identity provider that authenticates and authorizes users for resources and you want those resources served by a bot, you will need to implement this integration yourself. This tutorial seeks to demonstrate one such implementation using an OAuth-like flow.
Chat Bot: Listens to commands from the user and contacts the other components
Authorization Server: A server that integrates with the Identity Provider. This server is trusted with privileged access to Symphony Messaging REST APIs.
App frontend sends request to its backend to initiate app backend to Symphony backend authentication, passing the pod ID.
4
App backend looks up the pod URL for backend authentication based on the pod ID. This step is only required for partners whose apps will be used by multiple customers. Enterprise developers will already know their pod URL.
5
App backend generates an app token (Ta).
6
App backend requests Symphony backend authentication using a public RSA key for the app, supplying Ta.
7
Symphony backend generates a Symphony token (Ts).
8
Symphony backend stores the (Ta, Ts) token pair for future validation.
At this point, trust has been established between the Symphony and app backends.
9
Symphony backend returns Ts to app backend.
10
App backend stores the (Ta, Ts) token pair for future validation.
11
App backend provides Ta to app frontend.
Ta is beginning the counter-clockwise journey around the the circle of trust.
12
App frontend registers app with Symphony frontend, passing appId and Ta.
Ta continues its journey.
13
Symphony frontend passes Ta to Symphony backend.
14
Symphony backend validates Ta, verifying it matches the Ta of a stored token pair.
At this point, Ta has come full circle -- the Symphony backend initially received it securely from the app backend and has now received it from the app backend again, via the app and Symphony frontends.
15
Symphony backend passes Ts back to the Symphony frontend, along with the signed user identity JWT, which will be asked for later.
For more details on the JWT, see the section on .
At this point, the Symphony frontend trusts that the app is valid (i.e. the app server can be trusted). Because Symphony trusts the app, Symphony will be able to return protected content, like user identity information. However, the app must now trust Symphony itself in order to trust the information that is returned.
Ts is beginning the clockwise journey around the the circle of trust.
16
As a response to app registration (Step 12), Symphony frontend will return Ts.
Ts continues its journey.
17
App frontend should pass Ts to app backend for validation.
18
App backend should validate Ts against the previously stored token pair.
For more details on this, see the section on .
19
App backend should return a confirmation (or denial) to the app frontend.
At this point, the app frontend trusts that Symphony is valid and can trust the information returned by Symphony. The app can now request user identity information from Symphony and trust the response.
20
App frontend can request the user identity information by calling the getJWT() method on the extended-user-info service.
21
Symphony frontend returns the JWT which includes user identity information.
For more details on the JWT, see the section on .
22
App frontend passes the JWT to app backend for verification.
The JWT is signed by the Symphony backend to ensure that it is not tampered with. The signature can be verified using publicly available certificate on the Symphony pod.
23
App backend requests the public app certificate used to sign the JWT from the Symphony backend.
24
Symphony backend returns the certificate in PEM format.
25
App backend verifies the JWT using the obtained certificate.
26
App backend can authenticate the user using the JWT contents. The implementation details of this are up to the developer.
27
App backend returns confirmation to app frontend.
At this point, the app fully trusts the Symphony user.
Step
Description
1
App frontend requests Symphony frontend for pod ID via the Extension API SYMPHONY.remote.hello() method.
2
Symphony frontend returns the pod ID to the app frontend.
#!/usr/bin/env bash
if [ $# -eq 0 ]
then
echo "Please inform a prefix for the keys. Optionally, inform as your second parameter the bit length to be used by your key generator"
exit 1
fi
cert_prefix=$1
if [ $# -eq 2 ]
then
bitlength=$2
else
bitlength=4096
fi
mkdir $cert_prefix
cd $cert_prefix
openssl genrsa -out "${cert_prefix}_privatekey.pem" $bitlength
openssl req -newkey rsa:$bitlength -x509 -key "${cert_prefix}_privatekey.pem" -out "${cert_prefix}_publickey.cer"
openssl pkcs8 -topk8 -nocrypt -in "${cert_prefix}_privatekey.pem" -out "${cert_prefix}_privatekey.pkcs8"
openssl x509 -pubkey -noout -in "${cert_prefix}_publickey.cer" > "${cert_prefix}_publickey.pem"
echo "Keys created in the folder: $(pwd)"
{
"aud" : "<id of app>",
"iss" : "Symphony Communication Services LLC.",
"sub" : "<Symphony user ID>",
"exp" : "<expiration date in millis>",
"user" : {
"id" : "<Symphony user ID>",
"emailAddress" : "<email address>",
"username" : "<email address>",
"firstName" : "<first name>",
"lastName" : "<last name>",
"displayName" : "<display name>",
"title" : "<title>",
"company" : "<company>",
"companyId" : "<company (pod) ID>",
"location" : "<location>",
"avatarUrl" : "<URL for user's avatar>",
"avatarSmallUrl" : "<URL for user's small avatar>"
}
}
https://<host>/pod/v1/podcert
{
"certificate": "<public certificate in PEM format>" // String
}
{
"aud" : "<id of app>",
"iss" : "Symphony Communication Services LLC.",
"sub" : "<Symphony user ID>",
"exp" : "<expiration date in millis>",
"user" : {
"id" : "<Symphony user ID>",
"emailAddress" : "<email address>",
"username" : "<email address>",
"firstName" : "<first name>",
"lastName" : "<last name>",
"displayName" : "<display name>",
"title" : "<title>",
"company" : "<company>",
"companyId" : "<company (pod) ID>",
"location" : "<location>",
"avatarUrl" : "<URL for user's avatar>",
"avatarSmallUrl" : "<URL for user's small avatar>"
}
}
In the past, apps could use Client Certificates to authenticate. This is not the case anymore, and only RSA is supported.
Application Authentication Sequence
Although the sequence below looks intimidating, many of the steps are completed on the Symphony side and are included for informational purposes only.
App Developer Prerequisites
Prerequisites for Authentication
JSON Web Tokens
App Developer Implementation
1. Identify the Symphony Pod
2. Initiate Backend Authentication
RSA App Authenticate
Request Body
3. Register your App
Validate Tokens returned by Symphony Frontend
Obtaining User Identity
getJwt()
Currently, calling getJwt() without having completed the application authentication sequence will return Undefined. We will be addressing this in an upcoming release so that userReferenceId will correctly be returned if application authentication has not been completed. In the interim, userReferenceId can still be obtained from the Register and Connect methods.
Verifying, Decoding and Using the JWT
To learn more about authenticating on behalf of a user, continue here:
FAQs
Do I need to implement application authentication?
Why isn't Symphony using OAuth or SAML?
I am a partner developer building and testing my app using developer mode in the browser. Can I test this flow?
Resource Server: A server where requested resources are served from. This server does not trust the bot to make arbitrary calls for user-owned data.
This sequence diagram describes the flow of requests between the various components.
We will be using the BDK for this example, so generate a scaffold project using the Bot Generator by following these instructions. We will also be using the Spring Boot integration so ensure that is selected at the framework question in the generator.
Once you have your project, we will first add web capability by changing spring-boot-starter to spring-boot-starter-web, then adding com.auth0:java-jwt for minting tokens.
If you haven't already configured your bot in application.yaml, do that now. Then, generate a new RSA key pair used to sign and verify tokens.
Add the keys to your project and list their paths in your application.yaml file. We will also disable the BDK's datafeed since this server will initiate calls from HTTP endpoints rather than Symphony Messaging events.
We will use this object to request for tokens from the Authorization Server, where we want to validate if a message ID is valid and the initiator's user ID matches what was requested.
This service will be our main logic class, serving HTTP requests and processing validation. We will inject in the location of our keys and use the BDK message service and user service.
We'll then add some utilities for loading our keys from disk.
Then we'll add a method to mint a JWT token. The contents of the token are arbitrary, but the recipient needs to understand the structure. We will be setting the user's email as the audience and the grant (or permission scope) to the subject.
Next, we'll add an endpoint to serve the public key. This will be used for resource servers to validate any tokens they receive.
Finally, the core logic goes into the token request process. This method obtains the original message payload from Symphony and validates that the actual sender matches the request. It then goes ahead to extract the intent of the message - assuming that this is for command-based flows where the first non-@mention word is the intent. That word will be used as the grant. The user's email address and grant are then used to mint a JWT token and it is returned.
The resource server will be a standard Spring Boot web server, enabled with Spring Security and will have no knowledge of Symphony. Create an empty maven project and add these dependencies:
Add an application.yaml to your resources root and add in the URI to obtain the public key on the Authorization Server we added earlier. We will also change the port to 8081 so that it can run concurrently with the Authorization Server that was left defaulted to 8080.
This project will use a standard Spring Boot main class as follows.
Next, add a Spring Security filter to pre-process incoming requests on the Resource Server. This filter first extracts the JWT token from the Authorization header, verifies the signature using the Authorization Server's public key, then adds the the user and grant to the security context's Authentication for use in controllers.
This filter then needs to be added to the Spring Security configuration. Before that happens, the public key is fetched from the Authorization Server and loaded.
Finally, the actual resource is served on a standard controller. This controller does a further check against the grant to ensure it aligns with the resource being requested.
We are now ready to build the bot itself. This project is similar to the Authorization Server in that it uses BDK 2.0 with the Spring Boot integration, so repeat that process once more. We will add the openfeign project for calling our HTTP endpoints.
We will need to enable feign on the main class by adding the @EnableFeignClients annotation.
Add the bot configuration itself and then the location of our Authorization and Resource servers.
Copy the MessageIdentityRequest class from the Authorization Server project into this project. Then, create 2 feign clients to communicate with the Authorization and Resource Server endpoints.
Finally, we'll add a command handler to receive a /balance command from the user. This will first request for a token from the Authorization Server, then use that token to request for the user's bank balance before returning that value in a message to the user.
Launch your project now and go to your Symphony pod, search for your bot and issue a /balance command. If your current user account is authorized by both the Authorization and Resource Servers, you will see an account balance message appear like on the left pane below. If not, you will observe the message on the right pane instead.
@SpringBootApplication
public class ResourceServer {
public static void main(String[] args) {
SpringApplication.run(ResourceServer.class, args);
}
}
JWTAuthorizationFilter.java
public class JWTAuthorizationFilter extends BasicAuthenticationFilter {
private final Logger log = LoggerFactory.getLogger(this.getClass());
public static final String HEADER_STRING = "Authorization";
public static final String TOKEN_PREFIX = "Bearer ";
public final RSAPublicKey publicKey;
public JWTAuthorizationFilter(AuthenticationManager authManager, RSAPublicKey publicKey) {
super(authManager);
this.publicKey = publicKey;
}
@Override
protected void doFilterInternal(HttpServletRequest req, HttpServletResponse res, FilterChain chain) {
log.info("Authorising");
String token = req.getHeader(HEADER_STRING);
try {
if (token != null && token.startsWith(TOKEN_PREFIX)) {
DecodedJWT jwt = JWT.require(Algorithm.RSA512(publicKey, null))
.build()
.verify(token.replace(TOKEN_PREFIX, ""));
String subject = jwt.getSubject();
String audience = jwt.getAudience().get(0);
// In reality: check that this user exists
log.info("Authorised: [{}] {}", audience, subject);
SecurityContextHolder.getContext().setAuthentication(
new UsernamePasswordAuthenticationToken(audience, subject, List.of()));
}
chain.doFilter(req, res);
} catch (Exception e) {
log.error("Authorisation failed");
}
}
}
SecurityConfig.java
@Configuration
public class SecurityConfig extends WebSecurityConfigurerAdapter {
@Value("${resource-server.publicKeyUri}")
private String publicKeyUri;
@Override
protected void configure(HttpSecurity http) throws Exception {
// Fetch public key from Authorization Server
HttpRequest request = HttpRequest.newBuilder()
.uri(new URI(publicKeyUri)).build();
String response = HttpClient.newBuilder()
.build().send(request, HttpResponse.BodyHandlers.ofString()).body();
// Load public key
String keyString = response
.replaceAll("-----(BEGIN|END) PUBLIC KEY-----", "")
.replaceAll(System.lineSeparator(), "");
byte[] keyBytes = Base64.decodeBase64(keyString);
KeyFactory keyFactory = KeyFactory.getInstance("RSA");
RSAPublicKey publicKey = (RSAPublicKey) keyFactory.generatePublic(new X509EncodedKeySpec(keyBytes));
// Configure all endpoints to be authenticated
// and use this auth filter in the chain
http.authorizeRequests()
.anyRequest().authenticated()
.and()
.addFilter(new JWTAuthorizationFilter(authenticationManager(), publicKey));
}
}
BalanceController.java
@RestController
public class BalanceController {
@GetMapping("/api/balance")
public long getBalance(UsernamePasswordAuthenticationToken token) {
String grant = token.getCredentials().toString();
if (grant.equals("/balance")) {
// in reality: fetch the user's actual balance
return (long) (Math.random() * 777);
}
else {
throw new ResponseStatusException(HttpStatus.FORBIDDEN, "Incorrect grant");
}
}
}
The BDK for Python is Symphony Messaging's preferred tooling for Python developers to build bots. It is a library of tools and API bindings that provides simplified configuration and authentication, intuitive message and room management, customizable message templating and an activities API that makes it easy to build bot workflows.
Authenticating your bot is made simple when using the BDK for Python. Once you have your bot and Symphony Messaging environment properly configured, the generated code provides an out of the box implementation for authenticating your bot:
By instantiating a new SymphonyBdk instance with your config.yaml file, the BDK loads in your config and authenticates your bot. Once authenticated, your bot is ready to leverage the REST APIs in order to create rich automations and workflows on Symphony Messaging .
BDK for Python also supports OBO (On-Behalf-Of) pattern of authentication, allowing an authenticated bot + extension application to perform operations on behalf of a given user. The BDK's implementation makes it easy to perform the following operations on behalf of a given user:
List the streams of a given user
Initiate connection requests to and determine connection status with other users
Get the presence state of other connected users
To leverage an OBO based workflow, simply instantiate an OBO Session in your bot project. The BDK allows you to instantiate your OBO session from a username or user ID. Once authenticated bots can perform any of the OBO workflows listed above:
BDK for Python makes it easy to manage multiple bot instances within a single project. As long as you have unique configuration files that correspond to different service accounts, you can manage multiple bot instances from a centralized source. To do so, simply instantiate multiple bot instances of the SymphonyBDK class within your bot project:
The BDK also provides a DatafeedService interface that makes it easier than ever for bots to manage real-time messages and events. The DatafeedService interface provides the following methods for your bot to use:
Method
Descriptions
For bots to listen to incoming events and messages, bots must subscribe to a custom RealTimeEventListener. This RealTimeEventListener class must implement eventType methods (e.g. onMessageSent()) along with custom business logic inside.
When a user sends a bot a message, the bot will pick up the event from the datafeed and check to see if an implemented eventType method matches the eventType (MESSAGESENT) of the inbound event. If there is a corresponding eventType method registered, the bot will execute the business logic inside of this eventType method. Otherwise the bot will not perform an action and will continue to listen for inbound events from the datafeed. An example implementation is provided out of the box by the BDK:
Below is a full list of methods provided by the RealTimeEventListener class and their corresponding eventTypes. Implement the following methods in order to listen for a given Symphony Messaging event:
Method
Event Type
For more information on the Symphony datafeed continue here:
A Symphony Messaging workflow can be thought of as a sequence of operations or a repeatable pattern of activities that are organized together in order to transform data, provide a service, or process information. Each of these operations or activities may be completed by a single user, shared between a bot and a user, or shared between multiple actors including bots, users, and even third party systems.
By providing an intuitive Activities API, the BDK for Python makes it simple to define a set of discrete operations or activities for different actors in your system to execute. Ultimately, these activities constitute the building blocks for a powerful Symphony Messaging workflow automation.
Once you have defined a discrete set of activities for different actors in your system to execute, the next step is to organize them together in an intelligent way.
BDK for Python provides an Activities API, an interface that makes it easy to manage user-to-bot interactions or activities. Specifically, the Activities API provides easy access to message and room context, initiator metadata, and an intuitive way to interact with the datafeed, making it easy for bots to listen and reply to different Symphony Messaging events. The methods and logic provided by the Activities API allows for granular control over the entire user-to-bot interaction. This encapsulated logic is easily reused, forming the discrete building blocks of a Symphony Messaging workflow automation.
In order to register activities for your bot instance, you must leverage the ActivityRegistry class:
There are two different types of activities supported by the BDK:
Command Activity: an activity triggered when a message is sent in an IM or Chatroom.
Form Activity: an activity triggered when a user replies to an Elements form message.
A command-based activity is triggered when a message is sent in an IM or Chatroom. Using the Activities API allows developers to register commands in the following formats:
@bdk-bot /buy (Slash command with a bot @mention)
/buy 1000 goog (Slash command without a bot @mention)
Listen for the word 'hello' (Not a Slash command - Listen for a specific word)
The Activities API also makes it easy for Bots to listen for elements form submissions. Assume the following elements form has been posted into a room with the following attributes:
form id = "hello-form"
<text-field> name = "name"
form contains an action button
In order to register a form activity or listen for an incoming elements form submission, bots must register a class that extends the FormReplyActivity class:
As shown above, the Activities API makes it simple to manage incoming commands, elements form submissions, and access message context making it easy to manage bot-user interactions and create custom workflows.
As shown above, the BDK for Python makes it easy to create a datafeed and listen for events through the RealTimeEventListener class. In addition, this class makes it easy to access user, message, and room data in context. Each eventType method is implemented with instances of V4Initiator and V4MessageSent objects:
Use the V4Initiator class methods to access the the user data in context:
Method
User Attribute
Use the V4MessageSent class methods to access message data in context:
Method
Attribute
Use the V4MessageSent class methods to access stream data in context:
Method
Attribute
The Activities API also makes it easy to access relevant user, message, and stream data in context. CommandActivity classes have access to to this data through the CommandContext class. This class is instantiated with instances of V4Initiator and V4MessageSent objects. Bots are able access to the user, message, and stream data in context through the same methods shown above. Leverage these methods within the on_activity() method shown below:
FormActivity classes have access to relevant user, form, and stream data through the FormReplyContext class. This class is instantiated with instances of the V4Initiator and V4SymphonyElementsAction class. The V4SymphonyElementsAction class provides the following methods to access form data in context:
The BDK for Python also supports message templating. In order to use message templating, you must leverage the Jinja template engine. Below is an example:
The corresponding Jinja template is shown below:
Using templating you can also create Element Forms. Below is an example of a price enquiry form template:
Initiate IMs with other users
Send messages and attachments
Set the context user's own presence
unsubscribe(RealTimeEventListener)
Unsubscribe from a custom event listener class.
onRoomCreated()
ROOMCREATED
onRoomUpdated()
ROOMUPDATED
onRoomDeactivated()
ROOMDEACTIVATED
onRoomReactivated()
ROOMACTIVATED
onUserRequestedToJoinRoom()
USERREQUESTEDTOJOINROOM
onUserJoinedRoom()
USERJOINEDROOM
onUserLeftRoom()
USERLEFTROOM
onRoomMemberPromotedToOwner()
ROOMMEMBERPROMOTEDTOOWNER
onRoomMemberDemotedFromOwner()
ROOMMEMBERDEMOTEDFROMOWNER
onConnectionRequested()
CONNECTIONREQUESTED
onConnectionAccepted()
CONNECTIONACCEPTED
onSymphonyElementsAction()
SYMPHONYELEMENTSACTION
onSharedPost()
SHAREDPOST
initiator.user.display_name
Display Name
initiator.user.email
Email
initiator.user.user_name
Username
event.message.shared_message
Shared Message
event.message.data
Message Data
event.message.attachments
Message Attachments
event.message.stream.members
Room Members
event.message.stream.external
External
event.message.stream.cross_pod
Cross Pod
Elements Form ID
context.source_event.form_values
Elements Form Values
start()
Start the bot's datafeed
stop()
Stop the bot's datafeed
subscribe(RealTimeEventListener)
onMessageSent()
MESSAGESENT
onInstantMessageCreated()
INSTANTMESSAGECREATED
onMessageSuppressed()
initiator.user.user_id
User ID
initiator.user.first_name
First Name
initiator.user.last_name
event.message.message_id
Message ID
event.message.timestamp
Message Timestamp
event.message.message
event.message.stream.stream_id
Stream ID
event.message.stream.stream_type
Stream Type
event.message.stream.room_name
Method
Attribute
context.source_event.stream.stream_id
Elements Stream ID
context.source_event.form_message_id
Elements Message ID
Note: You must have a corresponding service or bot account setup on your Symphony Messaging instance before authenticating. For more information navigate to the Creating a Bot User guide.
OBO Authentication
Please follow our 'Getting Started with OBO' guide using the link here.
The guide will cover all of the prerequisites needed for OBO and how to enable & upload the OBO extension application, the required permissions and how to ensure the OBO authentication process will work successfully.
Managing Multiple Bots
Datafeed Management
Orchestrating Workflows with BDK for Python
Activities API
Registering Activities
Command Activities
Note: If you choose to create your own CommandActivity class, you must implement the matcher() and on_activity() methods provided by the AbstractActivity class. For more information on the implementation of the CommandActivity class, continue here.
Form Activities
Note: If you wish to create your own FormReplyActivity class, you must implement the methods matcher() and on_activity() methods provided by the AbstractActivity class. For more information on the implementation for the FormReplyActivity class, continue here.
Subscribe a custom event listener class. Inside this class is where the bulk of your business logic goes.
MESSAGESUPPRESSED
Last Name
Message Text
Room Name
context.source_event.form_id
# setup SymphonyBdk facade object
config = BdkConfigLoader.load_from_file(Path.joinpath(current_dir, 'resources', 'config.yaml'))
# authenticate on - behalf - of a given user using username or user_id
obo_auth_session = bdk.obo(username = "username")
obo_auth_session = bdk.obo(user_id = "123456789L")
# list streams OBO user "user.name"
bdk.obo_services(obo_auth_session).streams().list_all_streams(stream_filter)
# Bot #1
config_a = BdkConfigLoader.load_from_symphony_dir("config_a.yaml")
# Bot #2
config_b = BdkConfigLoader.load_from_symphony_dir("config_b.yaml")
# use your two service accounts
async with SymphonyBdk(config_a) as bdk_a, SymphonyBdk(config_b) as bdk_b:
# subscribe to real-time event listener
datafeed_loop = bdk.datafeed()
datafeed_loop.subscribe(RealTimeEventListenerImpl())
class RealTimeEventListenerImpl(RealTimeEventListener):
# on a message sent, the bot replies with "Hello, {User Display Name}!"
async def on_message_sent(self, initiator: V4Initiator, event: V4MessageSent):
name = initiator.user.display_name
stream_id = event.message.stream.stream_id
response = f"Hello, {name}"
await bdk.messages().send_message(stream_id, response)
async def run():
async with SymphonyBdk(BdkConfigLoader.load_from_symphony_dir("config.yaml")) as bdk:
# Access to the registry for activities
activity_registry = bdk.activities()
async def run():
config = BdkConfigLoader.load_from_symphony_dir("config.yaml")
async with SymphonyBdk(config) as bdk:
activities = bdk.activities()
@activities.slash("/buy", # (1)
True, # (2)
"Command Description") # (3)
async def callback(context: CommandContext):
logging.debug("Hello slash command triggered by user %s", context.initiator.user.display_name)
async def run():
config = BdkConfigLoader.load_from_symphony_dir("config.yaml")
async with SymphonyBdk(config) as bdk:
activities = bdk.activities()
@activities.slash("/buy {quantity} {$ticker}", # (1)
False, # (2)
"Command Description") # (3)
async def on_echo_mention(context: CommandContext):
# can also be retrieved with context.arguments.get("ticker").value
ticker = context.arguments.get_cashtag("ticker").value
quantity = context.arguments.get_string("quantity")
message = f"Buy ticker {ticker} with quantity {quantity}"
# send confirmation back to user
await messages.send_message(context.stream_id, f"{message}")
async def run():
async with SymphonyBdk(BdkConfigLoader.load_from_symphony_dir("config.yaml")) as bdk:
bdk.activities().register(HelloCommandActivity(bdk.messages()))
await bdk.datafeed().start()
class HelloCommandActivity(CommandActivity):
def __init__(self, messages: MessageService):
self._messages = messages
super().__init__()
# The matches() method allows the activity logic to be triggered when a message contains hello
def matches(self, context: CommandContext) -> bool:
match_string = "hello"
return context.text_content.contains(match_string)
async def on_activity(self, context: CommandContext):
# The activity logic. Here, we send a message: “Hello, There”
await self._messages.send_message(context.stream_id, "Hello, There!)
<h2>Hello Form</h2>
<form id="hello-form">
<text-field name="name" placeholder="Enter a name here..."/>
<button name="submit" type="action">Submit</button>
</form>
has been released! The BDK 2.0 will stop being supported in August 2024. Please consider migrating to keep up with the latest features!
Overview
The BDK for Java is Symphony Messaging's preferred tooling for Java developers to build bots. It is a library of tools and API bindings that provides simplified configuration and authentication, intuitive message and room management, customizable message templating and an activities API that makes it easy to build bot workflows.
Once you have your bot and Symphony Messaging environment properly configured, the generated code provides an out-of-the-box implementation for authenticating your bot:
By instantiating a new SymphonyBdk instance with your config.yaml file, the BDK loads in your config and authenticates your bot. Once authenticated, your bot is ready to leverage the REST APIs in order to create rich automations and workflows on Symphony Messaging.
BDK for Java also supports the OBO (On-Behalf-Of) pattern of authentication, allowing an authenticated bot + extension application to perform operations on behalf of a given user. The BDK's implementation makes it easy to perform the following operations on behalf of a given user:
List the streams of a given user
Initiate connection requests to and determine connection status with other users
Get the presence state of other connected users
To leverage an OBO based workflow, simply instantiate an OBO Session in your bot project. The BDK allows you to instantiate your OBO session from a username or user ID. Once authenticated bots can perform any of the OBO workflows listed above:
BDK for Java makes it easy to manage multiple bot instances within a single project. As long as you have unique configuration files that correspond to different service accounts, you can manage multiple bot instances from a centralized source. To do so, simply instantiate multiple bot instances of the SymphonyBDK class within your bot project:
The BDK also provides a DatafeedService interface that makes it easier than ever for bots to manage real-time messages and events. The DatafeedService interface provides the following methods for your bot to use:
Method
Descriptions
For bots to listen to incoming events and messages, bots must subscribe to a custom RealTimeEventListener. This RealTimeEventListener class must implement eventType methods (e.g. onMessageSent()) along with custom business logic inside.
When a user sends a bot a message, the bot will pick up the event from the datafeed and check to see if an implemented eventType method matches the eventType (MESSAGESENT) of the inbound event. If there is a corresponding eventType method registered, the bot will execute the business logic inside of this eventType method. Otherwise the bot will not perform an action and will continue to listen for inbound events from the datafeed. An example implementation is provided out of the box by the BDK:
Below is a full list of methods provided by the RealTimeEventListener class and their corresponding eventTypes. Implement the following methods in order to listen for a given Symphony Messaging event:
Method
Event Type
For more information on the Symphony Messaging datafeed continue here:
A Symphony Messaging workflow can be thought of as a sequence of operations or a repeatable pattern of activities that are organized together in order to transform data, provide a service, or process information. Each of these operations or activities may be completed by a single user, shared between a bot and a user, or shared between multiple actors including bots, users, and even third party systems.
By providing an intuitive Activities API, the BDK makes it simple to define a set of discrete operations or activities for different actors in your system to execute. Ultimately, these activities constitute the building blocks for a powerful Symphony Messaging workflow automation.
Once you have defined a discrete set of activities for different actors in your system to execute, the next step is to organize them together in an intelligent way. The BDK provides a powerful Workflow API (coming soon) that makes it easy to organize a sequence of activities together, and subsequently orchestrate a Symphony Messaging workflow.
BDK for Java provides an Activities API, an interface that makes it easy to manage user-to-bot interactions or activities. Specifically, the Activities API provides easy access to message and room context, initiator metadata, and an intuitive way to interact with the datafeed, making it easy for bots to listen and reply to different Symphony Messaging events. The methods and logic provided by the Activities API allows for granular control over the entire user-to-bot interaction. This encapsulated logic is easily reused, forming the discrete building blocks of a Symphony Messaging workflow automation.
In order to register activities for your bot instance, you must leverage the ActivityRegistry class:
There are two different types of activities supported by the BDK:
Command Activity: an activity triggered when a message is sent in an IM or Chatroom.
Form Activity: an activity triggered when a user replies to an Elements form message.
A command-based activity is triggered when a message is sent in an IM or Chatroom. Using the Activities API allows developers to register commands in the following formats:
@bot/buy (Slash command with a bot @mention)
/buy 1000 $goog (Slash command without a bot @mention)
Listen for the word hello (Not a Slash command - just listen for messages containing a specific word)
The Activities API also makes it easy for Bots to listen for elements form submissions. Assume the following elements form has been posted into a room with the following attributes:
form id = "hello-form"
<text-field> name = "name"
form contains an action button
In order to register a form activity or listen for an incoming elements form submission, bots must register a class that extends the FormReplyActivity class:
As shown above, the Activities API makes it simple to manage incoming commands, elements form submissions, and access message context making it easy to manage bot-user interactions and create custom workflows.
As shown above, the BDK makes it easy to create a datafeed and listen for events through the RealTimeEventListener class. In addition, this class makes it easy to access user, message, and room data in context. Each eventType method is implemented with instances of V4Initiator and V4MessageSent objects:
Use the V4Initiator class methods to access the the user data in context:
Method
User Attribute
Use the V4MessageSent class methods to access message data in context:
Method
Attribute
Use the V4MessageSent class methods to access stream data in context:
Method
Attribute
The Activities API also makes it easy to access relevant user, message, and stream data in context. CommandActivity classes have access to to this data through the CommandContext class. This class is instantiated with instances of V4Initiator and V4MessageSent objects. Bots are able access to the user, message, and stream data in context through the same methods shown above. Leverage these methods within the onActivity() method shown below:
FormActivity classes have access to relevant user, form, and stream data through the FormReplyContext class. This class is instantiated with instances of the V4Initiator and V4SymphonyElementsAction class. The V4SymphonyElementsAction class provides the following methods to access form data in context:
The BDK for Java also supports custom and built in message templating. The BDK is agnostic to what templating library developers choose, with built-in support for FreeMarker and Handlebars. In order to use message templating, you must leverage the TemplateEngine class provided by the BDK.
If you wish to build your own custom message template, you must implement one of the newTemplate() methods provided by the TemplateEngine class:
newTemplateFromFile()
newTemplateFromClasspath()
newTemplateFromString()
The following shows an implementation of the newTemplateFromClasspath() method:
The corresponding FreeMarker template should be stored in the classpath root i.e. src/main/resources/hello.ftl
The BDK for Java's Spring Boot integration provides native annotations, making it easy to configure your bot's datafeed listeners and register command activities. Start with a standard Spring Boot main class.
Now you can create a component for bot applications by annotating classes with the @Component annotation:
The Core Starter uses to deliver Real Time Events.
You can subscribe to any Real Time Event from anywhere in your application by creating a handler method with two conditions:
Be annotated with
Have a com.symphony.bdk.spring.events.RealTimeEvent<? extends T> parameter
You can easily register a slash command using the @Slash annotation. Note that the CommandContext is mandatory to successfully register your command. If not defined, a warn message will appear in your application log:
Any service or component class that extends FormReplyActivity or CommandActivity will be automatically registered within the ActivityRegistry
Initiate IMs with other users
Send messages and attachments
Set the context user's own presence
unsubscribe(RealTimeEventListener)
Unsubscribe from a custom event listener class.
onRoomCreated()
ROOMCREATED
onRoomUpdated()
ROOMUPDATED
onRoomDeactivated()
ROOMDEACTIVATED
onRoomReactivated()
ROOMACTIVATED
onUserRequestedToJoinRoom()
USERREQUESTEDTOJOINROOM
onUserJoinedRoom()
USERJOINEDROOM
onUserLeftRoom()
USERLEFTROOM
onRoomMemberPromotedToOwner()
ROOMMEMBERPROMOTEDTOOWNER
onRoomMemberDemotedFromOwner()
ROOMMEMBERDEMOTEDFROMOWNER
onConnectionRequested()
CONNECTIONREQUESTED
onConnectionAccepted()
CONNECTIONACCEPTED
onSymphonyElementsAction()
SYMPHONYELEMENTSACTION
onSharedPost()
SHAREDPOST
initiator.getUser().getDisplayName()
Display Name
initiator.getUser().getEmail()
Email
initiator.getUser().getUsername()
Username
event.getMessage().getSharedMessage()
Shared Message
event.getMessage().getData()
Message Data
event.getMessage().getAttachments()
Message Attachments
event.getMessage().getStream().getMembers()
Room Members
event.getMessage().getStream().getExternal()
External
event.getMessage().getStream().getCrossPod()
Cross Pod
Elements Form ID
context.getSourceEvent().getFormValues()
Elements Form Values
start()
Start the bot's datafeed
stop()
Stop the bot's datafeed
subscribe(RealTimeEventListener)
onMessageSent()
MESSAGESENT
onInstantMessageCreated()
INSTANTMESSAGECREATED
onMessageSuppressed()
initiator.getUser().getUserId()
User ID
initiator.getUser().getFirstName()
First Name
initiator.getUser().getLastName()
event.getMessage().getMessageId()
Message ID
event.getMessage().getTimestamp()
Message Timestamp
event.getMessage().getMessage()
event.getMessage().getStream().getStreamId()
Stream ID
event.getMessage().getStream().getStreamType()
Stream Type
event.getMessage().getStream().getRoomName()
Method
Attribute
context.getSourceEvent().getStream()
Elements Stream ID
context.getSourceEvent().getFormMessageId()
Elements Message ID
Note: You must have a corresponding service or bot account setup on your Symphony Messaging instance before authenticating. For more information navigate to the Creating a Bot User guide.
OBO Authentication
Please follow our 'Getting Started with OBO' guide using the link here.
The guide will cover all of the prerequisites needed for OBO and how to enable & upload the OBO extension application, the required permissions and how to ensure the OBO authentication process will work successfully.
Managing Multiple Bots
Datafeed Management
Orchestrating Workflows with BDK for Java
Activities API
Registering Activities
Command Activities
Note: If you choose to create your own CommandActivity class, you must implement the matcher() and onActivity() methods provided by the AbstractActivity class. For more information on the implementation of the CommandActivity class, continue here.
Form Activities
Note: If you wish to create your own FormReplyActivity class, you must implement the methods matcher(), onActivity() and info() methods provided by the AbstractActivity class. For more information on the implementation for the FormReplyActivity class, continue here.
Subscribe a custom event listener class. Inside this class is where the bulk of your business logic goes.
MESSAGESUPPRESSED
Last Name
Message Text
Room Name
context.getSourceEvent().getFormId()
// setup SymphonyBdk facade object
final SymphonyBdk bdk = new SymphonyBdk(loadFromSymphonyDir("config.yaml"));
//authenticate on-behalf-of a given user
final AuthSession oboSessionUsername = bdk.obo("user.name");
final AuthSession oboSessionUserId = bdk.obo(123456789L);
// list streams OBO user "user.name"
bdk.streams().listStreams(oboSessionUsername, new StreamFilter());
// Bot #1
final SymphonyBdk bot1 = new SymphonyBdk(loadFromClasspath("/config_1.yaml"));
//Bot #2
final SymphonyBdk bot2 = new SymphonyBdk(loadFromClasspath("/config_2.yaml"));
// subscribe to "onMessageSent" real-time event
bdk.datafeed().subscribe(new RealTimeEventListener() {
@Override
public void onMessageSent(V4Initiator initiator, V4MessageSent event) {
// on a message sent, the bot replies with "Hello, {User Display Name}!"
bdk.messages().send(event.getMessage().getStream(), "<messageML>Hello, " + initiator.getUser().getDisplayName() + "!</messageML>");
}
});
public static void main(String[] args) throws Exception {
// Create BDK entry point
final SymphonyBdk bdk = new SymphonyBdk(loadFromSymphonyDir("config.yaml"));
// Access to the registry for activities
final ActivityRegistry registry = bdk.activities();
}
@SpringBootApplication
public class BotApplication {
public static void main(String[] args) {
SpringApplication.run(Application.class, args);
}
}
@Component
public class HelloCommand {
@Autowired
private MessageService messages;
@EventListener
public void onMessageSent(RealTimeEvent<? extends V4MessageSent> event) {
messages.send(event.getSource().getMessage().getStream(), "Hello!");
}
}
@Slf4j
@Component
public class RealTimeEventsDemo {
@EventListener
public void onMessageSent(RealTimeEvent<? extends V4MessageSent> event) {
log.info(event.toString());
}
@EventListener
public void onUserJoined(RealTimeEvent<? extends V4UserJoinedRoom> event) {
log.info(event.toString());
}
@EventListener
public void onUserLeft(RealTimeEvent<? extends V4UserLeftRoom> event) {
log.info(event.toString());
}
}
@Component
public class SlashHello {
@Slash("/hello")
public void onHello(CommandContext commandContext) {
log.info("On /hello command");
}
@Slash(value="/hello", mentionBot=false)
public void onHelloNoMention(CommandContext commandContext) {
log.info("On /hello command (bot has not been mentioned)");
}
}
@Slf4j
@Component
public class GifFormActivity extends FormReplyActivity<FormReplyContext> {
@Autowired
private MessageService messageService;
@Slash("/gif")
public void displayGifForm(CommandContext context) throws TemplateException {
this.messageService.send(context.getStreamId(), "/templates/gif.ftl", emptyMap());
}
public ActivityMatcher<FormReplyContext> matcher() {
return context -> "gif-category-form".equals(context.getFormId())
&& "submit".equals(context.getFormValue("action"))
&& StringUtils.isNotEmpty(context.getFormValue("category"));
}
public void onActivity(FormReplyContext context) {
log.info("Gif category is \"{}\"", context.getFormValue("category"));
}
protected ActivityInfo info() {
return new ActivityInfo().type(ActivityType.FORM)
.name("Gif Display category form command")
.description("Form handler for the Gif Category form");
}
}
RSA Authentication Workflow
This pages describes the implementation of RSA Authentication. For the API reference of RSA Session Authenticate and Key Manager Authenticate, see the following API endpoints:
Note: The following authentication sequence is provided out of the box by our dedicated SDKs and BDK. To learn more about authenticating using the SDKs or BDK proceed to one of following configuration guides:
Summary
The Authentication process requires the following steps:
The user creates a public/private RSA key pair.
The admin imports the public key into the pod using the Admin Console or public APIs.
The user creates a short-lived JWT (JSON Web Token) and signs it with their private key.
The bot makes a call the the authentication endpoints. Here, the server checks the signature of the JWT against the public key and returns an authentication token.
The public/private key pair for signing authentication requests requires the following:
A JWT payload has to be signed with RS512 ()"
A X.509 format for public keys and PKCS#1 or PKCS#8 for private keys
PEM-encoded keys
Generate the PKCS#1 keys manually using the following commands:
Generate the PKCS#8 keys manually using the following commands. You can provide the Service Account's username as the Common Name (CN) but it is not a mandatory requirement.
Sign the authentication request using either privatekey.pkcs8 or privatekey.pem, depending on the support available in the JWT library.
The file publickey.pem is the public key. This is the key you will import into the pod in step 2.
Navigate to the Admin Console and create a new Service Account. Copy the contents of the pubkey.pem file you just created and paste into the textbox under the Authentication section:
Add your bot's basic information:
If successful, you should see the following:
To authenticate on the Pod and the Key Manager, the bot must call the authentication endpoints, passing a short-lived JWT token in the body of the request. The JWT token must contain the following:
a subject matching the username of the user to authenticate
an expiration time of no more than 5 minutes from the current timestamp (needed to prevent replay attacks)
a signature by a private RSA key matching a public key stored for the user in the Pod
The following script generates the authentication request:
The output of the script is a JWT:
The authentication token can be inspected on or .
Obtain a valid Session Token by making a POST request to your company's Session Auth endpoint:
A successful response:
Obtain a valid Key Manager Token by making a POST request to your company's Key Manager Auth endpoint:
A successful response:
You can replace the public key pubkeyA for a user with a new key, pubkeyB (for example, as part of an organization's key rotation schedule). Note the following outcomes:
When a key is replaced, the key pubkeyA becomes the user's previous key, and the newly uploaded pubkeyB becomes the current key.
The previous key is valid for 72 hours, but you can extend that period indefinitely in intervals of 72 hours.
While the previous key is valid, both keys can be used for authentication. When it expires, it can no longer be used to authenticate the user.
Alternatively, you can revoke a user key (current or previous), for example, if the key is compromised. Note the following outcomes:
When a key is revoked, it can no longer be used for authentication.
If a user has a non-expired previous key and their current key is revoked, the previous key becomes the new current key.
When a key is revoked, the user's sessions initiated with RSA authentication are invalidated.
To replace/revoke a key, navigate to the Bot's account in the admin portal > RSA > Replace or Revoke:
You can also use the following REST API call to programmatically replace a public key:
Additionally you can programmatically revoke a public key using either currentKey or previousKey. Use the following REST request to programmatically revoke a public key using currentKey:
Use the following REST request to programmatically revoke a public key using previousKey:
Use the following REST request to programmatically extend a public key:
package com.symphony.util.jwt;
import io.jsonwebtoken.Jwts;
import io.jsonwebtoken.SignatureAlgorithm;
import org.bouncycastle.asn1.pkcs.RSAPrivateKey;
import org.bouncycastle.crypto.params.RSAPrivateCrtKeyParameters;
import org.bouncycastle.crypto.util.PrivateKeyInfoFactory;
import org.bouncycastle.openssl.jcajce.JcaPEMKeyConverter;
import org.bouncycastle.util.io.pem.PemObject;
import org.bouncycastle.util.io.pem.PemReader;
import java.io.FileNotFoundException;
import java.io.IOException;
import java.io.StringReader;
import java.nio.charset.StandardCharsets;
import java.nio.file.Files;
import java.nio.file.Paths;
import java.security.GeneralSecurityException;
import java.security.Key;
import java.security.KeyFactory;
import java.security.PrivateKey;
import java.security.spec.PKCS8EncodedKeySpec;
import java.util.Base64;
import java.util.Date;
import java.util.stream.Stream;
/**
* Class used to generate JWT tokens signed by a specified private RSA key.
* Libraries needed as dependencies:
* - BouncyCastle (org.bouncycastle.bcpkix-jdk15on) version 1.59.
* - JJWT (io.jsonwebtoken.jjwt) version 0.9.1.
*
*
*/
public class JwtHelper {
// PKCS#8 format
private static final String PEM_PRIVATE_START = "-----BEGIN PRIVATE KEY-----";
private static final String PEM_PRIVATE_END = "-----END PRIVATE KEY-----";
// PKCS#1 format
private static final String PEM_RSA_PRIVATE_START = "-----BEGIN RSA PRIVATE KEY-----";
private static final String PEM_RSA_PRIVATE_END = "-----END RSA PRIVATE KEY-----";
/**
* Get file as string without spaces
* @param filePath: filepath for the desired file.
* @return
*/
public static String getFileAsString(String filePath) throws IOException {
StringBuilder message = new StringBuilder();
String newline = System.getProperty("line.separator");
if (!Files.exists(Paths.get(filePath))) {
throw new FileNotFoundException("File " + filePath + " was not found.");
}
try (Stream<String> stream = Files.lines(Paths.get(filePath))) {
stream.forEach(line -> message
.append(line)
.append(newline));
// Remove last new line.
message.deleteCharAt(message.length() -1);
} catch (IOException e) {
System.out.println(String.format("Could not load content from file: %s due to %s",filePath, e));
System.exit(1);
}
return message.toString();
}
/**
* Creates a JWT with the provided user name and expiration date, signed with the provided private key.
* @param user the username to authenticate; will be verified by the pod
* @param expiration of the authentication request in milliseconds; cannot be longer than the value defined on the pod
* @param privateKey the private RSA key to be used to sign the authentication request; will be checked on the pod against
* the public key stored for the user
*/
private static String createSignedJwt(String user, long expiration, Key privateKey) {
return Jwts.builder()
.setSubject(user)
.setExpiration(new Date(System.currentTimeMillis() + expiration))
.signWith(SignatureAlgorithm.RS512, privateKey)
.compact();
}
/**
* Create a RSA Private Key from a PEM String. It supports PKCS#1 and PKCS#8 string formats
*/
private static PrivateKey parseRSAPrivateKey(String privateKeyFilePath) throws GeneralSecurityException, IOException {
String pemPrivateKey = getFileAsString(privateKeyFilePath);
try {
if (pemPrivateKey.contains(PEM_PRIVATE_START)) { // PKCS#8 format
String privateKeyString = pemPrivateKey
.replace(PEM_PRIVATE_START, "")
.replace(PEM_PRIVATE_END, "")
.replace("\\n", "\n")
.replaceAll("\\s", "");
byte[] keyBytes = Base64.getDecoder().decode(privateKeyString.getBytes(StandardCharsets.UTF_8));
PKCS8EncodedKeySpec keySpec = new PKCS8EncodedKeySpec(keyBytes);
KeyFactory fact = KeyFactory.getInstance("RSA");
return fact.generatePrivate(keySpec);
} else if (pemPrivateKey.contains(PEM_RSA_PRIVATE_START)) { // PKCS#1 format
try (PemReader pemReader = new PemReader(new StringReader(pemPrivateKey))) {
PemObject privateKeyObject = pemReader.readPemObject();
RSAPrivateKey rsa = RSAPrivateKey.getInstance(privateKeyObject.getContent());
RSAPrivateCrtKeyParameters privateKeyParameter = new RSAPrivateCrtKeyParameters(
rsa.getModulus(),
rsa.getPublicExponent(),
rsa.getPrivateExponent(),
rsa.getPrime1(),
rsa.getPrime2(),
rsa.getExponent1(),
rsa.getExponent2(),
rsa.getCoefficient()
);
return new JcaPEMKeyConverter().getPrivateKey(PrivateKeyInfoFactory.createPrivateKeyInfo(privateKeyParameter));
} catch (IOException e) {
throw new GeneralSecurityException("Invalid private key.");
}
} else {
throw new GeneralSecurityException("Invalid private key.");
}
} catch (Exception e) {
throw new GeneralSecurityException(e);
}
}
public static String createJwt(String username, String privateKeyFilePath) throws IOException, GeneralSecurityException {
final long expiration = 300000L;
final PrivateKey privateKey = parseRSAPrivateKey(privateKeyFilePath);
return createSignedJwt(username, expiration, privateKey);
}
public static void main(String[] args) throws IOException, GeneralSecurityException {
final String username = System.getProperty("user");
final String privateKeyFile = System.getProperty("key");
final String jwt = createJwt(username, privateKeyFile);
System.out.println(jwt);
}
}
"""
0) Use python 3
1) Install python dependency required to run this script by:
pip install python-jose
2) The .pem file used in this script was generated from the previous step of this tutorial.
3) Create a create_jwt.py file, copy and paste the content you see here. Place your private key .pem file in the same directory as this script.
4) Change the value of \'sub\' to your Symphony service account username. Change the filename of the .pem file to the filename of your .pem file.
5) Generate jwt token simply by:
python create_jwt.py
6) You will see the jwt token in terminal output.
"""
from jose import jwt
import datetime as dt
def create_jwt():
private_key = get_key()
expiration_date = int(dt.datetime.now(dt.timezone.utc).timestamp() + (5 * 58))
payload = {
'sub': "username_of_service_account",
'exp': expiration_date
}
encoded = jwt.encode(payload, private_key, algorithm='RS512')
print(encoded)
def get_key():
with open('filename_of_private_key.pem', 'r') as f:
content =f.readlines()
key = ''.join(content)
return key
if __name__ == '__main__':
create_jwt()
// Based on https://github.com/jwtk/njwt
'use strict';
let crypto = require('crypto');
function nowEpochSeconds() {
return Math.floor(new Date().getTime() / 1000);
}
function base64urlEncode(str) {
return new Buffer(str)
.toString('base64')
.replace(/\+/g, '-')
.replace(/\//g, '_')
.replace(/=/g, '');
}
function Jwt(username, signingKey) {
this.header = {};
this.body = {};
this.header.alg = 'RS512';
this.body.sub = username
this.body.exp = (nowEpochSeconds() + (5 * 60)); // five minutes in seconds
this.signingKey = signingKey;
return this;
}
Jwt.prototype.sign = function sign(payload, cryptoInput) {
let buffer = crypto.createSign('RSA-SHA512').update(payload).sign(cryptoInput);
return base64urlEncode(buffer);
};
Jwt.prototype.compact = function compact() {
let segments = [];
segments.push(base64urlEncode(JSON.stringify(this.header)));
segments.push(base64urlEncode(JSON.stringify(this.body)));
console.log("segments ", segments);
console.log("segments join ", segments.join('.'));
console.log("Signing key ", this.signingKey);
this.signature = this.sign(segments.join('.'), this.signingKey);
segments.push(this.signature);
return segments.join('.');
};
const secret = "-----BEGIN RSA PRIVATE KEY-----\n" +
"...REDACTED..."
"-----END RSA PRIVATE KEY-----";
const user = 'bot.user1';
const jwt = new Jwt(user, secret);
const jws = jwt.compact();
console.log("========== JWS ==========")
console.log(jws);
using Microsoft.IdentityModel.Tokens;
using Org.BouncyCastle.Crypto;
using Org.BouncyCastle.Crypto.Parameters;
using Org.BouncyCastle.OpenSsl;
using System;
using System.Configuration;
using System.IdentityModel.Tokens.Jwt;
using System.IO;
using System.Security;
using System.Security.Claims;
using System.Security.Cryptography;
namespace Symphony.Util.Jwt
{
/// <summary>
/// Class used to generate JWT tokens signed by a specified private RSA key.
/// Libraries needed as dependencies:
/// - BouncyCastle version >= 1.8.5
/// - System.IdentityModel.Tokens.Jwt version >= 5.4.0
/// </summary>
public class JwtHelper
{
/// <summary>
/// Creates a JWT with the provided user name and expiration date, signed with the provided private key.
/// </summary>
/// <param name="user">The username to authenticate; will be verified by the pod.</param>
/// <param name="expiration">Expiration of the authentication request in milliseconds; cannot be longer than the value defined on the pod.</param>
/// <param name="privateKey">The private RSA key to be used to sign the authentication request; will be checked on the pod against the public key stored for the user.</param>
public static string CreateSignedJwt(string user, double expiration, SecurityKey privateKey)
{
var handler = new JwtSecurityTokenHandler
{
SetDefaultTimesOnTokenCreation = false
};
var tokenDescriptor = new SecurityTokenDescriptor
{
Expires = DateTime.Now.AddMilliseconds(expiration),
Subject = new ClaimsIdentity(new[] {
new Claim("sub", user)
}),
SigningCredentials = new SigningCredentials(privateKey, SecurityAlgorithms.RsaSha512, SecurityAlgorithms.Sha512Digest)
};
SecurityToken token = handler.CreateToken(tokenDescriptor);
return handler.WriteToken(token);
}
/// <summary>
/// Create a RSA Private Key from a PEM String. It supports PKCS#1 and PKCS#8 string formats.
/// </summary>
public static SecurityKey ParseRSAPrivateKey(String privateKeyFilePath)
{
if (!File.Exists(privateKeyFilePath))
{
throw new FileNotFoundException($"File {privateKeyFilePath} was not found");
}
var cryptoServiceProvider = new RSACryptoServiceProvider();
using (var privateKeyTextReader = new StringReader(File.ReadAllText(privateKeyFilePath)))
{
object rsaKey = null;
try
{
rsaKey = new PemReader(privateKeyTextReader).ReadObject();
}
catch (Exception)
{
throw new SecurityException("Invalid private key.");
}
RsaPrivateCrtKeyParameters privateKeyParams = null;
// PKCS#8 format.
if (rsaKey is RsaPrivateCrtKeyParameters)
{
privateKeyParams = (RsaPrivateCrtKeyParameters)rsaKey;
}
// PKCS#1 format
else if (rsaKey is AsymmetricCipherKeyPair)
{
AsymmetricCipherKeyPair readKeyPair = rsaKey as AsymmetricCipherKeyPair;
privateKeyParams = ((RsaPrivateCrtKeyParameters)readKeyPair.Private);
}
else
{
throw new SecurityException("Invalid private key.");
}
var parms = new RSAParameters
{
Modulus = privateKeyParams.Modulus.ToByteArrayUnsigned(),
P = privateKeyParams.P.ToByteArrayUnsigned(),
Q = privateKeyParams.Q.ToByteArrayUnsigned(),
DP = privateKeyParams.DP.ToByteArrayUnsigned(),
DQ = privateKeyParams.DQ.ToByteArrayUnsigned(),
InverseQ = privateKeyParams.QInv.ToByteArrayUnsigned(),
D = privateKeyParams.Exponent.ToByteArrayUnsigned(),
Exponent = privateKeyParams.PublicExponent.ToByteArrayUnsigned()
};
cryptoServiceProvider.ImportParameters(parms);
}
return new RsaSecurityKey(cryptoServiceProvider.ExportParameters(true));
}
public static string CreateJwt(string username, string privateKeyFilePath)
{
double expiration = 300000; // 5 minutes = 5*60*1000
SecurityKey privateKey = ParseRSAPrivateKey(privateKeyFilePath);
return CreateSignedJwt(username, expiration, privateKey);
}
static void Main(string[] args)
{
string username = ConfigurationManager.AppSettings.Get("user");
string privateKeyFile = ConfigurationManager.AppSettings.Get("key");
string jwt = CreateJwt(username, privateKeyFile);
Console.WriteLine(jwt);
Console.WriteLine("Press enter to exit...");
Console.ReadLine();
}
}
}
The token you receive is valid for the lifetime of a session that is defined by your pod's administration team. This ranges from 1 hour to 2 weeks.
You should keep using the same token until you receive a HTTP 401, at which you should re-authenticate and get a new token for a new session.
Datafeeds survive session expiration, you do not need to re-create your datafeed if your session expires.
Supported Ciphers for the SSL/TLS session
Symphony only supports the following cipher suites:
ECDHE-RSA-AES256-GCM-SHA384 (Preferred)
ECDHE-RSA-AES128-GCM-SHA256
DHE-RSA-AES256-GCM-SHA384
DHE-RSA-AES128-GCM-SHA256
1. Create an RSA Key Pair
Note: This script requires the openssl package.
2. Import Public Key into the Pod
Please note the below steps can only be performed by a Symphony Messaging Pod Administrator as they will have the necessary administrator privileges to access the Administration Portal.
3. Generate a signed JWT Token
4. Authenticate
Replace/Revoke Key
Extending a Public Key
Restricted Key Operations:
You CANNOT perform the following actions:
EXTEND on the current active key
EXTEND over an expired key
EXTEND over the previous key when no previous key is set for the user
EXTEND when no expiration date is set for the user's previous key
REVOKE over the previous key when no previous key is set for the user
REVOKE over a current key when no current key is set for the user
SAVE when the user already has a valid current and previous key set
SAVE over an old key
Note: When performing a SAVE, the key must be different from your current key.
id: A randomly generated ID for the event, distinct from the ID of the message or chatroom or other objects that the event pertains to. These IDs are unique, except in the situation where two activities are performed simultaneously in the Symphony Messaging client (for example, members are added during the creation of a room). In this case, the two associated events will share the same id. This is for Symphony Messaging internal use.
timestamp: The timestamp for when the event occurred in Unix timestamp milliseconds format. For certain events, this will be equivalent to the created timestamp of the object the event pertains to (for instance, room creation timestamp).
Generated when a message is sent in an 1-1 chat or chatroom of which the user in context is a member, including messages sent by the user him/herself.
Events attributes details:
version: version of the message payload, set when the message was created
message: the message itself
attachments
Generated when messages are suppressed:
Generated when a user replies to a bot message that contains an interactive form with UX components such as text fields, radio buttons, checkboxes, person selectors and more. Please refer to for more information.
Generated when either:
The user in context shares a wall post written by another user.
Another user shares a wall post written by the user in context.
Generated when an IM (1-1 chat) is created with the user in context as a member, initiated either by the user in context or another user:
Generated when a room is created by the user in context:
Generated when a room of which the user in context is a member is updated, including rooms updated by the user him/herself:
Generated when a room of which the user in context is a member is deactivated, including rooms deactivated by the user him/herself:
Generated when a room of which the user in context is a member is reactivated, including rooms reactivated by the user him/herself:
Generated when a user requests to join a room. Only the user who requested to join the room and the owners of that room will receive this event on their datafeeds.
The affectedUsers attribute represents the owners of the room.
Available in Agent 2.56.0.
Generated when a new user joins or is added to a room of which the user in context is a member, including when the user himself joins or is added to a room.:
Generated when a user leaves or is removed from a room of which the user in context is a member, including when the user himself leaves or is removed from a room:
Generated when a user is promoted from a participant to an owner of a room of which the user in context is a member, including when the user himself is promoted to an owner or promotes another user.:
Generated when a user is demoted from an owner to a participant of a room of which the user in context is a member, including when the user himself is demoted to a participant or demotes another user:
Generated when a connection request is sent, either:
Sent by the user in context to another user.
Sent to the user in context by another user.
Generated when a connection request is accepted, either:
Sent by the user in context and accepted by another user.
Sent by another user and accepted by the user in context.
Generic System Event is a new category of generic real time event, that is generated in various situations, such as phone calls, events specific to federated chats, and more.
The event is generic, and its structure depends on the event's subtype (genericSystemEvent.eventSubtype).
Most generic events are related to internal processes and are not useful for Bots, so you can just ignore them. When Symphony introduces events that can be relevant to Bots, they will be documented in this page.
The common structure to all Generic System Events is described below. The parameters section will vary depending on the subtype of the event.
type: The type of event that occurred (for instance, a "MessageSent" or "RoomCreated" event).
initiator: The actor that initiated the event. Currently, initiator will always be a user. The initiator user may be distinct from the affected user (for instance, when one user adds another user to a chatroom).
payload: An object containing event-specific information that is keyed off the event type.
: list of attachments to the message, not present if there are no attachments
user: author of the message
externalRecipients: indicates whether that message is sent to external users.
false: the message was only sent to users internal to the company.
true: the message was sent to at least one user outside of the company.
stream: stream the message was posted into.
streamId: identifier for the stream.
streamType: stream type can be ROOM, IM (1-1 chat), MIM (deprecated), or POST.
data: JSON structure contained inside an escaped string, NOT an actual JSON structure.
Message Sent
Note:
The event initiator and the message user are the same
Hashtags and cashtags in EntityJSON have no '#' or '$'
An external chatroom can contain messages with externalRecipients set to false in cases where external users have not been added to the chatroom yet.
Messages Suppressed
Symphony Messaging Elements Action
Note that since Symphony v20.3.1, the event payload returned by the Datafeed has changed. The attribute actionStream has been removed and the formStream attribute has been renamed to stream.
Shared Wall Posts
IM Created
Room Created
Room Updated Message
Room Deactivated Message
The ROOMDEACTIVATED event does not include the roomName or external fields.
Room Reactivated Message
User Requested to Join Room
User Joined Room
User Left Room
Room Member Promoted to Owner
Room Member Demoted from Owner
Connection Requested
Connection Accepted
Generic System Event
Always rely on the eventSubtype to filter the events that are relevant to you, as new subtypes with a different structure may be introduced in the future.
{
"id": "",
"timestamp": 0,
"type": "SHAREDPOST",
"initiator": {
"user": {
"userId": 0,
"firstName": "",
"lastName": "",
"displayName": "",
"email": "",
"username": ""
}
},
"payload": {
"sharedPost": {
"message": {
"messageId": "",
"timestamp": 0,
"message": "<div data-format='PresentationML' data-version='2.0'>Sent when sharing the original post</div>",
"data" : "{ }",
"attachments": [],
// This is the user who is sharing the wall post.
"user": {
"userId": 0,
"firstName": "",
"lastName": "",
"displayName": "",
"email": "",
"username": ""
},
"externalRecipients": false,
"stream": {
// This is the ID of the sharing user's wall.
"streamId": "",
// For a shared wall post, the destination stream type will always be POST.
"streamType": "POST"
}
},
// This is the original wall post that is being shared.
"sharedMessage": {
"messageId": "",
"timestamp": 0,
"message": "<div data-format='PresentationML' data-version='2.0'>Original Post</div>",,
"data" : "{}",
"attachments": [],
// This is the author of the original wall post.
"user": {
"userId": 0,
"firstName": "",
"lastName": "",
"displayName": "",
"email": "",
"username": ""
},
"externalRecipients": false,
"stream": {
// This is the ID of the original poster's wall.
"streamId": "",
// For a shared wall post, the originating stream type will always be POST.
"streamType": "POST"
}
}
}
}
}
[
{
"id": "LSWslw",
"messageId": "lwu0jF0reb7Sbw",
"timestamp": 1574439227693,
"type": "USERREQUESTEDTOJOINROOM",
// This is the user who initiated the action, in this case, the user who has requested to join the room.
"initiator": {
"user": {
"userId": 68719476737,
"firstName": "John",
"lastName": "Doe",
"displayName": "John Doe",
"email": "john_doe@symphony.com",
"username": "john_doe@symphony.com"
}
},
"payload": {
"userRequestedToJoinRoom": {
"stream": {
"streamId": "cVHHJfFJbjyQ4bmHsHJBcdA",
"members": []
},
//These are the users who own the room.
"affectedUsers": [
{
"userId": 68719476759,
"displayName": "owner1",
"email": "owner1@email.com",
"username": "owner1"
},
{
"userId": 68719476760,
"firstName": "owner2",
"lastName": "owner2",
"displayName": "owner2 owner2",
"email": "owner2@mail.com",
"username": "owner2"
}
]
}
}
}
]
{
"id": "",
"timestamp": 0,
"type": "USERJOINEDROOM",
// This is the user who initiated the action (i.e. added the user to the room). If the initiator and and affected user are the same, the user joined the room of his own accord.
"initiator": {
"user": {
"userId": 0,
"firstName": "",
"lastName": "",
"displayName": "",
"email": "",
"username": ""
}
},
"payload": {
"userJoinedRoom": {
"stream": {
"streamId": "",
"streamType": "ROOM",
"roomName": "",
"external": false
},
// This is the user who was affected by the action (i.e. joined the room).
"affectedUser": {
"userId": 0,
"firstName": "",
"lastName": "",
"displayName": "",
"email": "",
"username": ""
}
}
}
}
{
"id": "",
"timestamp": 0,
"type": "USERLEFTROOM",
// This is the user who initiated the action (i.e. removed the user from the room). If the initiator and and affected user are the same, the user left the room of his own accord.
"initiator": {
"user": {
"userId": 0,
"firstName": "",
"lastName": "",
"displayName": "",
"email": "",
"username": ""
}
},
"payload": {
"userLeftRoom": {
"stream": {
"streamId": "",
"streamType": "ROOM",
"roomName": "",
"external": false
},
// This is the user who was affected by the action (i.e. left the room).
"affectedUser": {
"userId": 0,
"firstName": "",
"lastName": "",
"displayName": "",
"email": "",
"username": ""
}
}
}
}
{
"id": "",
"timestamp": 0,
"type": "ROOMMEMBERPROMOTEDTOOWNER",
// This is the user who performed the promotion.
"initiator": {
"user": {
"userId": 0,
"firstName": "",
"lastName": "",
"displayName": "",
"email": "",
"username": ""
}
},
"payload": {
"roomMemberPromotedToOwner": {
"stream": {
"streamId": "",
"streamType": "ROOM",
"roomName": "",
"external": false
},
// This is the user who was promoted.
"affectedUser": {
"userId": 0,
"firstName": "",
"lastName": "",
"displayName": "",
"email": "",
"username": ""
}
}
}
}
{
"id": "",
"timestamp": 0,
"type": "ROOMMEMBERDEMOTEDFROMOWNER",
// This is the user who performed the demotion.
"initiator": {
"user": {
"userId": 0,
"firstName": "",
"lastName": "",
"displayName": "",
"email": "",
"username": ""
}
},
"payload": {
"roomMemberDemotedFromOwner": {
"stream": {
"streamId": "",
"streamType": "ROOM",
"roomName": "",
"external": false
},
// This is the user who was demoted.
"affectedUser": {
"userId": 0,
"firstName": "",
"lastName": "",
"displayName": "",
"email": "",
"username": ""
}
}
}
}
{
"id": "",
"timestamp": 0,
"type": "CONNECTIONREQUESTED",
// This is the user who sent the request.
"initiator": {
"user": {
"userId": 0,
"firstName": "",
"lastName": "",
"displayName": "",
"email": "",
"username": ""
}
},
"payload": {
"connectionRequested": {
// This is the user to whom the request was sent.
"toUser": {
"userId": 0,
"firstName": "",
"lastName": "",
"displayName": ""
}
}
}
}
{
"id": "",
"timestamp": 0,
"type": "CONNECTIONACCEPTED",
// This is the user who accepted the request.
"initiator": {
"user": {
"userId": 0,
"firstName": "",
"lastName": "",
"displayName": "",
"email": "",
"username": ""
}
},
"payload": {
"connectionAccepted": {
// This is the user who sent the request.
"fromUser": {
"userId": 0,
"firstName": "",
"lastName": "",
"displayName": "",
"email": ""
}
}
}
}


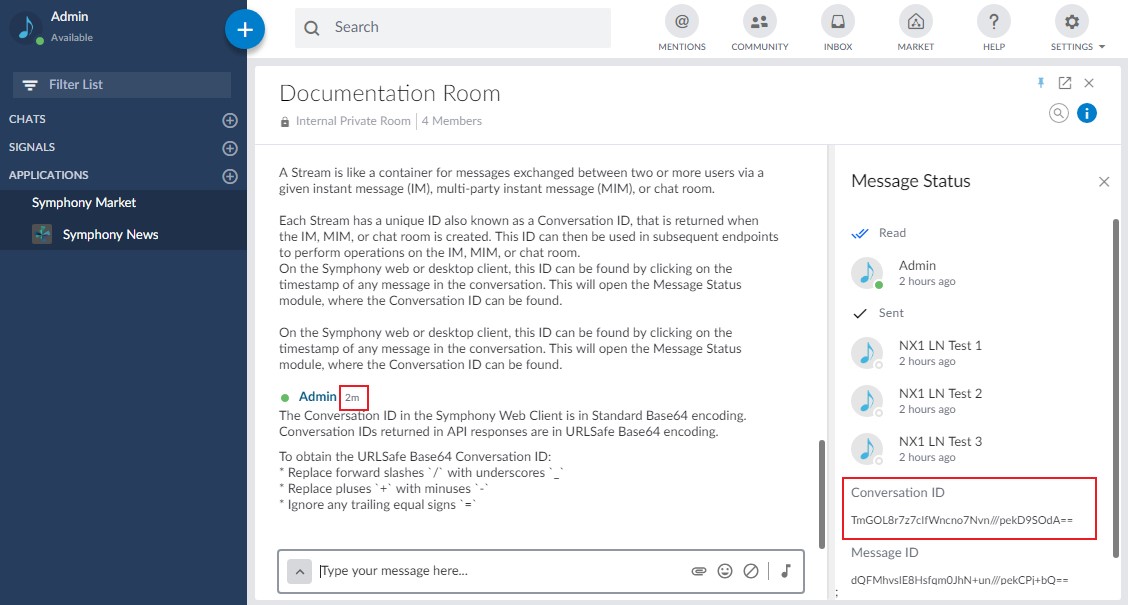


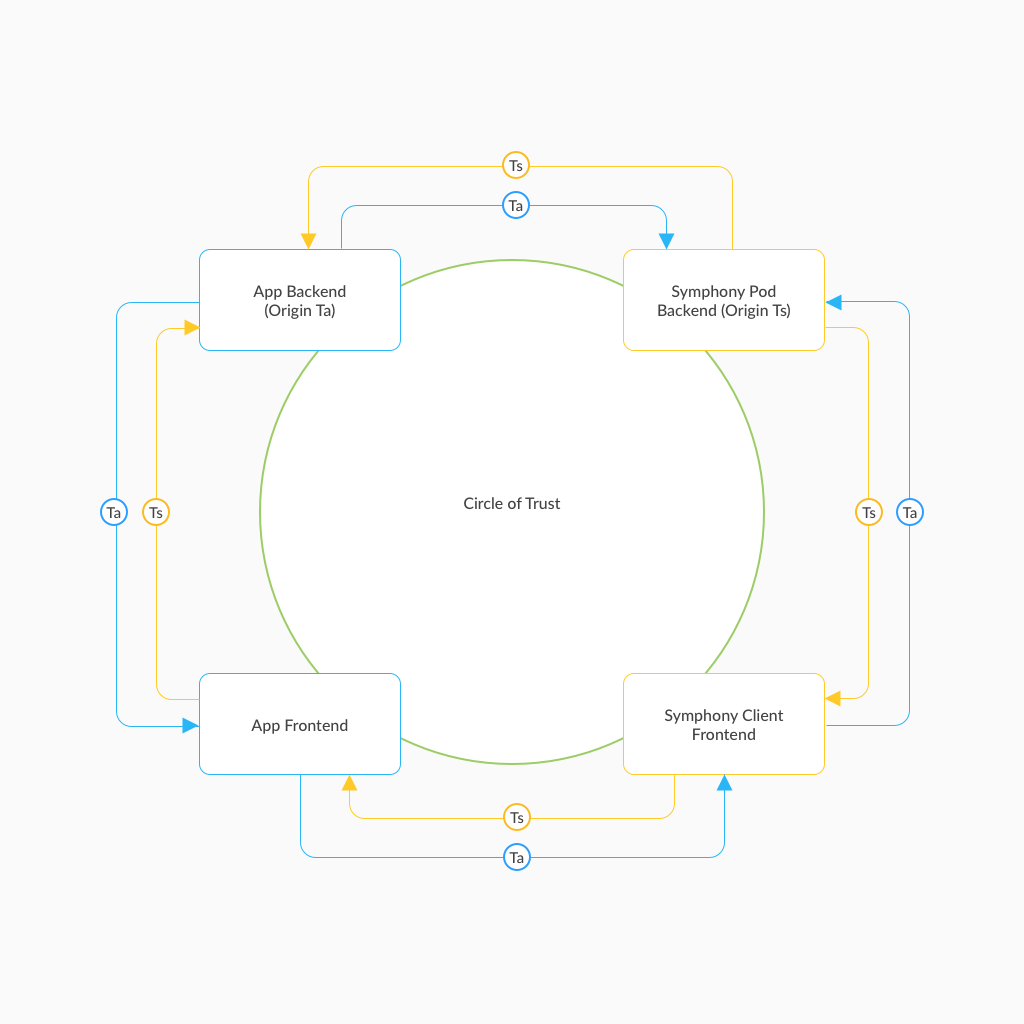


